Overnight Waffles (The Perfect Waffle)

Waffle

Life is getting so busy in the mornings. We’re starting to have kids leave at different times and to different places. It’s sad. I’m missing our morning ritual of eating a warm breakfast together. When I can, I still squeeze it in, and this week I loved making these waffles. They worked because I didn’t have much to prep in the morning, and I was craving that moment of starting the day together. Plus, these waffles are really, really delicious. Soft in the middle and crisp on the outside. A new morning delight. I adapted this recipe from Marion Cunningham’s recipe featured in Saveur.

1 (¼-oz.) package active dry yeast or 1/2 c. sourdough starter
2 c. buttermilk
½ c.unsalted butter, melted, plus more for serving
1 t. kosher salt
2 T. sugar
2 c. flour
2 eggs
¼ tsp. baking soda
Maple syrup, for serving

INSTRUCTIONS

1. Dissolve yeast in ½ cup warm water; set aside until foamy, 8 to 10 minutes. Add milk, butter, salt, sugar, and flour; whisk until combined. Cover with plastic wrap; let rest on the counter overnight.

2. Heat a nonstick waffle iron. Whisk baking soda and eggs into batter. Pour ¼ cup batter onto iron; let set for 30 seconds. Lower lid; cook until golden and crisp, 4 to 5 minutes. Repeat with remaining batter. Serve with maple syrup and butter.

Ham, Pickles, Mayo, and Cheese on a Homemade Wheat Bun

Homemade Hot Dog Bun
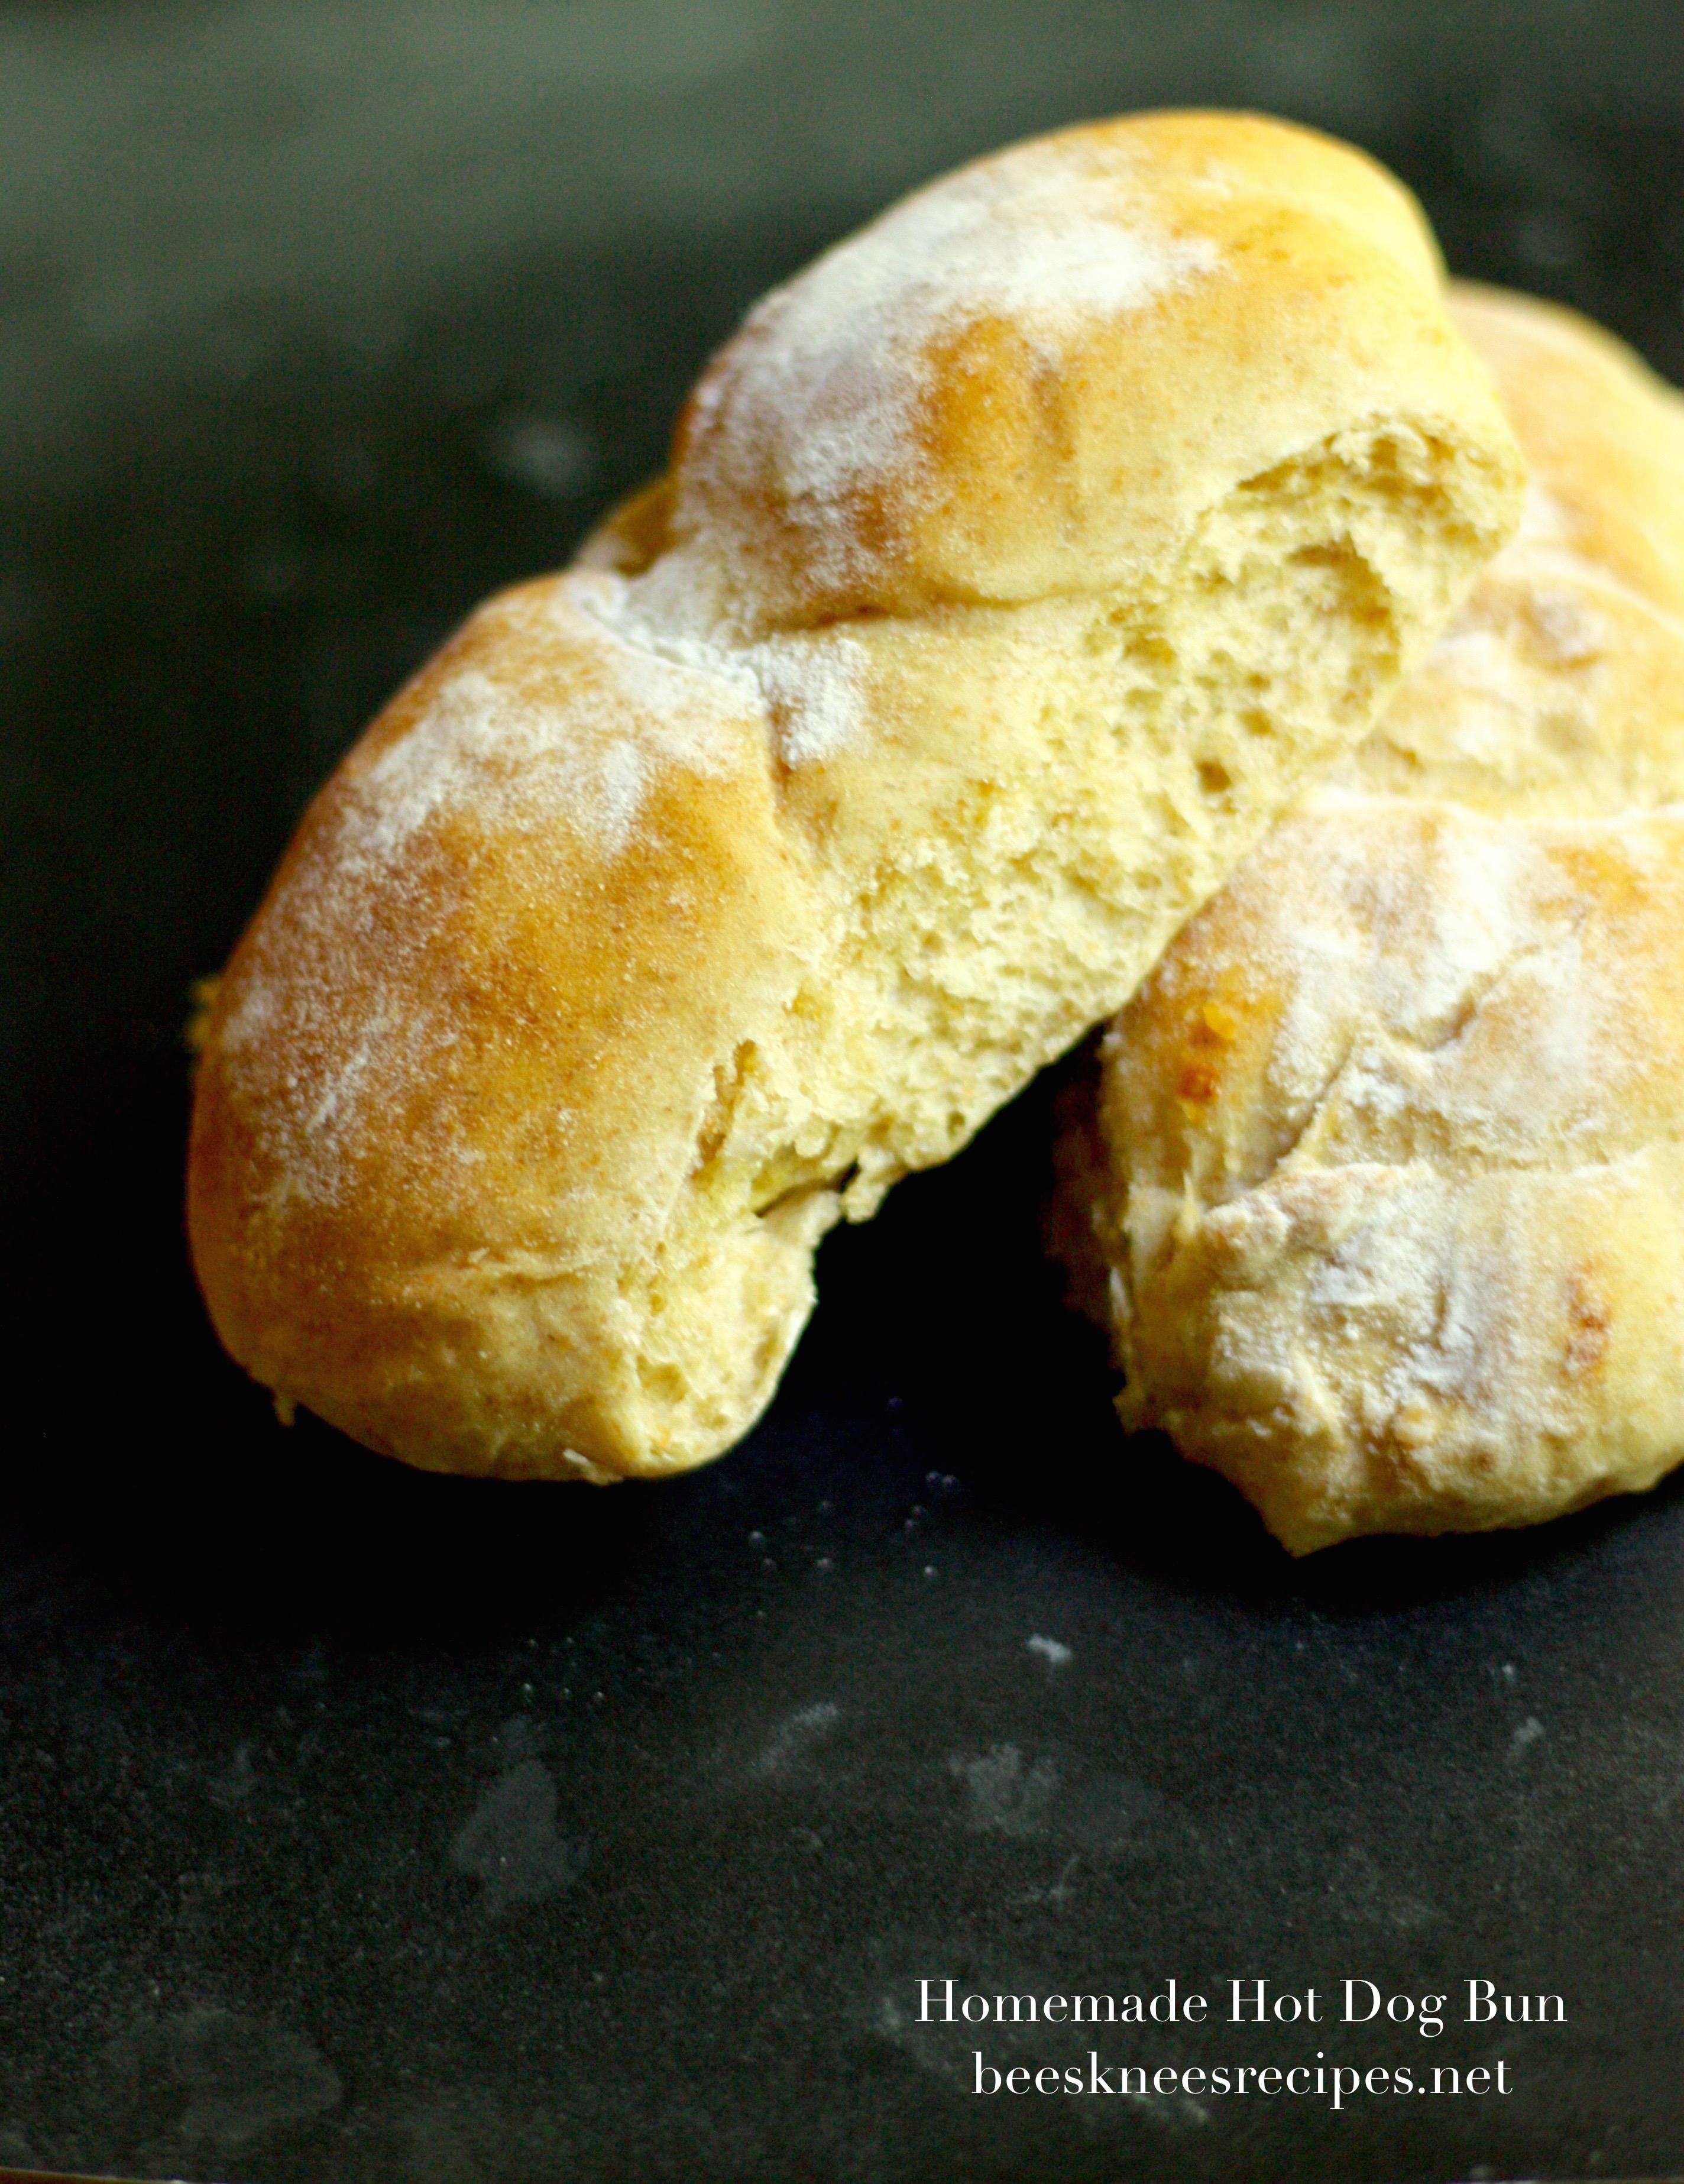
I just cringe when I have to buy store bought hoagies or hot dog buns. I frequently don’t have time in the summer to bake bread, but I regret it when I’m standing in front of all the unsavory options that most markets have for these purposes. So, this year I’ve been a little more proactive in creating a better alternative.

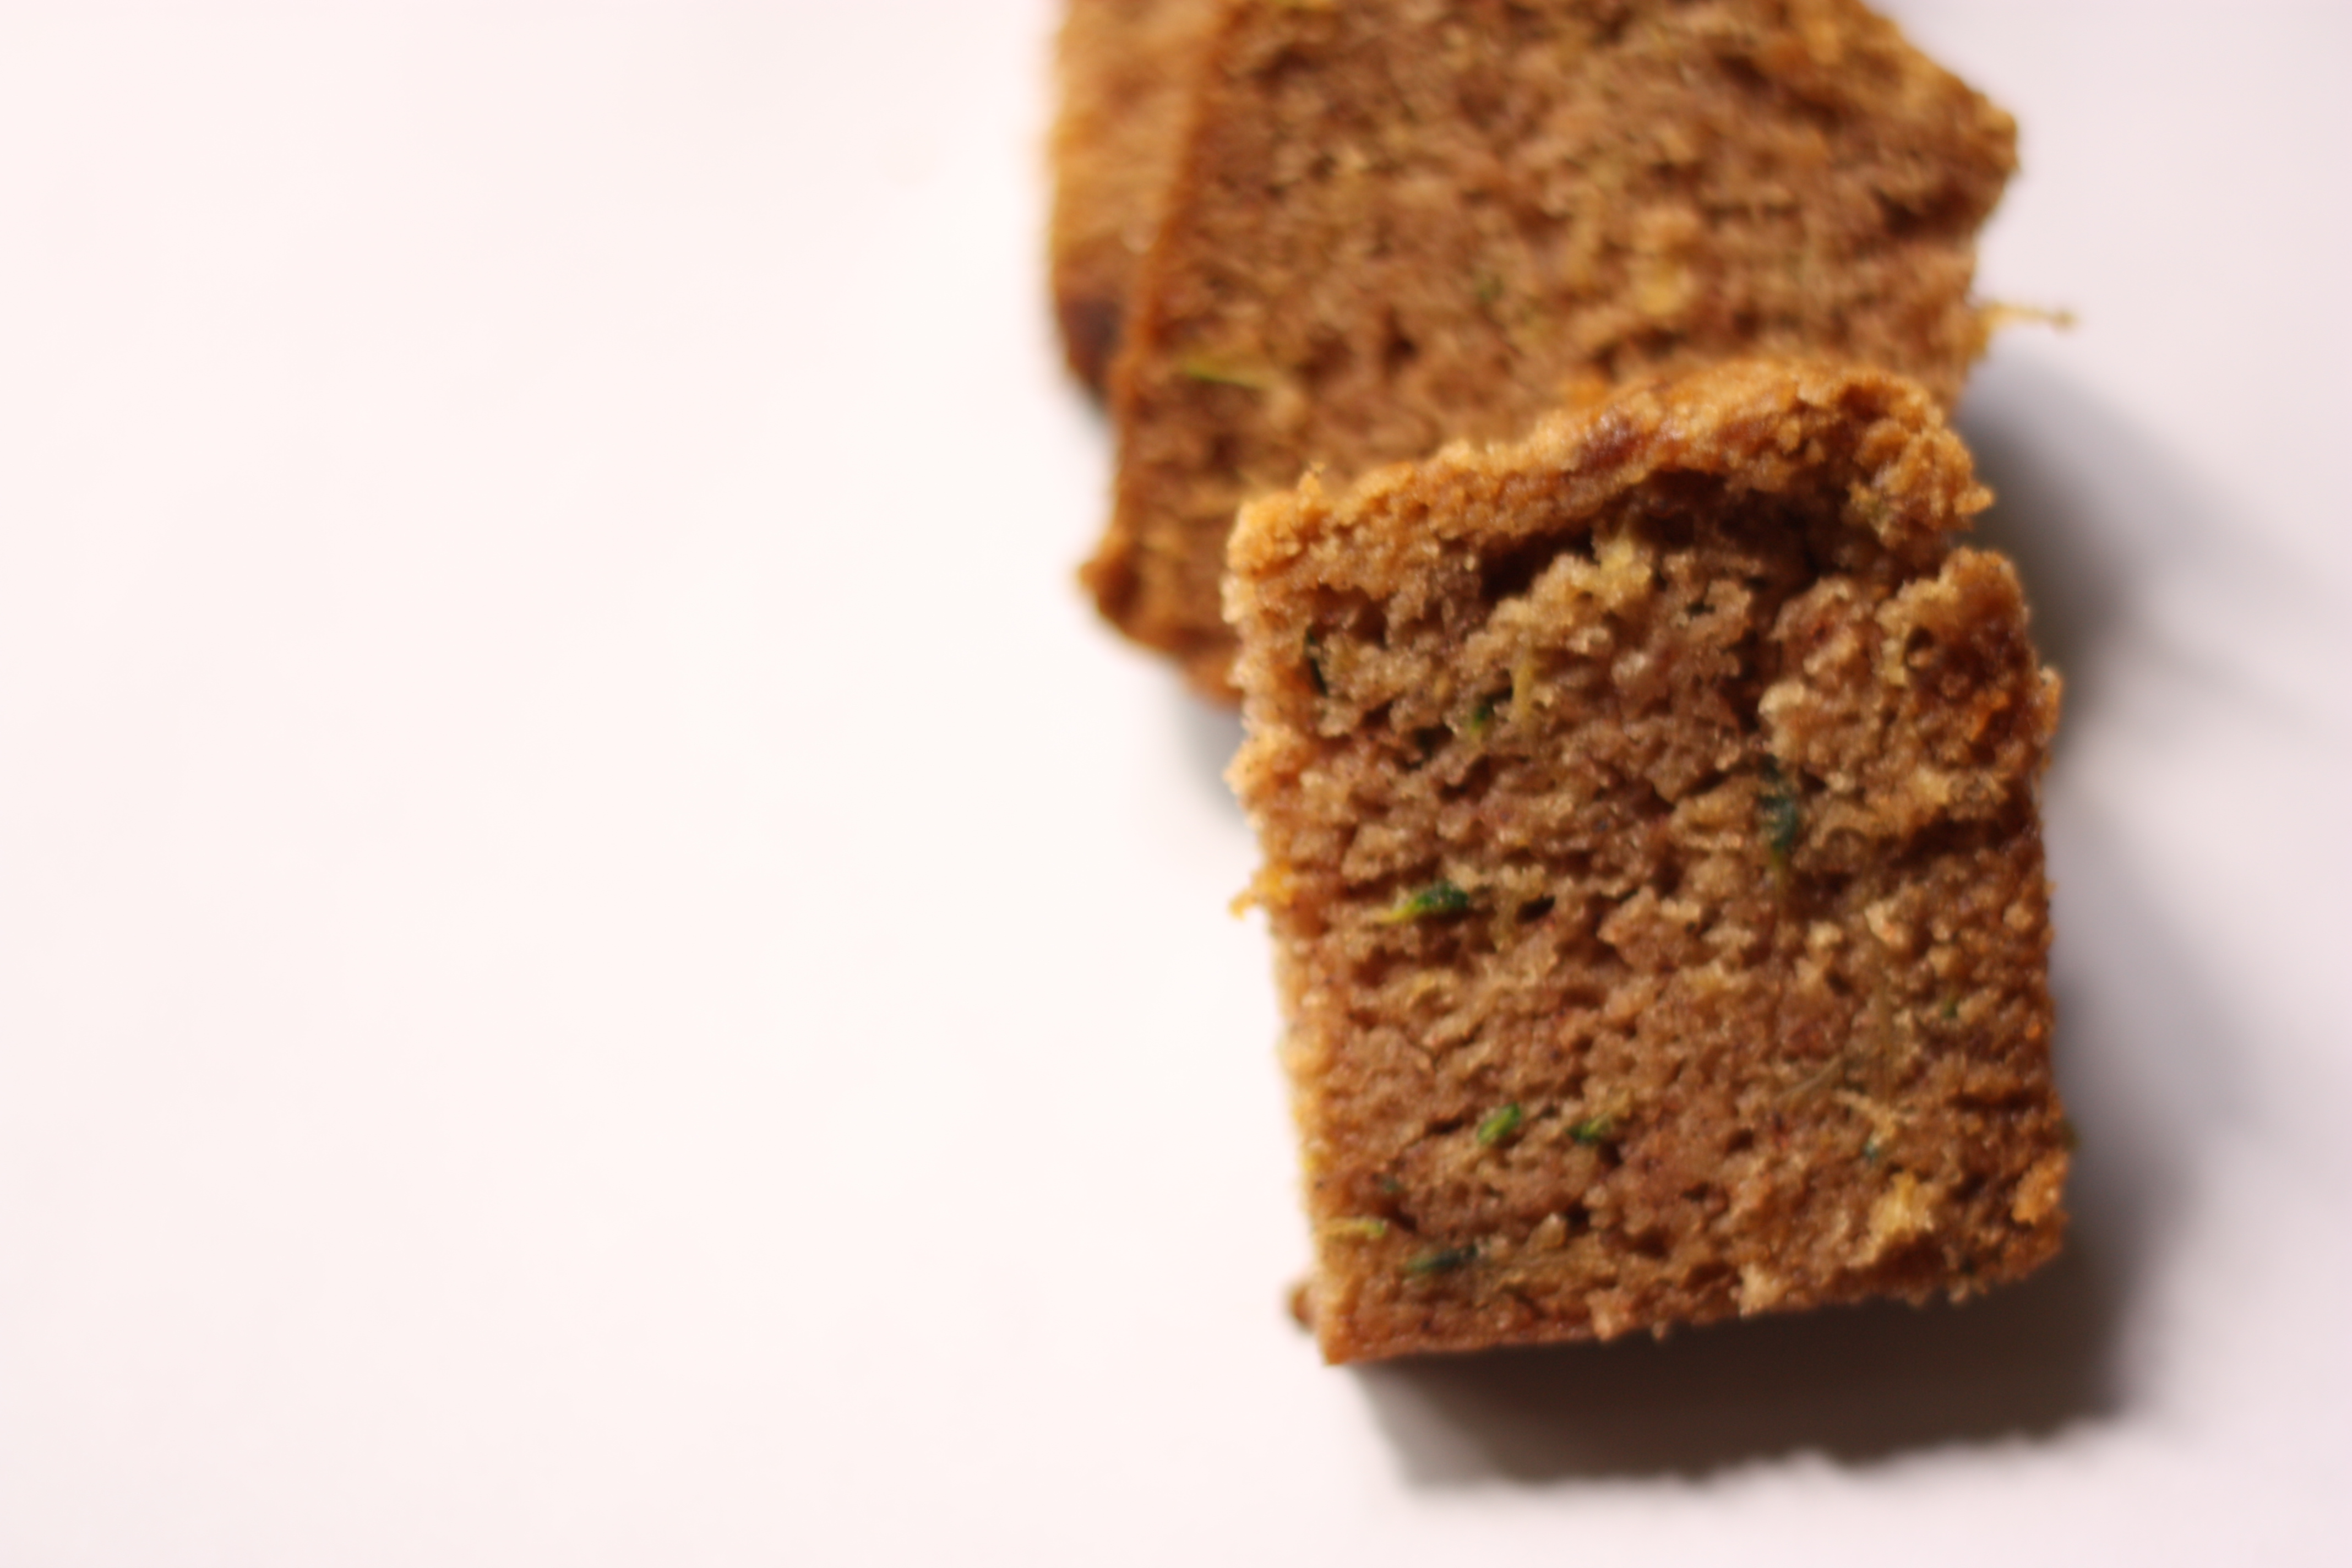
I’ve used this recipe several times for whole wheat bread, and I like the result, but sometimes I decide it’s a little too dry (maybe I overbake it a bit), and I experiment with other whole wheat bread options. (Though I have to say that this recipe makes perfect looking bread every time. It’s definitely not shabby when it comes to a whole wheat bread option.) But as a BUN, well, this recipe is perfect. I’ve made it up for hot dogs and hoagies and picnics and sack lunches. Works every time. It’s perfectly moist and stays fresh for two or three days. This recipe comes from Beth Hensperger’s Beth’s Basic Bread Book (probably my favorite basic bread-making book) and is titled “Perfect Whole Wheat Bread.” Note that it is not 100% whole wheat, but that is very typical of whole wheat bread.

My favorite meal ideas for this bread: ham, cheddar, mayo and pickles for the kids, Nathan’s hot dogs with the mustard and best pickles I can find, cherry jam with a slice of brie, and lettuce, or even just a pb&j.

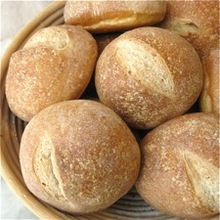
Whole Wheat Hoagie Rolls or Hot Dog Buns

1 c. warm water (105 F to 115 F)
2 T. (2 packages) active dry yeast
Pinch of brown sugar
1 c. warm milk
1/3 c. light brown sugar
3 T. unsalted butter, melted
1 T. salt
1 egg
2 1/2 c. whole wheat flour, fine or medium grind
3 1/2 to 4 c. unbleached flour or high-gluten bread flour

In a small bowl, pour 1/2 c. of the warm water. Sprinkle the yeast and pinch of brown sugar over the surface of the water. Stir to dissolve and let stand at room temperature until foamy, about 10 minutes. [I always skip this step, but do it if you’re worried that your yeast isn’t good, just to make sure.]

In a large bowl using a whisk or in the bowl of a heavy-duty electric mixer fitted with the paddle attachment, combine the remaining water, milk, 1/3 c. brown sugar, melted butter, salt, egg and the whole wheat flour. Beat hard until creamy, about 1 minute. Stir in the yeast mixture. [So, I just dump all these ingredients in and start mixing because I know my yeast works and I am used to the feel of the warm water–making sure that it isn’t hot enough to kill the yeast.] Add the unbleached flour, 1/2 c. at a time, until a soft, shaggy dough forms. Switch to a wooden spoon when necessary if making by hand.

Turn the dough onto a lightly floured surface and knead until soft and springy, 1 to 3 minutes for a machine-mixed dough and 4 to 7 minutes for a hand-mixed dough, dusting with flour only 1 T. at a time, just enough as needed to prevent sticking. The dough will be smooth and very springy with a slightly rough surface and sticky quality, but not dry. Do not add too much flour or the baked loaf will be dry and crumbly.

Place the dough in a lightly greased deep container. Turn the dough once to coat the top and cover with plastic wrap. Let rise at room temperature until double in bulk, about 1 to 1 1/2 hours. [This usually only takes 45-60 minutes for me.] Do not allow to rise higher than double, or it may collapse and bake into a flat loaf.

Prepare a baking sheet by lining it with a piece of parchment paper. Deflate dough. Divide dough in half, and shape into two long rectangles. Then, cut each log into eight pieces. Flatten each piece of dough, then roll, starting on the short side, into an oval bun, pinching the seam closed and placing the seam-side down on the prepared sheet. Place buns 1″ apart if you want them to touch as they bake, 2″ apart if you don’t. [You can also make this recipe into loaves by preparing two loaf pans and shaping the dough accordingly.] Cover loosely with plastic wrap and let rise at room temperature until almost double in bulk, about 30 minutes. These loaves need only a three-quarter proof for the best baked volume.

Twenty minutes before baking, preheat the oven to 375 F. Place pans on center rack and bake about 18-20 minutes for buns or 35 to 40 minutes for loaves, or until golden brown. Remove immediately from pans to a cooling rack. These freeze well, if you have leftovers!

100% Whole Wheat Sandwich Bread

KAF Whole Wheat

So, usually bread isn’t 100% whole wheat flour, because adding white flour improves the texture and flavor of the loaf so much, and makes it much more like  the store-bought bread we are used to eating. When a bread recipe does make something with 100% whole wheat, it usually adds many unusual ingredients to make it not as dry and to improve the flavor (I’ve seen applesauce, eggs, potato flakes, orange juice, etc). I was surprised to see this recipe voted “Best recipe of 2014” by King Arthur Flour for that very reason. Could 100% whole wheat bread that didn’t have a ton of extra steps and extra strange ingredients be the best recipe of year? Well, it surprisingly is a really great recipe. Not the most mouth-watering thing you can bake, but a really useful recipe, especially when I swing towards the, “my kids are junk-food addicts! NO white sugar or flour for at least, you know, today!” side of the pendulum. On the down side,  though, after two days, this loaf was quite dry (still suitable for toast and bread crumbs and croutons), but, as always, bread freezes fabulously, so just pop it in the freezer if you find it partially uneaten within two days.

King Arthur Flour’s 100% Whole Wheat Bread

  • 1 to 1 1/8 c. lukewarm water*
  • 1/4 c. vegetable oil
  • 1/4 c. honey, molasses, or maple syrup [I prefer honey]
  • 3 1/2 c. Whole Wheat Flour
  • 2 1/2 t. yeast or 1 packet active dry yeast dissolved in 2 tablespoons of the water in the recipe
  • 1/4 c. nonfat dried milk
  • 1 1/4 t. salt
  • *Use the greater amount in winter or in a dry climate; the lesser amount in summer or a humid climate.

In a large bowl, combine all of the ingredients and stir until the dough starts to leave the sides of the bowl. For easiest, most effective kneading, let the dough rest for 20 to 30 minutes in the bowl; this gives the flour a chance to absorb some of the liquid, and the bran to soften. Transfer the dough to a lightly greased surface, oil your hands, and knead it for 6 to 8 minutes, or until it begins to become smooth and supple. (You may also knead this dough in an electric mixer or food processor, or in a bread machine programmed for “dough” or “manual.”) Note: This dough should be soft, yet still firm enough to knead. Adjust its consistency with additional water or flour, if necessary.

2) Transfer the dough to a lightly greased bowl or large measuring cup, cover it, and allow the dough to rise till puffy though not necessarily doubled in bulk, about 1 to 2 hours, depending on the warmth of your kitchen.

3) Transfer the dough to a lightly oiled work surface, and shape it into an 8″ log. Place the log in a lightly greased 8 1/2″ x 4 1/2″ loaf pan, cover the pan loosely with lightly greased plastic wrap, and allow the bread to rise for about 1 to 2 hours, or till the center has crowned about 1″ above the rim of the pan. Towards the end of the rising time, preheat the oven to 350°F.

4) Bake the bread for 35 to 40 minutes, tenting it lightly with aluminum foil after 20 minutes to prevent over-browning. The finished loaf will register 190°F on an instant-read thermometer inserted into the center.

5) Remove the bread from the oven, and turn it out of the pan onto a rack to cool. If desired, rub the crust with a stick of butter; this will yield a soft, flavorful crust. Cool completely before slicing. Store the bread in a plastic bag at room temperature.

Yield: 1 loaf.

Baked’s Pumpkin Bread

Pumpkin Bread Baked

I know there are a million recipes for pumpkin bread, but I will add this one to the internet on account of a request. This recipe comes from the cookbook Baked: New Frontiers in Baking, and there are many winners in this book, especially when it comes to cakes, but this is a great recipe, too. Sorry to my cousin that it has taken me so long to post it! I’m just getting back to life, post holidays, vacation, sick kids, etc. I love the Joy of Cooking’s recipe for pumpkin bread as well; any pumpkin bread is great to have around for the weekend.

Pumpkin Chocolate Chip Loaf

3 1/4 c. all-purpose flour (you can substitute 1 c. whole wheat, if desired)
2 t. ground cinnamon
1/2 t. ground nutmeg
1/2 t. ground allspice
1/2 t. ground ginger
2 t. baking soda
2 t. salt
1 3/4 cups pumpkin puree (a 15-ounce can)
1 c. vegetable oil
3 c. sugar
4 large eggs
1 t. pure vanilla extract
1 1/2 c. (12 ounces) semi- or bittersweet chocolate chips

Preheat the oven to 350 degrees. Grease and flour (or line with parchment paper) 2 9×5×3-inch loaf pans.

In a large bowl, whisk together the flour, spices, baking soda and salt.

In another large bowl, whisk together the pumpkin puree and oil until combined. Add sugar and whisk again.
Whisk in the eggs one at a time, then add the vanilla. Fold the dry ingredients into the wet ingredients, until just mixed, then add the chocolate chips and briefly stir again. Spread the batter into the prepared pans, and gently knock the bottom of the pan onto the countertop to even out the batter. Use a spatula to smooth the top.

Bake in the center of the oven until a toothpick comes out clean, about 75 to 90 minutes, rotating pans halfway through. Cool on a wire rack for 15 minutes before inverting the loaf onto the rack to cool completely before serving. The loaf will keep for 3 days or more wrapped in plastic wrap or in an airtight container at room temperature.

Makes 2 9×5×3-inch loaves

Pumpkin Ginger Braid Bread

Ginger Pumpkin Bread
This bread isn’t nearly as sweet as I thought it was going to be, which actually made me like it better than I thought I would. I was expecting a yeasted version of the traditional pumpkin quick bread, but this loaf was quite different. The texture is light, and the bits of ginger are a surprise–I thought they might cause my kids to not eat it, but they didn’t seem to mind (or maybe didn’t notice?). I really liked this bread, and see it taking a nice role in my fall inventory of great bread for toast, french toast, and afternoon snacks. It might also make an interesting Thanksgiving Day roll! I got the recipe from a King Arthur Flour Magazine (you can also find it on their website). 

Pumpkin Ginger Braid Bread

4 1/2 c. King Arthur Unbleached Special Bread Flour
1 t. cinnamon
1 t. ground ginger
1/4 t. ground cloves (optional)
1/3 c. sugar
1/3 c. diced candied ginger
1 1/2 t. salt
1 t. instant yeast
1 3/4 c. pumpkin
2 eggs
1/4 c. (1/2 stick) butter, melted
1/2 c. raisins (optional)

In a large mixing bowl, combine the flour, spices, sugar, ginger, salt and yeast, mixing till everything is well-distributed. In a separate bowl, stir together the pumpkin, eggs and melted butter till well-combined. Add the wet ingredients to the dry ingredients, stirring until the dough begins to come away from the sides of the bowl. Knead the dough with an electric mixer for 2 minutes; allow it to rest for 15 minutes, then continue kneading it for an additional 5 to 7 minutes, or until it’s smooth. Add the raisins, and continue kneading just until they’re incorporated.

If you’re kneading by hand, transfer the dough to a lightly oiled work surface; knead it for 3 minutes, allow it to rest for 15 minutes, then continue kneading till smooth, an additional 8 to 10 minutes. Add more flour sparingly, and only if the dough is absolutely impossible to work with by hand. Knead in the raisins right at the end.

Transfer the dough to a lightly oiled bowl, cover the bowl with plastic wrap, and set it aside to rise for 1 to 1 1/2 hours; it should be just about doubled in bulk.

Turn the dough out onto a lightly greased surface, divide it in half then divide each half into three pieces. Roll each piece into a 10-inch log.

Working with three logs at a time, place them on a lightly greased or parchment-lined baking sheet. Braid them together; be sure to pinch the ends together well, and tuck them under. Repeat with the remaining logs. Set the braids aside, covered with lightly greased plastic wrap or an acrylic dough-rising cover, to rise for 1 hour; they should look puffy, though not necessarily doubled in bulk.

Bake the bread in a preheated 375°F oven for 25 to 30 minutes, until lightly browned and a cake tester inserted in the center comes out clean. Remove the braids from oven, and allow them to cool on a wire rack. Serve them warm or at room temperature. If any is left over after a few days, use bread to make bread pudding (recipe follows).Yield: two 10-inch braids.

The Thanksgiving Roll Round-up

I usually make 2-3 kinds of rolls for Thanksgiving dinner: a crusty roll, a dried fruit, slightly sweet roll, and a soft buttery dinner roll. If you need any ideas for your own baking, here are some really great rolls.

Chewy Italian NEW 2
Chewy Italian Rolls
A non-fat, start-the-night before, yummy bread, especially good for the end of meal plate cleaning 🙂

KAFs Photo!

KAFs Photo!

Golden Pull-Apart Buns
These rolls have a great light texture, but not nearly as much butter as many other rolls of the same character have. This roll is great!

Crescent Roll 1
Crescent Rolls
This is the best roll. Sooo delicious and the best crumb. It also rivals pies in terms of the amount of butter, but it’s definitely worth it!

I hope this picture gives an idea of the great texture this roll has

I hope this picture gives an idea of the great texture this roll has

BA Poppyseed Buttermilk Bun
I love that this roll is made with cream, not butter, so it seems faster to make up. Bakes beautifully, but, like the roll before, not really the lightest calorie option! I also left off the poppyseeds in this photo, but they are also a beautiful addition.

thumb
Crusty European Roll
Another great nonfat, crusty roll from King Arthur Flour (as is this picture), that you have to start the night before, but is a lovely addition to the sweeter, more bodied options!

My Favorite Zucchini Bread

Zucchini Bread

Maybe there’s nothing notable to mention about any zucchini bread recipe, but I don’t think that’s the case with this one. This recipe got us through a very prolific zucchini plant this season, and so I’m very grateful for it (my kids just weren’t into zucchini tempura, zucchini pancakes, slow-cooked zucchini, or any of the other many things I tried). The lemon in this recipes makes it unique, so many thanks to my friend Mark for sharing it! He adapted it from the Food Network, and I think I might have made it somewhere between 5-7 times this year. It’s that amazing, and we have that much zucchini. And the prep time is about 10 minutes. Makes it a winner in my book. 

My Favorite Zucchini Bread

3 1/4 c. all-purpose flour (I usually do 1 c. whole wheat, the rest all-purpose)
1 1/2 t. salt
1 t. ground nutmeg
2 t. baking soda
1 t. ground cinnamon
2 1/4 c. sugar (I’ve cut this down from the original 3 c.)
1 c. vegetable oil
4 eggs, beaten
1/3 c. water
2 c. grated zucchini
zest and juice from 1 lemon
1 cup chopped walnuts or pecans (or chocolate chips!)
Preheat the oven to 350 degrees F. Spray two standard bread pans with nonstick cooking spray.

In a large bowl, combine flour, salt, nutmeg, baking soda, and cinnamon. In a separate bowl, combine oil, sugar, eggs, water, lemon zest, and lemon juice. Mix wet ingredients into dry, then add the zucchini and nuts and fold just until all the ingredients come together. Divide the batter between the two standard bread pans, and bake for one hour, or until a tester comes out clean. (To make mini loaves instead, divide the batter into five mini loaf pans and bake for about 45 minutes.)

Yield: Makes 2 loaves.

Parsley Butter for Preserving Parsley

Parsley ButterI was reading through a couple of magazines and books, and this idea struck me as a great way to preserve parsley. My potted parsley plant has done great this year, but I know if I don’t start clipping and storing it, I won’t have enough to last through winter. I’ve also found that freezing herbs preserves their flavor (in this case, especially) so much better than drying them. So, this is my way of keeping a stash of fresh parsley this winter–it will be great for topping salmon, squash, baked potatoes, steaks, or just a slice of bread! 

Parsley Butter for Preserving Parsley

1/2 c. butter, softened (either on the counter or briefly, like 12 seconds, in a microwave)
1/2 c. washed and blotted parsley, stems mostly removed, and chopped

Combine the two together in a medium and cream with a wooden spoon. When completely incorporated (this might take 3-5 minutes), shape into a log. Refrigerate  for 1 hour.

Remove the log from the fridge and slice into 1″ wide circles (see photo above). Place on a baking sheet lined with waxed or parchment paper and freeze 4 hours or overnight. Remove from the sheet and store in a airtight baggie or container.

Homemade Ice Cream Cones

Homemade Cone 1
I’ve been wanting to try making my own cones with my pizzelle maker, and with the aid and excitement of a great friend, I finally gave it a go. Super fun! The cones were small, and I couldn’t quite get the bottom to close, so I had to dip them in chocolate (darnit!). But they were actually the perfect size for one scoop of ice cream, and I can’t wait to try them again, and even trying some different mix-ins, like perhaps lemon zest?  If you got lost at pizzelle maker, here’s a link to amazon‘s sampling of choices–they are great for Christmas cookies! I got this recipe from
The Perfect Scoop by David Lebovitz. 

Homemade Ice Cream Cones

  • 1/4 c. (60 ml) egg whites (about 2 large egg whites)
  • 7 T. (85 g) sugar
  • 1/2 t. vanilla extract
  • 1/8 t. salt
  • 2/3 c. (90 g) flour
  • 2 T. (30 g) unsalted butter, melted

Plug in and turn on your waffle cone or pizzelle maker.

In a small mixing bowl, stir together the egg whites, sugar, and vanilla. Stir in the salt and half of the flour, then mix in the melted butter. Beat in the rest of the flour until smooth.

If you want to bake these in an oven (it seems a little complicated to me), here’s the epicurious link. Otherwise, fill each mold in your cone or pizzelle maker with about 1 1/2 T. batter, and bake for about 1 minute. Remove cookie and immediately shape around your fingers or in a ramekin (for more of a seashell). You may want to use a tea towell or gloves ’cause these are hot!! Enjoy! I doubled the recipe and it yielded about 20 in a pizzelle maker.

Homemade Cone Hazel

My cute four-year-old loving it!

Some Variations:

For Sesame or Poppy Seed Ice Cream Cones, stir 3 tablespoons (35 g) toasted sesame or poppy seeds and a bit of grated lemon zest into the batter.

To make Chocolate Ice Cream Cones, increase the sugar to 1/2 cup (100 g), and use 6 tablespoons (60 g) flour and 3 tablespoons (21 g) unsweetened Dutch-process cocoa powder in place of the 2/3 cup (90 g) flour.

For Gingersnap Ice Cream Cones, add 1 tablespoon mild molasses and 1/4 teaspoon each ground cinnamon, ginger, and nutmeg to the batter. Increase the sugar to 1/2 cup (100 g).

For Honey-Cornmeal Ice Cream Cones, substitute 1 large egg and 1 egg white for the 1/4 cup (60 ml) egg whites. Melt 2 teaspoons of strongly flavored honey with the butter, and substitute 1/2 cup (70 g) of flour and 1/4 cup (35 g) of stone-ground cornmeal for the 2/3 cup (90 g) flour.

For Rosemary Ice Cream Cones, add 2 teaspoons finely chopped fresh rosemary to the Honey-Cornmeal Ice Cream Cone batter.
Homemade Cone 2