Old Mill Bread

A beautiful everyday loaf that slices amazingly for sandwiches.

I have made so many everyday loaves over the years. I have a collection of favorites, and yet since I make them so frequently, I still look for new ones to add to my cache. This recipe comes from one of my favorite wholesome baking books, Recipes from the Old Mill by Sarah E. Myers and Mary Beth Lind. Despite having tried close to half of the recipes before, I somehow had never noticed this one, which reads “This is my favorite bread, the one I always come back to.” How did I miss that? I always want to try a baker’s favorite go-to bread! So, I pioneered it last week, and I think my husband mentioned three times, while cutting it one morning, what a fan he was. So, now it’s part of the honored collection.
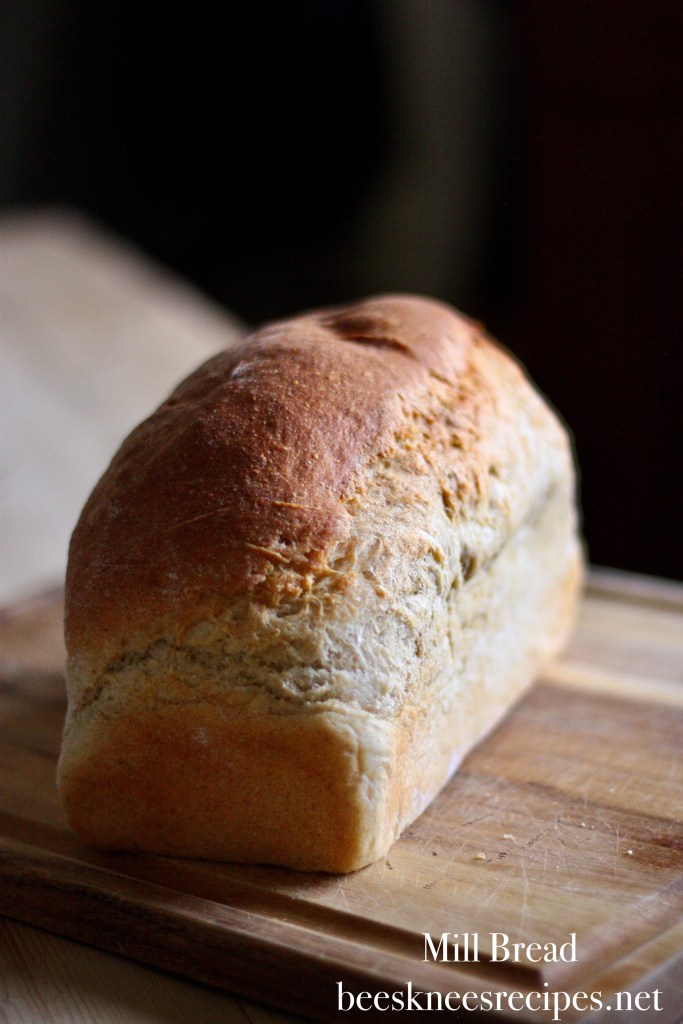
Old Mill Bread

2 c. boiling water
1/2 c. cornmeal
1/4 c. honey
2 t. salt
2 packages dry yeast (2- 2 1/4 t.)
1/2 c. warm water
1/4 c. oil
1/2 rye flour
1-2 c. whole wheat flour
3-4 c. flour

Mix together boiling water, cornmeal, honey, and salt. Cool to lukewarm. Meanwhile, dissolve yeast in warm water.

Once the cornmeal mixture is lukewarm, add the oil and the yeast. Mix well, then add the rye and wheat flour. Continue to add the water flour until you have a soft, but not dry, dough.

Knead by hand for 10 minutes, or in a standing mixer for 5-6 minutes at level 4. Once well kneaded, place the dough into a greased bowl and let rise until doubled, about one hour.

Punch down and divide into three parts (for the picture, I divided the dough into just two sections, to make two extra large loaves, instead of three). Taking one amount at a time, flatten into a rectangle (about 12 in. by 8 in. with the short side facing you) and then tightly roll to make a loaf, tucking the dough into the sides as you roll if it starts to balloon out. Place into greased bread pan and shape the remaining two dough balls.

Let rise again for 45-60 min. Twenty minutes before baking, heat the oven to 375 degrees. Bake for 35-45 minutes (until 190 degrees). Immediately turn the loaves out onto a cooling rack once done, to prevent the loaf from getting soggy.

Cinnamon Raisin Variation: After the first rise, once you have created a rectangle, sprinkle the dough with brown sugar, raisins, and cinnamon, and roll in a similar fashion to before.

Advertisement

A New Spring Salad Dressing

Turkey Celery Wide

I did something this year I’ve been wanting to do for a quite a few years. Back in March, on a particularly warm day, we prepped our garden boxes and then filled them with all sorts of cool weather seeds: lettuce, arugula, beets, radishes, spinach, onions, fennel, garlic, and peas. Every day, I’ve been watching and waiting to see if I’ve finally become a good enough gardener to get these little seeds to grow. Well, they came up, and they are beautiful. We have buttercrunch lettuce and arugula that just keeps coming and coming, so we’ve been eating salad after salad. This is a new favorite dressing for these salads that I got from the terrific cookbook called The Food Lab. It’s simply delicious, and makes a it easy to throw anything and still have great flavor, but one of my favorites has been arugula, lettuce, celery, turkey, and sunflower seeds or cooked wheatberries. 

Balsamic-Soy Vinaigrette

1/2 c. vegetable oil
1/4 c. olive oil
a small shallot, minced or grated on a microplane
2 cloves garlic, minced or grated on a microplane
4 t. dijon mustard
3 T. balsamic vinegar
1 T. soy sauce
salt and pepper to taste (about 1/2 t. salt for me, and a few shakes of pepper)

Combine all ingredients together in a glass jar, shake well to emulsify, and then resupply yourself in three days, since you will want it every lunch and dinner! It will keep for up to three months in your fridge, if you find yourself not wanting it quite as often as I do.

Salted Chocolate Granola

Chocolate Granola 1

When I get a new cookbook, I usually have a recipe I make the very next day because I just can’t wait to find out what it is. Well, my husband surprised me with a new cookbook in the mail while he was out of town recently (he knows my language of love), and this is the recipe I hopped to the very next minute I could. It comes from Valerie Gordon’s Sweet, with just one revision. She finely chops 8 oz. of bittersweet chocolate and sprinkles it on top of the granola when it’s hot out of the oven, stirs the granola after the chocolate melts, and then lets it cool before serving. She also serves this as a dessert (on top of ice cream or pudding). Well, I wanted this to be breakfast, so I omitted the extra chocolate, and it has been breakfast (and even lunch) nearly every day since I made it. I think it tastes like a very much improved version of Cocoa Puffs (that’s my high-brow opinion). And it’s very easy to not want anything to do with boxed cereals when you have this tucked in your cupboard. Yields about 12 cups.

Chocolate Granola Bowl
Salted Chocolate Granola

  • 4 cups wholemeal rolled oats
  • 1 1/2 cups sliced raw almonds
  • 1 cup raw hazelnuts, halved
  • ¼ cup cacao nibs
  • 1/3 cup  cocoa powder
  • 3/4 cup light brown sugar
  • ¼ cup honey
  • 1/3 cup vegetable oil
  • 2 t. vanilla bean paste
  • 1 1/2 tsp. fleur de sel or fine sea salt (I found some smoked chocolate salt that I used. Wow!)
  1. Preheat the oven to 250 F / 120 C. Line a baking sheet with parchment paper or a silicon liner and set aside. [I did 350 degrees and only baked it for 40ish minutes.]
  2. In a large bowl, mix together the rolled oats, almonds, hazelnuts, cacao nibs, and fleur de sel or fine sea salt.
  3. In a separate bowl, whisk together the cocoa powder, brown sugar, honey, oil and vanilla.
  4. Pour the wet ingredients over the dry ingredients and stir well with a rubber spatula until combined and evenly moistened.
  5. Spread the granola in an even layer on the prepared baking sheet. Bake for about 1 hour, stirring every 15 minutes, until crisp and the nuts are turning golden.
  6. Remove the granola from the oven and move the baking sheets to a cool area and allow the granola to cool. It can be stored in an airtight container for up to three weeks.

Chocolate Granola Spoon

100% Whole Wheat Sandwich Bread

KAF Whole Wheat

So, usually bread isn’t 100% whole wheat flour, because adding white flour improves the texture and flavor of the loaf so much, and makes it much more like  the store-bought bread we are used to eating. When a bread recipe does make something with 100% whole wheat, it usually adds many unusual ingredients to make it not as dry and to improve the flavor (I’ve seen applesauce, eggs, potato flakes, orange juice, etc). I was surprised to see this recipe voted “Best recipe of 2014” by King Arthur Flour for that very reason. Could 100% whole wheat bread that didn’t have a ton of extra steps and extra strange ingredients be the best recipe of year? Well, it surprisingly is a really great recipe. Not the most mouth-watering thing you can bake, but a really useful recipe, especially when I swing towards the, “my kids are junk-food addicts! NO white sugar or flour for at least, you know, today!” side of the pendulum. On the down side,  though, after two days, this loaf was quite dry (still suitable for toast and bread crumbs and croutons), but, as always, bread freezes fabulously, so just pop it in the freezer if you find it partially uneaten within two days.

King Arthur Flour’s 100% Whole Wheat Bread

  • 1 to 1 1/8 c. lukewarm water*
  • 1/4 c. vegetable oil
  • 1/4 c. honey, molasses, or maple syrup [I prefer honey]
  • 3 1/2 c. Whole Wheat Flour
  • 2 1/2 t. yeast or 1 packet active dry yeast dissolved in 2 tablespoons of the water in the recipe
  • 1/4 c. nonfat dried milk
  • 1 1/4 t. salt
  • *Use the greater amount in winter or in a dry climate; the lesser amount in summer or a humid climate.

In a large bowl, combine all of the ingredients and stir until the dough starts to leave the sides of the bowl. For easiest, most effective kneading, let the dough rest for 20 to 30 minutes in the bowl; this gives the flour a chance to absorb some of the liquid, and the bran to soften. Transfer the dough to a lightly greased surface, oil your hands, and knead it for 6 to 8 minutes, or until it begins to become smooth and supple. (You may also knead this dough in an electric mixer or food processor, or in a bread machine programmed for “dough” or “manual.”) Note: This dough should be soft, yet still firm enough to knead. Adjust its consistency with additional water or flour, if necessary.

2) Transfer the dough to a lightly greased bowl or large measuring cup, cover it, and allow the dough to rise till puffy though not necessarily doubled in bulk, about 1 to 2 hours, depending on the warmth of your kitchen.

3) Transfer the dough to a lightly oiled work surface, and shape it into an 8″ log. Place the log in a lightly greased 8 1/2″ x 4 1/2″ loaf pan, cover the pan loosely with lightly greased plastic wrap, and allow the bread to rise for about 1 to 2 hours, or till the center has crowned about 1″ above the rim of the pan. Towards the end of the rising time, preheat the oven to 350°F.

4) Bake the bread for 35 to 40 minutes, tenting it lightly with aluminum foil after 20 minutes to prevent over-browning. The finished loaf will register 190°F on an instant-read thermometer inserted into the center.

5) Remove the bread from the oven, and turn it out of the pan onto a rack to cool. If desired, rub the crust with a stick of butter; this will yield a soft, flavorful crust. Cool completely before slicing. Store the bread in a plastic bag at room temperature.

Yield: 1 loaf.

Maple Oat Scone

Maple Oat Scone

So, more renewed focus on whole grains in this house, but this time because of recent talk about diabetes, both in our family and in our culture. A bit of a downer. But, fantastically, there are so many great recipes out there that have pioneered modern baking with a more wholesome bent, and I’m making my own tweaks and turns to some favorites, and they are turning out great. I don’t think this is going to be much of a headache at all. Next project: to see if I can get the elementary school to stop handing out so much sugar . . . I’m aware this will be traveling down the path of most unpopular mom, but I think it’s worth a shot. In the meantime, my kids did not balk at all at this terrific scone that’s a little bit sweet and light. I’ve slightly changed this recipe from The New Best Recipe, by ATK.

Maple Oat Scones

1 1/2 c. old fashioned oats
1/4 c. whole milk
1/4 c. sour cream or cream
1 egg
3/4 c. unbleached all-purpose flour
3/4 c. whole wheat flour or spelt flour (or just use all-purpose if you want)
1/4 c. maple syrup
2 t. baking powder
1/2 t. table salt
10 T. unsalted butter, chilled and cut into 1/2 inch cubes
1/2 c. additional dried fruit or nut, if desired (apricots, raisins, currants, pecans)

1. Heat oven to 375 degrees. Spread the oats on a rimmed baking sheet and toast in oven for about 7-9 minutes. Cool on a wire rack, but reserve 2 T. for rolling the dough out (if doing). Increase oven to 450 degrees. [If you’re in a time crunch, don’t worry about this. It makes the flavor of the oats nuttier, but it’s not necessary.]

2. Line a baking sheet with parchment paper.

3. Whisk milk, sour cream, egg, and maple syrup together in a measuring cup.

4. Pulse the flour, sugar, baking powder, and salt in a food processor until combined. Add butter and pulse until the mixture looks like coarse cornmeal. [Or do this step by hand using a pastry blender, or even your fingers!]

5. Transfer the flour mixture to a medium bowl and stir in the cooled oats. Then, with a spatula, fold in 3/4 of the liquid ingredients. Gently the dough by hand until everything comes together, adding more liquid as needed to not have any dry bits at the bottom of the bowl.

6. Dust the work surface with a tablespoon of the reserved oats. Add the dough. Then dust the top with the remaining one tablespoon of oats. Pat into a 7-inch circle about one inch thick. Using a bench scraper cut dough into eight wedges. Set on a baking sheet lined with parchment paper. Or, use a tablespoon scoop, and simply scoop the scones onto the sheet, flattening a bit for a wider shape.

6.  Bake for about 12-14 minutes. Let cool, and if desired, make a simple glaze of 3 T. maple and 1/3 c. powdered sugar to drizzle over the top.

Chocolate Pecan Grahams


Chocolate GrahamsOn Mondays, I’ve been trying to bake something that I can use all week as a healthy-ish and filling after school snack, pairing it with cut fruit or vegetables or the like. So, I baked these this last Monday, I even baked a double batch, hoping I would have enough to last through the week. Well, we had enough to last through early-morning munchies on Tuesday. So, the bad news was I had to bake a new after school snack on Tuesday (which actually isn’t bad news to me! I have two new cookbooks I’m trying to bake through: Bouchon Bakery–which will take me a few years–and Payany’s Better Made at Home. So delightful!), and the good news was that we have another winner for after school snacks! I’ve adapted this recipe from one on King Arthur Flour (I’ve reduced the sugar and added pecans. The full sugar amount is delicious, but tastes more like a flat brownie than a cracker. Not that there’s anything wrong with that! Just wanting a little less sugar before dinner).

Note: these grahams are quite crumbly out of the oven, but firm up within an hour of cooling. Also, I scored them before they went into the oven, and then again right out of the oven. And thanks to Bouchon, I now want a bicycle for scoring. I think that’s what he calls it. Anyway. Big dreams. Another note: my kids had no idea these grahams had pecans in them (Lucie just reading over my shoulder commented on this!). Now, that’s success.

Chocolate Pecan Grahams

1/2 c. all-purpose flour
3/4 c.  whole wheat flour
1/2 t. salt
1/2 c. Dutch-process cocoa
1/2 c. confectioners’ sugar
1 t. baking powder
1/2 c. pecans, finely chopped or pulsed in a food processor till finely chopped
1/2 c. (1 stick, 4 ounces) unsalted butter
3-4 T.  honey (I like more, plus I needed it for moisture)
2 T. cold milk
2 T. granulated sugar, for sprinkling

Preheat your oven to 325°F. Cut out two sheets of parchment as large as your cookie sheets.

In a medium-sized bowl, whisk together the flours, salt, cocoa, sugar, and baking powder. With a pastry blender, two knives, or your fingertips, cut the butter into the flour mixture until evenly crumbly. In a separate bowl, combine the honey and milk, stirring until the honey dissolves. Add the liquid to the dry ingredients and toss lightly with a fork until the dough comes together. Add additional milk, if necessary.

[Alternately, place the dry ingredients in a food processor, pulse 5 times, add the pecans, pulse 2-3 times. Then, add the butter, and pulse until mixture looks like sand, then add the wet ingredients and pulse until the mixture comes together, adding more milk or honey if needed. ]

Turn the dough out onto a well-floured surface and fold it over gently 10 to 12 times, until smooth. Divide the dough in half. Work with half the dough at a time, keeping the remaining dough covered.

Transfer one piece of dough to a piece of parchment. Roll it into a rectangle a bit larger than 10 x 14 inches; the dough will be about 1/16-inch thick. Trim the edges and prick the dough evenly with a dough docker or fork. Sprinkle with a tablespoon of sugar. Repeat with the remaining dough and parchment. Place the rolled-out dough pieces, on their parchment, onto baking sheets.

Bake the crackers for 15 minutes, or until you begin to smell chocolate. Remove them from the oven, and immediately cut them into rectangles with a pizza wheel or knife. Transfer them to a rack to cool. Store the cooled crackers tightly wrapped. Yield: thirty-two 3 1/2 x 2 1/2-inch crackers.

Best Granola Bars I’ve Ever Had/Made

Puffed Rice Bars

Well, I’m sure almost anyone who has googled “energy bar recipe” like I did has seen this bar, since it comes from the first hit, but it’s time for me to publish how much I like them! After making them the first time, I went to the store the next morning to buy all the ingredients to make them again, in case my kids finished them off after school. They are so good, I’m a little embarrassed I’ve ever purchased a granola bar. And though I’m sure I’ll buy granola bars again, I will always wish I had taken time to make these instead. Soooo good. So Good. This recipe comes from beardandbonnet.com, but I’ve altered it a bit for our taste.

Sweet Pine Nut and Puffed Rice Bars

  • 1 c. pecans, chopped
  • 1 c. oats
  • ⅓ c. pine nuts
  • ¼ c. flax seeds
  • ⅔ c. light brown sugar
  • ½ c. honey
  • 4 T. unsalted butter
  • ½ t. salt
  • 2 t. vanilla extract
  • 4 c. puffed brown rice cereal (also could mix in puffed Kamut or Millet)
  • 1/4 c. water
  1. Preheat the oven to 350°F and line a baking sheet with parchment paper. Spread the pecans, oats, pine nuts, and flax seeds on the sheet and bake about 8 minutes or until fragrant. Transfer to a large mixing bowl.
  2. In a saucepan, bring the sugar, honey, butter, water, and salt to a boil over medium heat, making sure that the sugar dissolves before the mixture boils. Simmer until a light brown caramel forms, about 5 minutes. Remove from heat and stir in the vanilla.
  3. Pour the caramel over the nut and oat mixture. Stir in the brown rice cereal until evenly coated.
  4. Line an 11×17 inch baking pan with parchment paper, extend the paper over the sides of the pan to use as a handle later. Pour the cereal mixture into the baking dish and spread out into an even layer. Cover the pan with a second piece of parchment and press down to compress the bars. Let the mixture stand for about 2 hours until firm.
  5. Discard the top piece of parchment and use the “handles” from the second piece of parchment to gently remove the cereal square from the pan then cut into bars and serve.

Rosemary Raisin Crackers

Rosemary Raisin CrackersI’m obsessed with Trader Joe’s Rosemary Raisin Crisps, but Trader Joe’s isn’t very close to my home, so I’m committed to figuring this recipe out myself. This is my first attempt, and it’s good, although not an exact likeness (not quite as dry and has wheat germ–tastes a little more like a graham cracker, and also wasn’t sliced in squares). The flavor is so similar, though, that I have to write this down, so I remember it, even if I continue tweaking it! 

Rosemary Raisin Crackers


  • 1 1/4 c. whole-wheat flour, plus more for dusting
  • 1/2 c. toasted wheat germ
  • 1/4 c. sunflower seeds
  • 1/4 c. raisins, minced
  • 1 T. fresh (or 1 t. dried) rosemary, minced
  • 1/4 c. sugar
  • 1/2 t. baking powder
  • 1/2 t. baking soda
  • 1/2 t. salt
  • 3 T. unsalted butter, cut into pieces
  • 1/2 c. nonfat buttermilk

Preheat oven to 350 degrees. Spray two baking sheets with cooking spray; set aside. In the bowl of a food processor, pulse flour, wheat germ, sugar, sunflower seeds, raisins, rosemary, baking powder, baking soda, and salt (you may also just do this with a whisk, by hand). Add butter; process until mixture resembles coarse meal (or use your fingers and do the same). With machine running, gradually add buttermilk; process until dough comes together and is moist (if doing by hand, switch to a wooden spoon and mix until the dough just comes together, adding a little extra buttermilk, if needed).

Transfer to a lightly floured surface or to a sheet of parchment paper precut to the size of a baking sheet. Allow the dough to rest for 5 minutes. Roll until 1/4 to 1/8 inch thick.

Cut dough into diamonds or rectangles using a pastry knife (or butter knife). Transfer to ungreased baking sheets. Pierce each cracker liberally with a fork. Bake until hard, about 16 minutes. Transfer crackers to a wire rack to cool. Store in an airtight plastic container, at room temperature, up to 1 week.

New Favorite Granola

Granola is like bread for me–I have a clear favorite for a few months, maybe even a few years, and then I have to start trying other recipes to see if something better’s out there. This granola has been my favorite for about a year now, and I make it sometimes as many as two times a week. (My oldest son Henry came home from school last week and ate four cups of it. FOUR CUPS of it. I couldn’t believe it. I didn’t think any stomach could handle that much granola). Anyway, this recipe comes from Lucinda Scala Quinn’s Mad Hungry, but I’ve made a change or two. 

Great Granola

5 c. rolled oats
1 c. coconut
1/2 c. wheat germ
1/4 c. sesame seeds
1/2 c. nuts (I use sliced almonds or chopped pecans)
1/2 c. honey
1/2 c. coconut oil
1/4 c. water
1 1/2 t. vanilla
1/2 t. salt
1 c. dried fruit (craisins, raisins, or whatever. We never get around to adding any, though!)

Preheat oven to 300 degrees, and place an oven rack in the center of your oven. Prepare a large rimmed baking sheet with parchment paper. In a large bowl, combine oats, coconut, wheat germ, sesame seeds, and nuts.

Over the stove or in the microwave, heat the honey and oil until dissolved. Add the water, vanilla, and salt. Pour the wet ingredients over the dry ingredients, and mix. Spread on the prepared baking sheet and bake for 50-60 minutes, until golden brown, stirring every 20 minutes to prevent scorched edges. Cool completely on a rack, and then store in airtight containers for as long as two weeks!


Black Bean and Mango Quinoa Salad

I improvised a little for a luncheon get-together last week, and came up with a new salad that is wonderfully colorful and seemed nutritionally loaded

A bright salad for spring and summer!

(as far as my knowledge of nutrition goes:). It’s also vegetarian and vegan.  I based it off of a recipe from epicurious, although the end result is quite a bit different. So, this is for Sara particularly, but if something doesn’t seem right, let me know! This is how I remember it going . . .

Black Bean and Mango Quinoa Salad

  • 1 cup quinoa (about 6 ounces)
  • 1/4 c. canola oil
  • 2 T. white wine vinegar
  • 1/2 t. cumin
  • 1/2 t. dijon mustard
  • 1/2 t. salt (or more, to taste)
  • 1 c. black beans, cooked and drained (or from a can)
  • 1 c. chopped peeled mango
  • 1 medium tomato, cored and chopped into 1/4″ cubes
  • 1 sweet pepper (orange or yellow look particularly great), seeded, deveined, and chopped
  • 3 green onions, chopped
  • 1 large handful of cilantro, stems removed, roughly chopped

Cook quinoa in medium pot of boiling salted water over medium heat until tender but still firm to bite, stirring occasionally, about 12 minutes. Drain well; cool. Transfer to medium bowl. [My quinoa gets really clumpy when I cook it this way, so instead, I boil it for 10 minutes, then I put it in a fine mesh steamer, and steam it for 10 minutes more. It turns out light and fluffy this way. I also always rinse it 3xs before cooking it, which was the excellent advice of my friend Maryann. Rinsing it ensures the quinoa’s not bitter.]

Meanwhile, whisk oil and next 4 ingredients in small bowl to blend. Season dressing to taste with more salt (if desired) and pepper.

Add chopped mango, black beans, tomato,  green onions, pepper, 1/2 the cilantro and 1/4 cup dressing to quinoa; toss to coat. Garnish with remaining cilantro and drizzle with remaining dressing; serve. Stores well for 2 days in an airtight container, refrigerated.

Serves 4-6.