Pick-Your-Own Handmade Potato Chips

Handmade Potato Chips
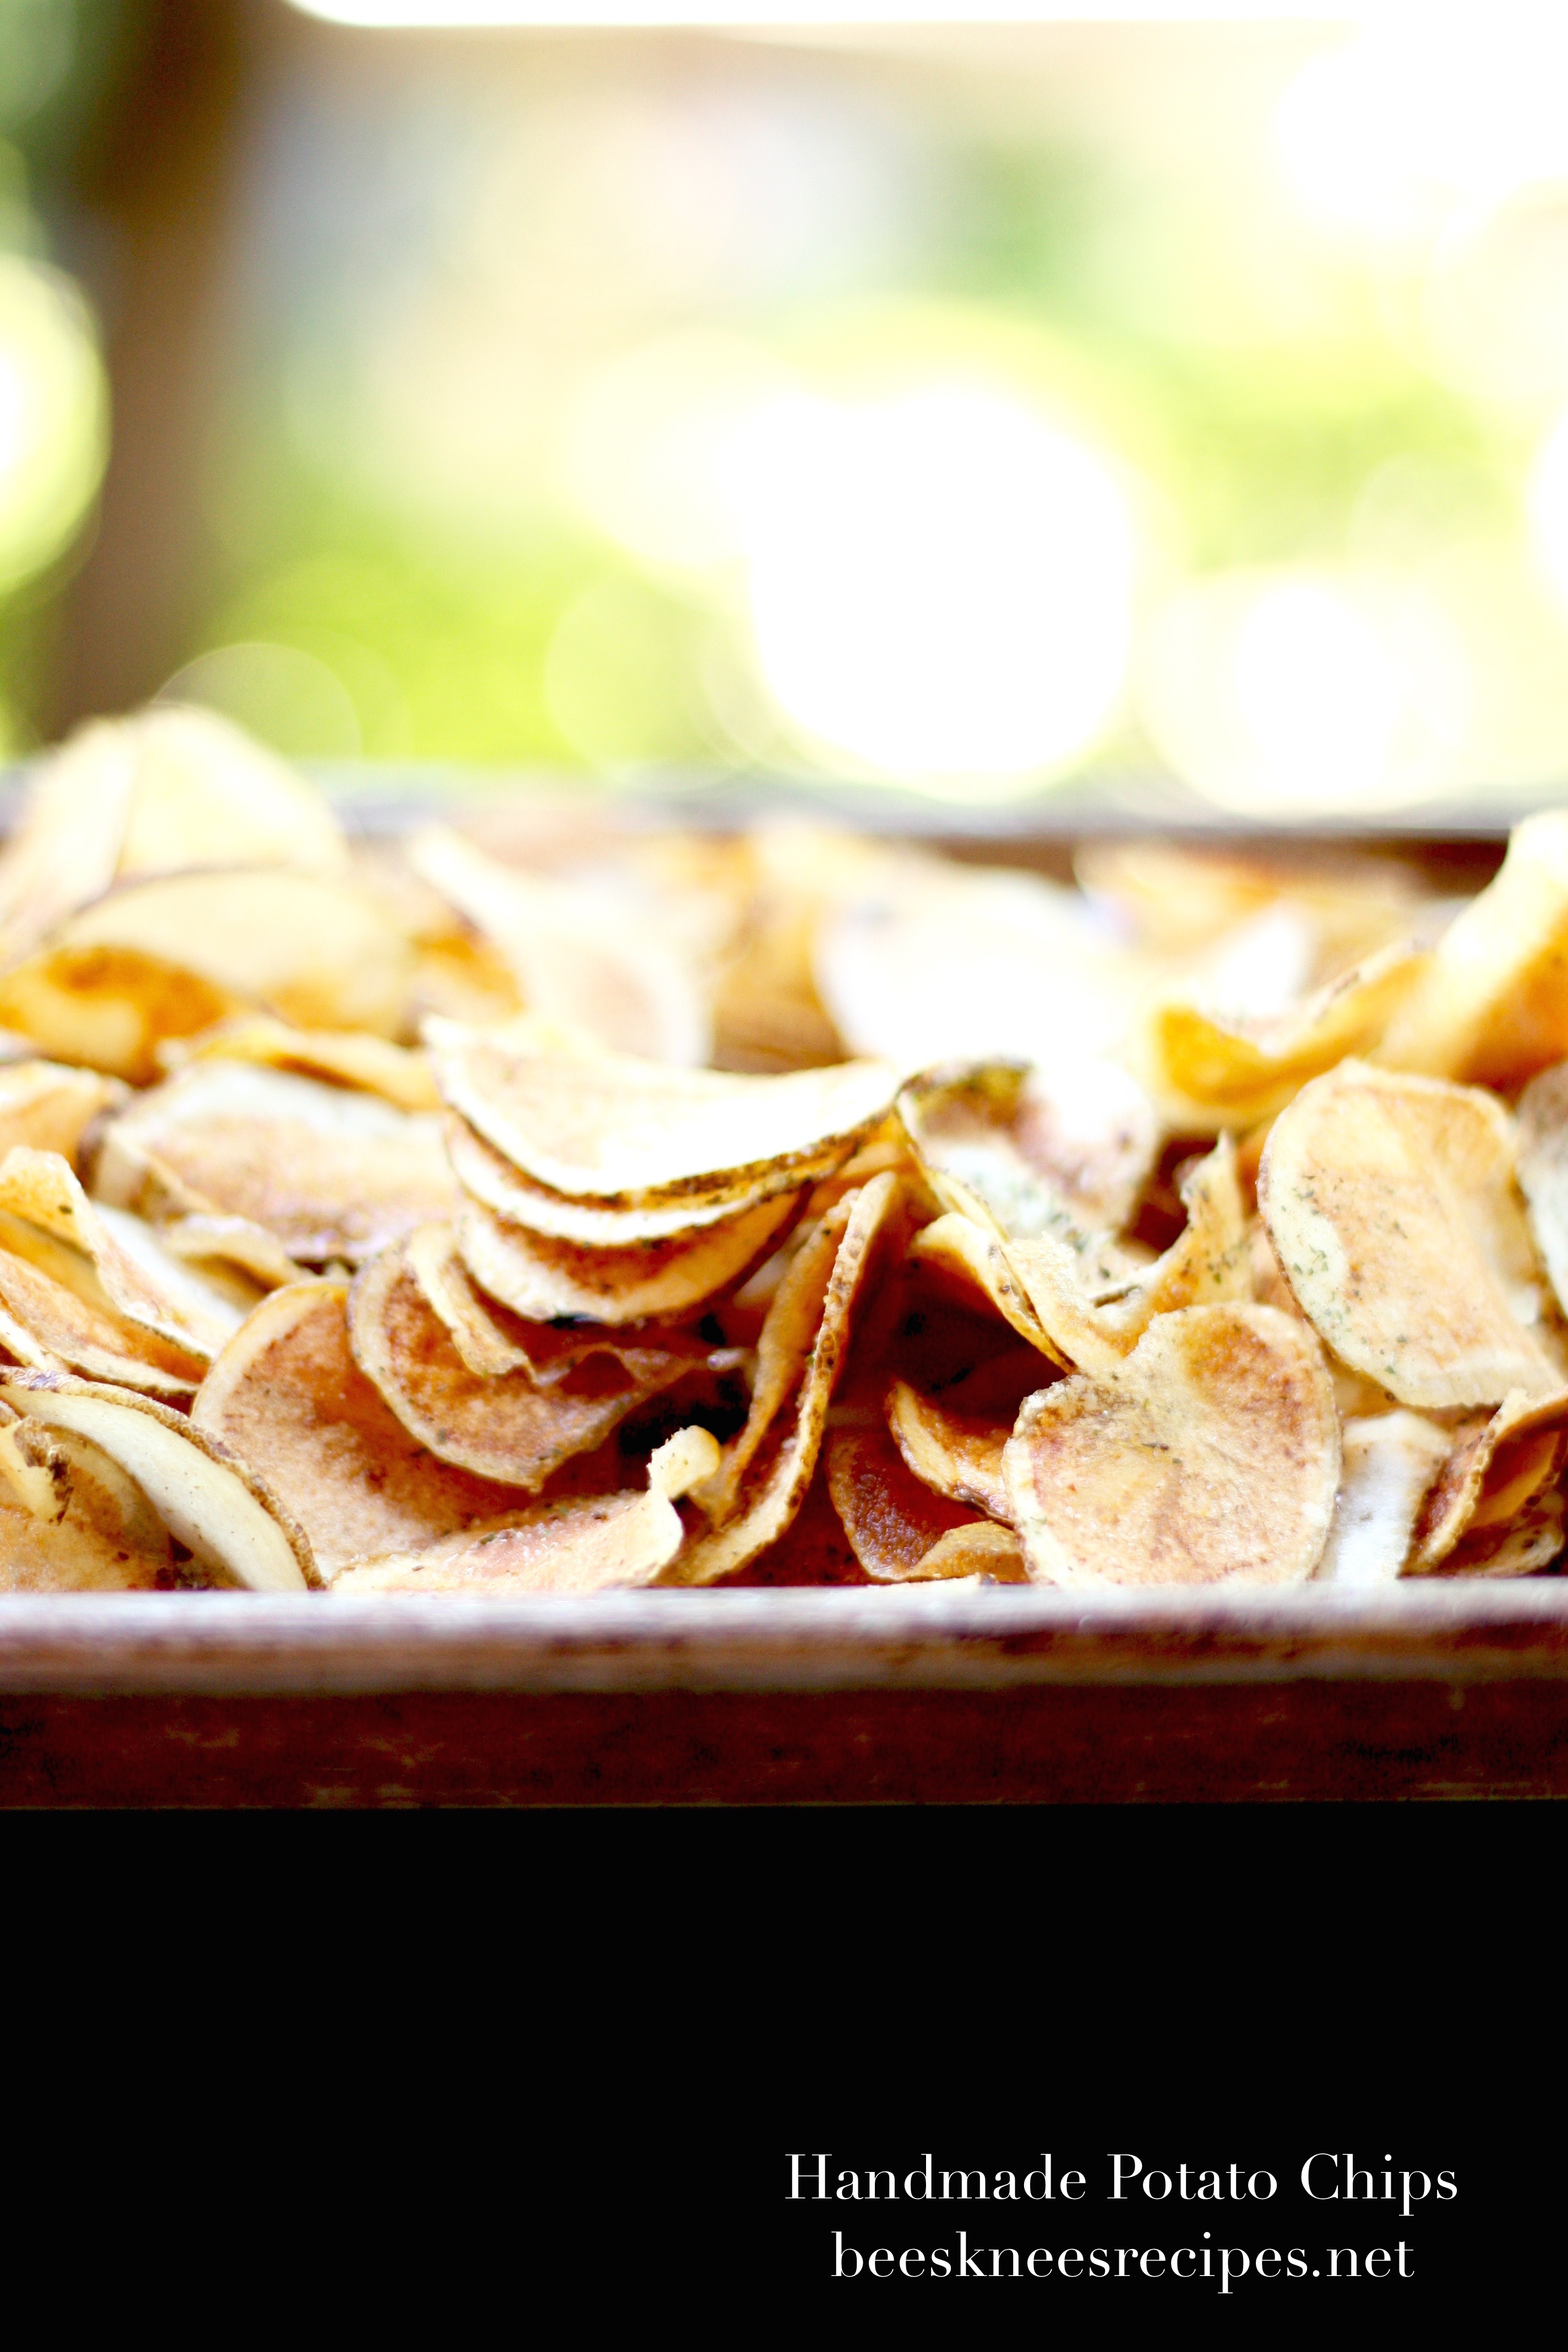
I was reading through a sweet little recipe book on making common snacks and grocery items from scratch when I found a recipe for potato chips. Now, why this has never occurred to me before, I have no idea, but it shot off in my brain as the perfect use for the mounds of potatoes in my home. So, the good news is that after last week, there is no longer a mound of potatoes in my home. The bad news is that although handmade potato chips taste WAY better and are WAY more cost effective than store-bought ones, the nutritional value is probably just about the same. So, probably not everyday food. But, you can reuse the oil for multiple fryings, which makes the purchase of peanut oil pay off, and if you’re wondering if the 2 gallon-size of peanut oil that Costco sells is worth it, it is. Absolutely.

Handmade Potato Chips

4-5 medium-sized Russet or Yukon Gold Potatoes
8-10 c. peanut oil (vegetable oil will work, too, I just prefer peanut)

For seasoning you might consider:
salt & pepper, or
ranch seasoning powder (try Penzey’s!), or
barbecue rub powder, or
cheddar cheese powder (used for popcorn seasoning) or
chopped rosemary and salt

Special Equipment:
a large pot, a mandolin (or slicer on a box greater or sharp knife), an instant-read thermometer, a slotted metal spoon or spider skimmer

Heat the oil in a large kettle or pasta pot over medium-high to high heat (I put it on 8.5/10 on my electric stove).

Fill a large bowl with cold water. Using a mandolin, a slicer on a box grater (the single blade), or a knife, slice the potatoes as thin as you can get them. Immediately place them in the cold water as you continue to slice the remaining potatoes (this will prevent them from turning brown and remove a little extra starch from the surface).

Cover a baking sheet with paper towels. Once the potatoes have soaked for 10 minutes or so, drain them and spread them on the sheet to dry. Blot the extra water with a few extra towels to get the potatoes as dry as possible (this will prevent sputtering as they hit the oil).

Prepare another baking sheet with fresh paper towels. When the oil reaches 375 to 400 degrees (test with the instant read thermometer), throw about 1 c. of sliced potatoes into the oil (I usually place them in with a spider skimmer, about arm’s length away, because I don’t want any more oil burns on my hands. Yes, I have a few). Fry, stirring with a metal spoon to make them curved and crinkled (which is beautiful), until the inside of the chips are a nice golden brown. Remove with a metal slotted spoon or spider skimmer and place on prepared sheet. Wait for the oil to return to 375, and continue to fry in batches.

Season the hot potato chips with a shake of salt and pepper, a dusting of ranch or barbecue powder, or freshly cut rosemary, and eat immediately or save for an excursion to the woods. Enjoy.

Green Peas, Mint, & Ricotta Pasta

Fregola from epi
This dish, from Bon Appetit back in April, looked so pretty, I couldn’t wait to try it. I have to say, it cooked up looking quite a bit less brothy than this image shows, but it was simple and delicious, and has ingredients I almost always have on hand. These are the type of dishes I like to keep in my pocket, so I can pull them together whenever I need. I also loved the little bit of mint in this dish. So bright & springy, as well as great to use a little more mint from my garden.

Green Peas, Mint & Ricotta Pasta

  • 1 1/4 c. fregola, or other short pasta
  • Kosher salt
  • 2 T. olive oil, plus more for serving
  • 2 oz. bacon (about 3 slices), chopped
  • 1 medium onion, chopped
  • 1 c. dry white wine
  • 2 1/2 c. low-sodium chicken broth
  • Freshly ground black pepper
  • 1 c. shelled fresh peas (from about 1 pound pods) or frozen peas, thawed
  • 2 T. chopped fresh mint, plus leaves for serving
  • 4 oz. ricotta

Cook pasta in a large pot of boiling salted water until very al dente, 6–8 minutes. Drain pasta (do not rinse), reserving 1 cup pasta cooking liquid.

Heat 2 tablespoons oil in a large skillet over medium and cook bacon, stirring often, until bacon is brown around the edges, about 5 minutes. Add onion and cook, stirring occasionally, until bacon is crisp and onion is translucent, about 5 minutes.

Add wine, bring to a simmer, and cook until skillet is almost dry, about 5 minutes. Add broth and bring to a simmer. Add fregola and cook, stirring often, until pasta is just al dente and broth is thickened, about 5 minutes. Taste and season with salt and pepper. Add peas and chopped mint and cook, stirring, until peas are warmed through, about 2 minutes. Add pasta cooking liquid as needed to adjust consistency.

Serve topped with ricotta, mint, and cracked pepper and drizzled with oil.

Sweet & Simple Cinnamon Rolls

Cinnamon Roll WS
I know there are a million cinnamon rolls on the web, but I’m adding this one to the chaos. It’s great. It’s simple. The orange zest in it makes it memorable, and it’s light enough that you don’t need a bulldozer to lift you after eating one (I’m thinking Cinnabon here–yummy roll, but maybe a week’s worth of sweetness!). I’ve also learned two little tricks about cinnamon rolls. 1) If you roll them really tight, you can get the middle to pop up while baking, which is very pretty, and 2) you can make them in the evening through the second rise, then put them in the fridge overnight, making the morning pretty simple. And delicious.

Sweet & Simple Cinnamon Rolls

for the rolls

  • 5 t. active dry yeast (2 packages)
  • 1 c. warm milk
  • 1/2 c. sugar
  • 3 eggs
  • 5 1/2 c. flour [up to 1 1/2 c. can be whole wheat, if you’d like]
  • 1 t. salt
  • 1 t. ground mace [I haven’t put in, because I can’t find it yet!]
  • Zest of one orange
  • 1/2 c. room temperature butter

for the filling

  • 1/2 c. room temperature butter
  • 1/2 c.  sugar
  • 1/2 c. packed brown sugar
  • 6 T. flour
  • 1 T. ground cinnamon

for the glaze

  • 1/2 c. powdered sugar
  • 1/4 c. heavy cream
  • 1 t. vanilla

In a stand mixer or a large mixing bowl, add the yeast and the warm milk. Allow the mixture to stand for about 5 minutes, until the yeast is foamy. Add the sugar, eggs, flour, salt, mace, orange zest and butter. If you’re using a stand mixer, attach the dough hook and knead the dough for 5-7 minutes, or knead the dough by hand, until a smooth and elastic dough is formed.

Oil a large bowl and place the dough into it. Cover the bowl with a damp towel or plastic wrap and let the dough rise in a warm place for about 2 hours.

Once the dough has doubled in size, punch it down and place it onto a floured surface. Cut the dough in half. Roll one half of the dough into a 10 inch x 16 inch rectangle. Cover with half of the filling mixture. Starting with the 16 inch side, roll the rectangle toward you. Pinch the edges and ends of the roll together to seal it. Cut the roll into 8 slices. Repeat with the remaining half of the dough.

Place the rolls on a baking sheet lined with parchment so that they’re barely touching one another. Cover the baking sheet with a towel and let the rolls rise for 30-40 minutes. Or, place them in the refrigerator and allow them to rise overnight. If you refrigerate them, allow them to stand at room temperature for about 30 minutes before baking.

Bake the rolls on the middle rack of the oven preheated to 400 degrees. Bake for 20-25 minutes until a toothpick inserted into the center of a roll comes out clean.  Cover the rolls with the glaze (above) while the rolls are still warm.

100% Whole Wheat Sandwich Bread

KAF Whole Wheat

So, usually bread isn’t 100% whole wheat flour, because adding white flour improves the texture and flavor of the loaf so much, and makes it much more like  the store-bought bread we are used to eating. When a bread recipe does make something with 100% whole wheat, it usually adds many unusual ingredients to make it not as dry and to improve the flavor (I’ve seen applesauce, eggs, potato flakes, orange juice, etc). I was surprised to see this recipe voted “Best recipe of 2014” by King Arthur Flour for that very reason. Could 100% whole wheat bread that didn’t have a ton of extra steps and extra strange ingredients be the best recipe of year? Well, it surprisingly is a really great recipe. Not the most mouth-watering thing you can bake, but a really useful recipe, especially when I swing towards the, “my kids are junk-food addicts! NO white sugar or flour for at least, you know, today!” side of the pendulum. On the down side,  though, after two days, this loaf was quite dry (still suitable for toast and bread crumbs and croutons), but, as always, bread freezes fabulously, so just pop it in the freezer if you find it partially uneaten within two days.

King Arthur Flour’s 100% Whole Wheat Bread

  • 1 to 1 1/8 c. lukewarm water*
  • 1/4 c. vegetable oil
  • 1/4 c. honey, molasses, or maple syrup [I prefer honey]
  • 3 1/2 c. Whole Wheat Flour
  • 2 1/2 t. yeast or 1 packet active dry yeast dissolved in 2 tablespoons of the water in the recipe
  • 1/4 c. nonfat dried milk
  • 1 1/4 t. salt
  • *Use the greater amount in winter or in a dry climate; the lesser amount in summer or a humid climate.

In a large bowl, combine all of the ingredients and stir until the dough starts to leave the sides of the bowl. For easiest, most effective kneading, let the dough rest for 20 to 30 minutes in the bowl; this gives the flour a chance to absorb some of the liquid, and the bran to soften. Transfer the dough to a lightly greased surface, oil your hands, and knead it for 6 to 8 minutes, or until it begins to become smooth and supple. (You may also knead this dough in an electric mixer or food processor, or in a bread machine programmed for “dough” or “manual.”) Note: This dough should be soft, yet still firm enough to knead. Adjust its consistency with additional water or flour, if necessary.

2) Transfer the dough to a lightly greased bowl or large measuring cup, cover it, and allow the dough to rise till puffy though not necessarily doubled in bulk, about 1 to 2 hours, depending on the warmth of your kitchen.

3) Transfer the dough to a lightly oiled work surface, and shape it into an 8″ log. Place the log in a lightly greased 8 1/2″ x 4 1/2″ loaf pan, cover the pan loosely with lightly greased plastic wrap, and allow the bread to rise for about 1 to 2 hours, or till the center has crowned about 1″ above the rim of the pan. Towards the end of the rising time, preheat the oven to 350°F.

4) Bake the bread for 35 to 40 minutes, tenting it lightly with aluminum foil after 20 minutes to prevent over-browning. The finished loaf will register 190°F on an instant-read thermometer inserted into the center.

5) Remove the bread from the oven, and turn it out of the pan onto a rack to cool. If desired, rub the crust with a stick of butter; this will yield a soft, flavorful crust. Cool completely before slicing. Store the bread in a plastic bag at room temperature.

Yield: 1 loaf.

Whoopie! School’s Out!

Whoopie PIe with Salted Dulce
This was the recipe that caught my eye the most as I flipped through the cookbook, Home Baked Comfort, and I thought, yes, of every recipe, I will make this one right this minute. And I did. And honestly, a whoopie pie can be a little dangerous at high altitude, because sometimes the cookie will spread too much and flatten, but this recipe performed beautifully. (Okay, it can also be dangerous when trying to lower sugar intake, but, well, that’s the kind-of danger I like.) I also took this cookie with me to my nephew’s all-cookie birthday party (how is that not the perfect party idea?). The filling didn’t do great in the hot weather, but I kind-of enjoyed watching them slowly slip and slide. Maybe not the perfect 90-degree-weather-outside-party cookie, but definitely the perfect cookie to welcome in summer! Wouldn’t be so bad at any other time of the year, either.

Salty Dulce de Leche Whoopie Pie

For the cookies:
6 T. unsalted butter, at room temperature
1/2 c. firmly packed light brown sugar
1 large egg
1 t. pure vanilla extract
3/4 c. all-purpose flour
1/2 c. natural cocoa powder (like Hershey’s)
1/2 t. baking soda (reduce slightly for high altitude, like a little shake less, or 1/4 t. less if doubling)
1/4 t. salt

For the filling:
4 T. unsalted butter, at room temperature
3/4 c. confectioners’ sugar
2 T. heavy cream
1/4 to 1/2 t. kosher salt
1/3 c. dulce de leche (you can find this at Latin American Grocers or Trader Joe’s)

To make the cookies, in the bowl of a mixer fitted with the paddle attachment, beat the butter and sugar on medium-high speed until combined. Add the egg and vanilla and beat until blended. Sift the flour, cocoa, baking soda and salt into the bowl and beat just until blended. Cover the bowl and refrigerate the dough until firm, about 2 hours.

Space 2 racks evenly in the oven and preheat to 350 degrees F. Line 2 baking sheets with parchment.

With dampened hands, shape tablespoonfuls of the dough into balls [I used a tablespoon cookie scoop]. Place them firmly on the prepared pans, spacing them slightly apart and squishing them a little. You should have about 20 balls. Bake until the cookies are puffed and slightly firm, 8 to 10 minutes, rotating the pans about halfway through. Let the cookies cool on the pans for 5 minutes, then transfer to wire racks to cool completely.

While the cookies are cooling, make the filling: In the bowl of a mixer fitted with the paddle attachment, beat the butter and confectioners’ sugar on medium-high speed until lightened. Stir in the cream and salt, to taste, on low speed, then stir in the dulce de leche until the filling is smooth.

Spread the flat side of half the cookies with a big dollop of the filling. Top each with a second cookie, placing the flat side on the filling. (You’ll probably have a bit more filling than you need, but if you’re like us, you’ll find a good use for it and will sneak spoonfuls here and there.) Refrigerate until the filling is set, at least 1 hour. Whoopie! Makes 10 whoopie pies.

Butternut Squash Soup with Sage

Butternut Squash soup with sage

I wanted to use two small butternut squashes the other night for dinner, but didn’t have a ton of time to think about what I would do with them, so in the early afternoon, I threw them in a hot oven, and when they were done, this soup was born. It ended up just taking a matter of minutes to pull together at the dinner hour, complete with croutons from some day-old bread. I quickly jotted what I did down, so I can do it again. Plus, with all the rain and my gigantic sage plant, I need some great ways to use this pretty herb. Consider roasting the squash the night before, the morning of, or in the early afternoon, if you need dinner to come together quickly at night. Simply put the roasted squash in the fridge until you are ready to use it (you can just wrap it in the aluminum that you baked it in!)

Butternut Squash Soup with Sage

2 small butternut squash, or one large one
1-2 T. olive oil
1 yellow onion, diced
2 T. butter
4 c. chicken or vegetable stock
2 c. water
1 parmesan rind
2 t. dried sage
1/2-1 c. cream

Croutons
2-3 sliced country bread, torn into rough pieces
2 T. butter
1/4 c. parmesan

1. Preheat the oven to 425 degrees. Line a baking sheet with aluminum foil. Cut the butternut squash in half, and brush with olive oil and then sprinkle with salt and pepper. (You may also want to sprinkle it with 1/2-1 t. of sugar, if you want to bring the sweetness out and caramelize the squash while it roasts. This is a great tip from America’s Test Kitchen.)

2. When the oven is ready, roast the squash for 45-60 minutes, or until it is soft under the prick of a fork. Remove from oven and let cool until you are ready to make your soup.

3. For the soup: heat a stockpot over medium to medium-high heat. When hot, add the butter until it’s melted, then add the onion and saute until translucent but not browned, 5-7 minutes. Add in the sage and saute for 1 minute, then add the chicken stock and water. Meanwhile, scoop the seeds out of the butternut squash and discard them, and then scoop the flesh away from the skin of the squash and add to the stockpot along with (or after, if your timing is more like mine!) the stock and water. Also add the parmesan rind, if using. Bring to a boil, and then simmer for as long as you have time, but aim for at least 5-10 minutes to meld flavors.

4. Just before serving, remove the stockpot from the heat and puree the soup with an immersion blender or in batches in a traditional blender. Once the soup has been pureed, add the cream, but don’t allow the soup to boil again, in order to keep its creaminess. Adjust the seasoning, adding salt and pepper as needed.

5. For the croutons: Heat a skillet over medium-high heat, and add the butter once it’s heated. Allow the butter to fully melt, and then add the bread, sauteing for a a few minutes, until the bread is browned to your liking, about 5-7 minutes. Individually portion the soup, and then top with the croutons, grating the parmesan on top. Beautiful!

Maple Oat Scone

Maple Oat Scone

So, more renewed focus on whole grains in this house, but this time because of recent talk about diabetes, both in our family and in our culture. A bit of a downer. But, fantastically, there are so many great recipes out there that have pioneered modern baking with a more wholesome bent, and I’m making my own tweaks and turns to some favorites, and they are turning out great. I don’t think this is going to be much of a headache at all. Next project: to see if I can get the elementary school to stop handing out so much sugar . . . I’m aware this will be traveling down the path of most unpopular mom, but I think it’s worth a shot. In the meantime, my kids did not balk at all at this terrific scone that’s a little bit sweet and light. I’ve slightly changed this recipe from The New Best Recipe, by ATK.

Maple Oat Scones

1 1/2 c. old fashioned oats
1/4 c. whole milk
1/4 c. sour cream or cream
1 egg
3/4 c. unbleached all-purpose flour
3/4 c. whole wheat flour or spelt flour (or just use all-purpose if you want)
1/4 c. maple syrup
2 t. baking powder
1/2 t. table salt
10 T. unsalted butter, chilled and cut into 1/2 inch cubes
1/2 c. additional dried fruit or nut, if desired (apricots, raisins, currants, pecans)

1. Heat oven to 375 degrees. Spread the oats on a rimmed baking sheet and toast in oven for about 7-9 minutes. Cool on a wire rack, but reserve 2 T. for rolling the dough out (if doing). Increase oven to 450 degrees. [If you’re in a time crunch, don’t worry about this. It makes the flavor of the oats nuttier, but it’s not necessary.]

2. Line a baking sheet with parchment paper.

3. Whisk milk, sour cream, egg, and maple syrup together in a measuring cup.

4. Pulse the flour, sugar, baking powder, and salt in a food processor until combined. Add butter and pulse until the mixture looks like coarse cornmeal. [Or do this step by hand using a pastry blender, or even your fingers!]

5. Transfer the flour mixture to a medium bowl and stir in the cooled oats. Then, with a spatula, fold in 3/4 of the liquid ingredients. Gently the dough by hand until everything comes together, adding more liquid as needed to not have any dry bits at the bottom of the bowl.

6. Dust the work surface with a tablespoon of the reserved oats. Add the dough. Then dust the top with the remaining one tablespoon of oats. Pat into a 7-inch circle about one inch thick. Using a bench scraper cut dough into eight wedges. Set on a baking sheet lined with parchment paper. Or, use a tablespoon scoop, and simply scoop the scones onto the sheet, flattening a bit for a wider shape.

6.  Bake for about 12-14 minutes. Let cool, and if desired, make a simple glaze of 3 T. maple and 1/3 c. powdered sugar to drizzle over the top.

Balsamic Bread Salad

Tomato Bread Salad
This salad started as a riff on a date salad from the great cookbook Jerusalem, but has become a nightly addition to the dinner table for the last two weeks. My husband and I surprised ourselves by eating an entire large bowl full the first night I made it, and he told me at the end of the meal, “why don’t we just have this for dinner every night?” So, we kind-of have, at least for now. It’s simple and versatile and comes together in a matter of minutes–just how I want a green salad to be.

Balsamic Bread Salad

1 head of lettuce, either Romaine or buttercrunch work nicely
12 or so cherry tomatoes, sliced thinly
about 1/2 c. crumbled goat cheese (feta works nicely)
2-3 slices of day-old country bread, or broken pitas, or whatever other bread you have
2 T. olive oil
2 T. butter
2 cloves of garlic, finely minced (optional)
a few splashes of balsamic vinegar
a handful of nuts (pine nuts or sliced almonds)
a handful of shredded basil leaves would be delicious, too

Wash and tear your lettuce to the size you like (I tear small because I think it’s more enjoyable to eat it that way). Place in a medium-sized bowl, adding the cherry tomatoes, and then salt and pepper it all reasonably. Sprinkle the cheese on top.

Heat a skillet over medium to medium-high, then add the butter and oil until melted. Add the garlic and saute for 30 seconds, then add the bread and nuts, if using, and cook, stirring continually, until browned to your liking. Remove from heat and set aside to cool slightly.

Once the bread and nuts have cooled, add to the salad. Splash with balsamic vinegar and some more salt and pepper. Serve immediately, before the bread gets soggy, adding a little more oil, if desired.

Chocolate Coconut Bread

Choc Coconut Bread2I know the title of this recipe sounds so ho-hum, but I think this recipe was given as a heavenly gift to us all. I have had to restrain myself from making it every single night (which is partly because of Katie Couric’s documentary about childhood obesity in America, Fed Up. Very good information. Glad I watched it. Can’t wait till my ten-day sugar fast is over, because I will be making this the first minute I can!) I usually stir this together right before bed and bake it in the morning (the weekend is a perfect time for this, of course), and then eat it all day long. My favorite story about this bread: I gave a loaf to my aunt, and she had a polite amount after dinner, and we left. Later that week, she told me she had woken up at 3:30 a.m. the next morning and thought, “is it irrational to get out of bed at this hour to go have another slice of this bread?” and decided it was. She went back to sleep, and then at 6:30 decided it was acceptable behavior to get out of bed. For bread. I love it. This recipe comes from Jim Lahey’s My Bread (thank you, thank you!).

Chocolate Coconut Bread

2 c. plus 2 T.  (280 grams) bread flour
2 c., loosely packed (100 grams)  large flake unsweetened coconut [I actually prefer the smallest shred possible. It disappears in the bread but gives it great chew.]
1 c. (150 grams) bittersweet chocolate chunks
3/4 t. (4 grams) salt
1/4 t. instant yeast or 1/2 c. sourdough starter
1 1/4 c. (280 grams) room temperature water

  1. [The night before you bake] In a medium bowl, stir together the flour, half of the coconut, the chocolate, salt, and yeast [If you use the smallest shred coconut, you can add it all at once, which I prefer]. Add the water and, using a wooden spoon or your hand, mix until you have a wet, sticky dough, about 30 seconds. Cover the bowl and let sit at room temperature until the surface is puffy and the dough is more than doubled in size, 12 to 18 hours.
  2. When the first rise is complete, generously dust a work surface with flour. Use a bowl scraper or rubber spatula to scrape the dough out of the bowl in one piece.  Using lightly floured hands or a bowl scraper or spatula, lift the edges of the dough in toward the center. Nudge and tuck in the edges of the dough to make it round.
  3. Place a tea towel surface and generously dust it with wheat bran or flour. Gently place the dough on the towel, seam side down. If the dough is tacky, dust the top lightly with wheat bran, cornmeal or flour. Lightly sprinkle the surface with the remaining ½ cup coconut. Fold the ends of the tea towel loosely over the dough to cover it and place in a warm, draft-free spot to rise for 1 to 2 hours. The dough is ready when it is almost doubled. If you gently poke it with your finger, it should hold the impression. If it springs back, let it rise for another 15 minutes.
  4. Half an hour before the end of the second rise, preheat the oven to 475 degrees F, with a rack in the lower third, and place a covered 4 ½ -to 5 ½ -quart heavy pot in the center of the rack.
  5. Using pot holders, carefully remove the preheated pot from the oven and uncover it. Unfold the tea towel and quickly but gently invert the dough into the pot, seam side up.  Cover the pot and bake for 40 minutes.
  6. Remove the lid and continue baking until the bread is a deep chestnut color but not burnt, 20 to 25 minutes more.
  7. Use a heatproof spatula or pot holders to carefully lift the bread out of the pot and place it on a rack to cool thoroughly.

Two Summery, Kid-Friendly Drinks

Brazilian Lemonade
With warm weather, it makes a little more sense to have an after-school drink rather than an after school snack, and these two were big hits this last week! These drinks were also the result of buying a huge bag of limes and lemons from Costco, and feeling like I shouldn’t make them all into curd 🙂

Strawberry Lime Slushie

3 c. frozen strawberries
2 c. club soda
3 limes, juiced

Blend these three together. The club soda gives a little kick, but you could replace it for water or milk or lime soda, if desired. If you want even more lime flavor, zest the limes before juicing them.

Brazilian Lemonade or Limeade
pictured above

4 c. ice
1 can sweetened condensed milk
1 whole lemon (or lime), cut into quarters (omit if you don’t like pulp, or just use the zest)
1 1/4 c.  fresh lemon or lime juice (or substitute with Real Lemon or concentrate)
1/4-1/2 c. sugar
4-5 c. water

The bigger the blender, the easier!

Unfortunately, I had to blend this drink in 3 batches:
Batch 1: sweetened condensed milk, 2 c. ice, 1/2 c. lemon juice, 2 c. water

Batch 2: another 1/2 c. lemon juice, 2 c. ice, 2 c. water

Batch 3: whole lemon, 1/4-1/2 c. sugar, 1/2 c. water

Blend together in a large pitcher. If not using immediately, make sure to stir before serving.