2011 in review

The WordPress.com stats helper monkeys prepared a 2011 annual report for this blog.

Here’s an excerpt:

The concert hall at the Syndey Opera House holds 2,700 people. This blog was viewed about 16,000 times in 2011. If it were a concert at Sydney Opera House, it would take about 6 sold-out performances for that many people to see it.

Click here to see the complete report.

White Christmas Dream Drops

christmas-dream-drops
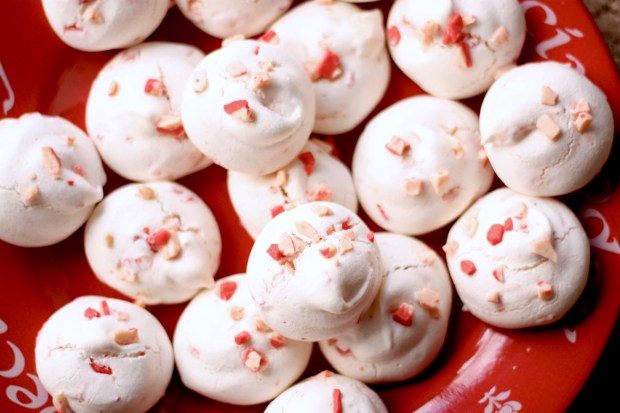
I tried a bunch of new recipes this year for Christmas, and even though I’m not a huge fan of meringues, I really loved this recipe. It was unique, beautiful, and tastes great, so I’ll definitely repeat. I also was surprised at how much my kids loved them! This recipe comes from Sunset Magazine’s December 2011 issue.

White Christmas Dream Drops

  • 2 large egg whites, at room temperature
  • 1/8 teaspoon cream of tartar
  • 1/2 teaspoon vanilla extract
  • 1/8 teaspoon salt
  • 3/4 cup sugar
  • 1 cup white chocolate chips
  • 1/3 cup plus 1 1/2 tbsp. coarsely crushed peppermint candies
  1. 1. Preheat oven to 250°. Beat egg whites and cream of tartar in a deep bowl with a mixer, using whisk attachment if you have one, just until soft peaks form. Add vanilla and salt. With motor running and mixer on high speed, pour in 1 tbsp. sugar and beat 10 to 15 seconds, then repeat until all sugar has been added. Scrape inside of bowl and beat another 15 seconds. At this point, meringue should form straight peaks when beaters are lifted. Fold in chocolate chips and 1/3 cup candies with a flexible spatula.
  2. 2. Line 2 baking sheets with parchment paper, using a bit of meringue at corners as glue. Using a soup spoon, drop meringue in rounded 1-tbsp. portions slightly apart onto sheets, scraping off with another spoon. Sprinkle with remaining 1 1/2 tbsp. candies.
  3. 3. Bake until meringues feel dry and set when touched but are still pale, 30 to 35 minutes, switching pan positions halfway through. Turn off oven, open door, and let cookies stand about 10 minutes. Let cool on pans.
  4. Make ahead: Up to 2 days, stored airtight.

My Favorite Caramel (especially for Christmas)

My friend Amy put me on to a recipe book named Caramel by Peggy Cullen years ago, and I still think her caramel recipe is my favorite, despite all the others I’ve   tried. If you are as careful as the recipe tells you to be, the recipe turns out perfectly. This is definitely one of my favorite all-time recipes. The caramels are easy to cut (well, as easy as caramel can be), and the flavor is fantastic. I usually make the vanilla bean and honey variation, because it’s my favorite, and my friends who don’t care much for honey have still loved them (the honey flavor isn’t overbearing at all).  I allow these caramels to cool in my bread pans lined with Reynolds Release foil (a gem for caramels!) and then slice and wrap the next day. Beautiful! Please note, if making this recipe above sea level, adjust the temperature accordingly: 2 degrees lower for every 1000 feet above sea level you are cooking at. So, for Provo, decrease the temperature by 9 degrees in all instances when measuring the candy. Also, it’s a good idea to have everything prepped before starting (cans opened, ingredients measured), and you will probably be standing over the stove for about 45-60 minutes. Incidentally, I’ve passed these out at Christmas, plain, but I’ve also dipped them for Valentines or other holidays. Always terrific.

Classic Cream Caramels or Honey Vanilla Bean Caramels

2 c. sugar
1/2 c water
1 1/2  c. light corn syrup (or 1 c. corn syrup and 1/2 c. honey)
1/2 t. salt
1/2 c. unsalted butter, cut into pieces
2 c. heavy cream
1 c. sweetened condensed milk
1 T. pure vanilla (plus vanilla seeds scraped from a pod, if doing the variation)
(2 c. lightly toasted walnuts, chopped, optional, but good with the honey/vanilla bean variation)

Line a 9-inch square pan with aluminum foil so that the edges of the foil are overhanging; press the foil snugly into the corners of the pan (I’m telling you, get Reynold’ Release!). Lightly butter the foil (not necessary with the Release). Set the prepared pan on a cooling rack. Place a nonbreakable glass of water next to the stove for storing the pastry brush and wooden spatula when not in use.

In a 3-1/2 or 4-quart saucepan, gently stir the sugar, water, corn syrup, and salt together (and honey, if using). Wash down the sides of the pan with a wet pastry brush. Over medium-high heat, bring the syrup to a boil. Insert a candy thermometer and boil, undisturbed, until the temperature reaches 250 degrees, about seven minutes. Wash down the sides of the pan and add the butter. Once it melts, gradually stir in 1 cup of the heavy cream; bring to a boil. In about five minutes, when the level of liquid reduces somewhat, gradually stir in the remaining 1 cup cream. Continue to boil, stirring occasionally with a figure-8 motion, until the temperature reaches 250 degrees, about 7 minutes.

Remove the pan from the hat and stir in the condensed milk. Return the pan to the heat. Stirring constantly with a figure-8 motion, boil until the temperature reaches 244 degrees (or 245, if using honey), about 4 minutes. Immediately remove from the heat and continue to stir for 1 minute. Stir in the vanilla (and vanilla seeds, if using). Pour the caramel into the prepared pan without scraping the saucepan.

Let the caramel cool and sit undisturbed, for at least 8 hours or as long as overnight; do not cover. Turn the caramel out onto a piece of waxed or parchment paper and peel off the foil. Using a large sharp knife, cut the slab into quarters. Cut each quarter into four 1×4″ bars or 16- 1″ squares (or whatever). The caramel can be wrapped and stored at room temperature for 3 weeks.

Mama’s Sweet Potatoes

In 2002, for my first Thanksgiving in Massachusetts, I made this recipe for a group potluck and the Legend of the Sweet Potatoes has followed me ever since.  By popular demand, I submitted the recipe to our church cookbook, and I just got a request from another friend to please send her the recipe.  So I thought I would post it here for posterity.

As a little background, I’m 3/4 Southern.  Which means sweet potatoes are very important to my family.  Also, pecans.  My mom invented this sweet potato recipe when I was in junior high and we were trying to eat less refined sugar.  While this isn’t healthy, per se, you can feel a little better about eating this than the sugar-filled, marshmallow-topped version.  Personally, I like my mom’s version better.

Sweet Potatoes

2 large cans sweet potatoes (or 3-4 medium size fresh sweet potatoes, baked in the oven or microwave until soft)
1/4 C. butter
1 tsp. vanilla
2 eggs
1/2 tsp. grated orange peel
1/2 tsp. salt
3/4 tsp. cinnamon
1/4 C. apple cider or 1 tsp. apple juice concentrate
1/4 C. water

Blend everything together and spread into 9×13 glass baking pan.

Topping (as a confession, sometimes I double the topping)

1/3 C. flour
1/3 C. turbinado sugar (Sugar in the Raw)
1/2 C. chopped pecans
1/4 tsp. cinnamon
1/4 C. butter

Mix topping ingredients together and sprinkle evenly over sweet potatoes. Bake at 350 for 20-30 minutes, or until sweet potatoes are bubbling around the edges.

Sesame-Lemon Cucumber Salad

Cucumber sesame saladI’ve been trying to find a recipe for a cucumber salad that is reminiscent of Asian cucumbers salads I’ve had at restaurants, and this is it. It’s not too sweet, and the sesame flavors really shine through. It also comes together easily. It comes from the Best American Side Dishes (America’s Test Kitchen), and makes great use of cucumbers, if you have a prolific plant. Note that you have to drain the cucumbers before making the salad, so start this dish at least 70 minutes before serving. Or, just start it at the beginning of your meal prep and let it rest however long you have time!

Sesame-Lemon Cucumber Salad

3 medium cucumbers, peeled, seeded, sliced, salted, and drained (See instructions below)
1 T. salt (used to drain the cucumbers)
1/4  c. rice vinegar
1 T. juice from 1 lemon
2 T. toasted sesame oil
2 t. sugar
1/8 t. dried red pepper flakes plus more to taste
1 T. sesame seeds, toasted in a small dry skillet over medium heat until fragrant, about 4 minutes.

1. DRAIN CUCUMBERS: Peel each cucumber and halve lengthwise. Use a small spoon to remove the seeds and surrounding liquid from each cucumber half. Place the cucumber halves flat-side down on a work surface and slice them on the diagonal into 1/4-inch-thick pieces. Toss the cucumbers and salt (1 T.) in a colander set in a bowl. Place a gallon-size zipper-lock plastic bag filled with water on top of the cucumbers to weigh them down and force out the liquid. Drain for at least an hour, and up to 3 hours.

2. Whisk all of the ingredients except the cucumbers in a medium bowl. Add the drained cucumbers; toss to coat. Serve chilled or at room temperature.

Cornmeal Waffles

I’ve been using a waffle recipe from Cook’s Country for the last few months, but last week, I pulled out this one from Martha’s Living Cookbook, and the family loved it. In fact, even my pretty-undiscerning-8-year-old thought they were the best he’d ever had. And I thought they were great, too. They are crisp and light, a little buttery, but not too much. I didn’t make the apricot-cherry compote, but I did heat some frozen peaches and blackberries, which were terrific, too. I also didn’t do creme fraiche; instead, I whipped some cream and added maple syrup to sweeten it. Anyway, here’s a great new waffle to try. This recipe made about 8 waffles in my waffle maker.

Cornmeal Waffles

  • 8 ounces creme fraiche
  • 1/4 cup confectioners’ sugar
  • 1 1/4 cups all-purpose flour
  • 3/4 cup coarse yellow cornmeal
  • 3 tablespoons plus 1 teaspoon granulated sugar
  • 4 teaspoons baking powder
  • 1 teaspoon salt
  • 2 large eggs
  • 1 1/2 cups low-fat buttermilk
  • 1/2 teaspoon pure vanilla extract
  • 1/3 cup vegetable oil
  • 5 tablespoons unsalted butter, melted
  • Apricot-Cherry Compote
  1. Whisk together creme fraiche and confectioners’ sugar in a small bowl. Refrigerate until ready to use (up to overnight).
  2. Whisk together flour, cornmeal, granulated sugar, baking powder, and salt in a large bowl. Whisk eggs, buttermilk, and vanilla in a small bowl. Add egg mixture to flour mixture; stir until combined. Add oil and butter; whisk until smooth.
  3. Heat a waffle iron (preferably Belgian-style). Ladle 1/2 cup batter into each mold. Cook according to manufacturer’s instructions until golden brown. Place waffles in a 200-degree oven to keep warm while you make the rest. Serve topped with compote and sweetened creme fraiche.

Hot Fudge Pudding Cake

hot-fudge-pudding-cake

I admit that I made this recipe two nights in a row last week, and it was gone before I could take a picture. This recipe whips together in about 10-15 minutes, and then comes out of the oven quite heavenly–like a brownie, but up a notch. We served it with whipped cream and vanilla ice cream, and both went well with it. I love how rich and dark and gooey it is. Hmmm. Maybe I’ll make it again today. This comes from Cook’s Illustrated Fall 2010 Entertaining.

Hot Fudge Pudding Cake

1 c. sugar
1/2 c. Dutch-processed cocoa powder
1 c. unbleached all-purpose flour
2 t. baking powder
1/4 t. salt
1/2 c. milk
4 T. unsalted butter, melted
1 large egg yolk
2 t. vanilla extract
1/2 c. semisweet chocolate chips
1 c. boiling water

1. Adjust oven rack to middle position and heat to 350 degree. Spray 8-inch square glass or metal cake pan with nonstick cooking spray. Whisk 1/2 c. sugar with 1/2 c. cocoa in a small bowl.

2. Whisk flour, remaining 1/2 c. sugar, remaining 1/4 c. cocoa, baking powder, and salt in large bowl. Whisk milk, butter, egg yolk, and vanilla in a medium bowl until smooth. Stir milk mixture into flour mixture until just combined. Fold in chocolate chips (Batter will be stiff).

3. Using rubber spatula, scrape batter into prepared pan and spread into corners. Sprinkle reserved coca mixture evenly over top. Gently pour boiling water over cocoa. Do not stir.

4. Bake until top of cake looks cracked, sauce is bubbling, and toothpick inserted into cakey area comes out with moist crumbs attached,  about 25 minutes (do not overbake or the cake will be dry. Better underdone than over). Cool on rack for a least 10 minutes before serving. To serve, scoop portions of warm cake into individual serving bowls and top with vanilla ice cream or whipped cream. Enjoy!!

Masaman Curry

I’ve been meaning to post this recipe for a long time. It seems funny that I’m getting to it Thanksgiving Week, but it’s worth having around any time of the year. We inhale this recipe. I find the tamarind liquid at a local Asian Market on 300 S. in Provo, but I would guess many Asian markets would carry it. Fish sauce, coconut milk, and masaman curry paste can also be found at local markets, or even most grocery stores (I found that Sunflower Market has good prices on these items here). Anyway, if you still have carrots, potatoes, and even turkey (even though it calls for chicken or beef) after Thursday, this recipe is a great use! This recipe comes from a collection of recipes from the Thai Market I go to, just like the peanut sauce recipe. I serve it with sticky rice or jasmine rice. This recipe serves 6 people.

Masaman Curry

2 T. vegetable oil
1 can coconut milk (20 oz)
3 T. fish sauce
3 1/2 T. sugar
1/3 c. roasted peanuts or cashews
2 carrots, peeled and cut into 1″ long pieces (I cut on the bias)
3 T. masaman curry paste (I get Mae Ploy, and it’s not spicy at all)
1-1 1/2 lbs. chicken or beef, cut into 1″pieces
2 T. tamarind liquid
2-3 medium size potatoes (cut into about 1″ cubes)

1. Heat a dutch oven (or large saucepan) over medium-high heat. Add vegetable oil, let it heat 1-2 minutes, and then add curry paste and stir fry for 2-3 minutes.

2. Add 1/3 of the can of coconut milk, and stir fry for 4-5 more minutes, until red bubbles rise to the surface.

3. Add chicken or beef, and stir fry for 5-8 more minutes.

4. Add the remainder of the coconut milk to the pan, and then fill the milk can up 3/4 full with water, and also add the water to the pot.

5. If using chicken, add the potatoes and carrots at this point. If you’re using beef, simmer the beef for 30 minutes, or until it’s tender, then add the potatoes and carrots.

6. Add fish sauce, sugar, tamarind liquid, and roasted peanuts/cashews. Bring to a boil, and then reduce the heat and simmer for 30 minutes. After the curry simmers, if it’s too thick, add a little water. If it’s too runny, continue to simmer until it thickens. Serve over rice.

You can make this recipe in advance; the flavors continue to meld, even in the fridge, and taste great the next day as well.

Pumpkin Doughnut Muffins

Pumpkin Doughnut 2Another great autumnal recipe for those of us who can’t get enough pumpkin. This recipe comes from November 2010 Everyday Food. I prefer making it in mini muffin tins, because they are pretty rich, and so good.

Pumpkin Doughnut Muffins

10 T. (1 1/4 sticks) unsalted butter, room temperature, plus more for pan
3 c. all-purpose flour (spooned and leveled), plus more for pan
2 1/2 t. baking powder
1/4 t. baking soda
1 t. coarse salt
1/2 t. ground nutmeg
1/4 t. ground allspice
1/3 c. buttermilk
1 1/4 c. pure pumpkin puree (from a 15-ounce can)
3/4 c. light brown sugar
2 large eggs

For the sugar coating
3/4 c. granulated sugar
2 1/2 t. ground cinnamon
1/4 c. (1/2 stick) unsalted butter, melted

Preheat oven to 350 degrees. Butter and flour 12 standard muffin cups. Make batter: In a medium bowl, whisk together flour, baking powder, baking soda, salt, nutmeg, and allspice. In a small bowl, whisk together buttermilk and pumpkin puree. In a large bowl, using an electric mixer, beat butter and brown sugar until light and fluffy. Beat in eggs, one at a time, scraping down bowl as needed. With mixer on low, add flour mixture in three additions, alternating with two additions pumpkin mixture, and beat to combine.

Spoon 1/3 cup batter into each muffin cup and bake until a toothpick inserted in center of a muffin comes out clean, 30 minutes. Meanwhile, in a medium bowl, combine granulated sugar and cinnamon. Let muffins cool 10 minutes in pan on a wire rack. Working with one at a time, remove muffins from pan, brush all over with butter, then toss to coat in sugar mixture. Let muffins cool completely on a wire rack.

Halloween Whoopie Pies

I started making this recipe in February this year, and it’s great. I went ahead last week and outfitted them like Martha does in October 2008’s

This picture turned out quite dramatic, I'd say . . .

Everyday Food (orange nonpareils in the middle), but it’s unnecessary. Just cute. I love the applesauce in the recipe. In fact, this last time, I cored and then blended up some ripe pears I had on hand instead, and it was also great. So, here’s another fun Halloween idea–it’s also great for bake sales!

Halloween Whoopie Pies

  • 1 1/2 cups all-purpose flour, (spooned and leveled)
  • 1/2 cup unsweetened cocoa powder (spooned and leveled)
  • 1 teaspoon baking soda
  • 1 teaspoon baking powder
  • 1 teaspoon salt
  • 1 cup (2 sticks) unsalted butter, room temperature
  • 1 cup packed light-brown sugar
  • 1 large egg
  • 1 cup unsweetened applesauce
  • 1/2 teaspoon pure vanilla extract
  • 1 cup confectioners’ sugar
  • Orange nonpareils or sanding sugar, for decoration
  1. Preheat oven to 375 degrees. In a medium bowl, whisk flour, cocoa, baking soda, baking powder, and salt; set aside.
  2. In a large bowl, using an electric mixer, beat 1/2 cup butter and brown sugar until light and fluffy. Add egg; beat until smooth. With mixer on low, alternately add flour mixture and applesauce, beginning and ending with flour mixture. Mix just until smooth (do not overmix).
  3. Drop dough by heaping tablespoons, 2 inches apart, onto two baking sheets. Bake until a toothpick inserted in the center of a cookie comes out clean, 10 to 14 minutes. With a thin metal spatula, immediately transfer cookies to a wire rack; let cool completely.
  4. Meanwhile, make filling: In a large bowl, using an electric mixer, beat vanilla and remaining 1/2 cup butter until light and fluffy. Gradually add confectioners sugar, beating until smooth.
  5. Spread bottom of half the cookies with 1 tablespoon filling each; sandwich with remaining cookies, pressing gently so filling oozes out slightly. Sprinkle exposed filling with nonpareils. Let rest 15 minutes to set.