Crazy Good Falafel

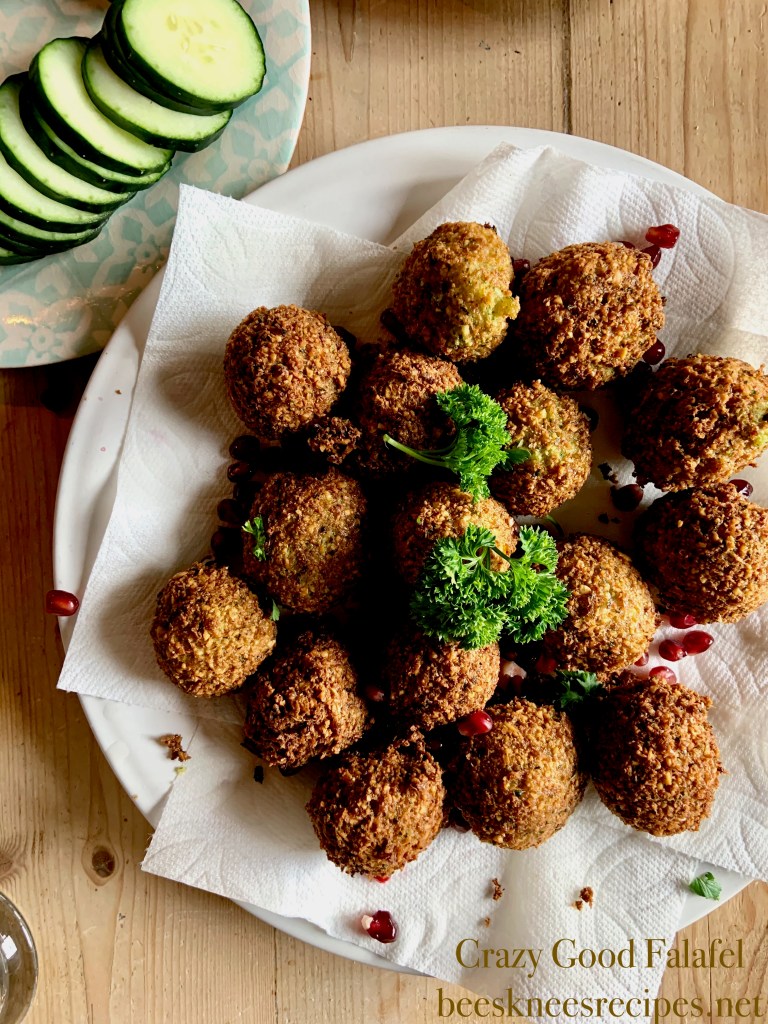
I haven’t made falafel in years, because I just knew my kids would turn their noses up at it, but then we had a great experience at a Shawarma cafe while we were abroad last summer, and suddenly they were open to it. Okay, I think they were more into the chicken than the falafel, but at least they tried it (and I remembered that they liked it. They contested that when they saw these on the table.) At any rate, I had thought we had turned a new leaf and I was delighted. So, with the little extra time I can devote to actually soaking beans and the like, I pulled out my old recipe, rearing up to make it, when I thought to compare it to a new recipe from Bowls of Plenty from Carolynn Carreno. This new recipe was very similar to my old favorite, but included sparkling water, and knowing how much better tempura and onion rings are with sparkling water, I thought it was genius. And, it is. So, here’s crazy good falafel for you. So good, in fact, my fourteen-year-old not only requested it for her birthday, but also for dinner every night of the week. Enjoy.
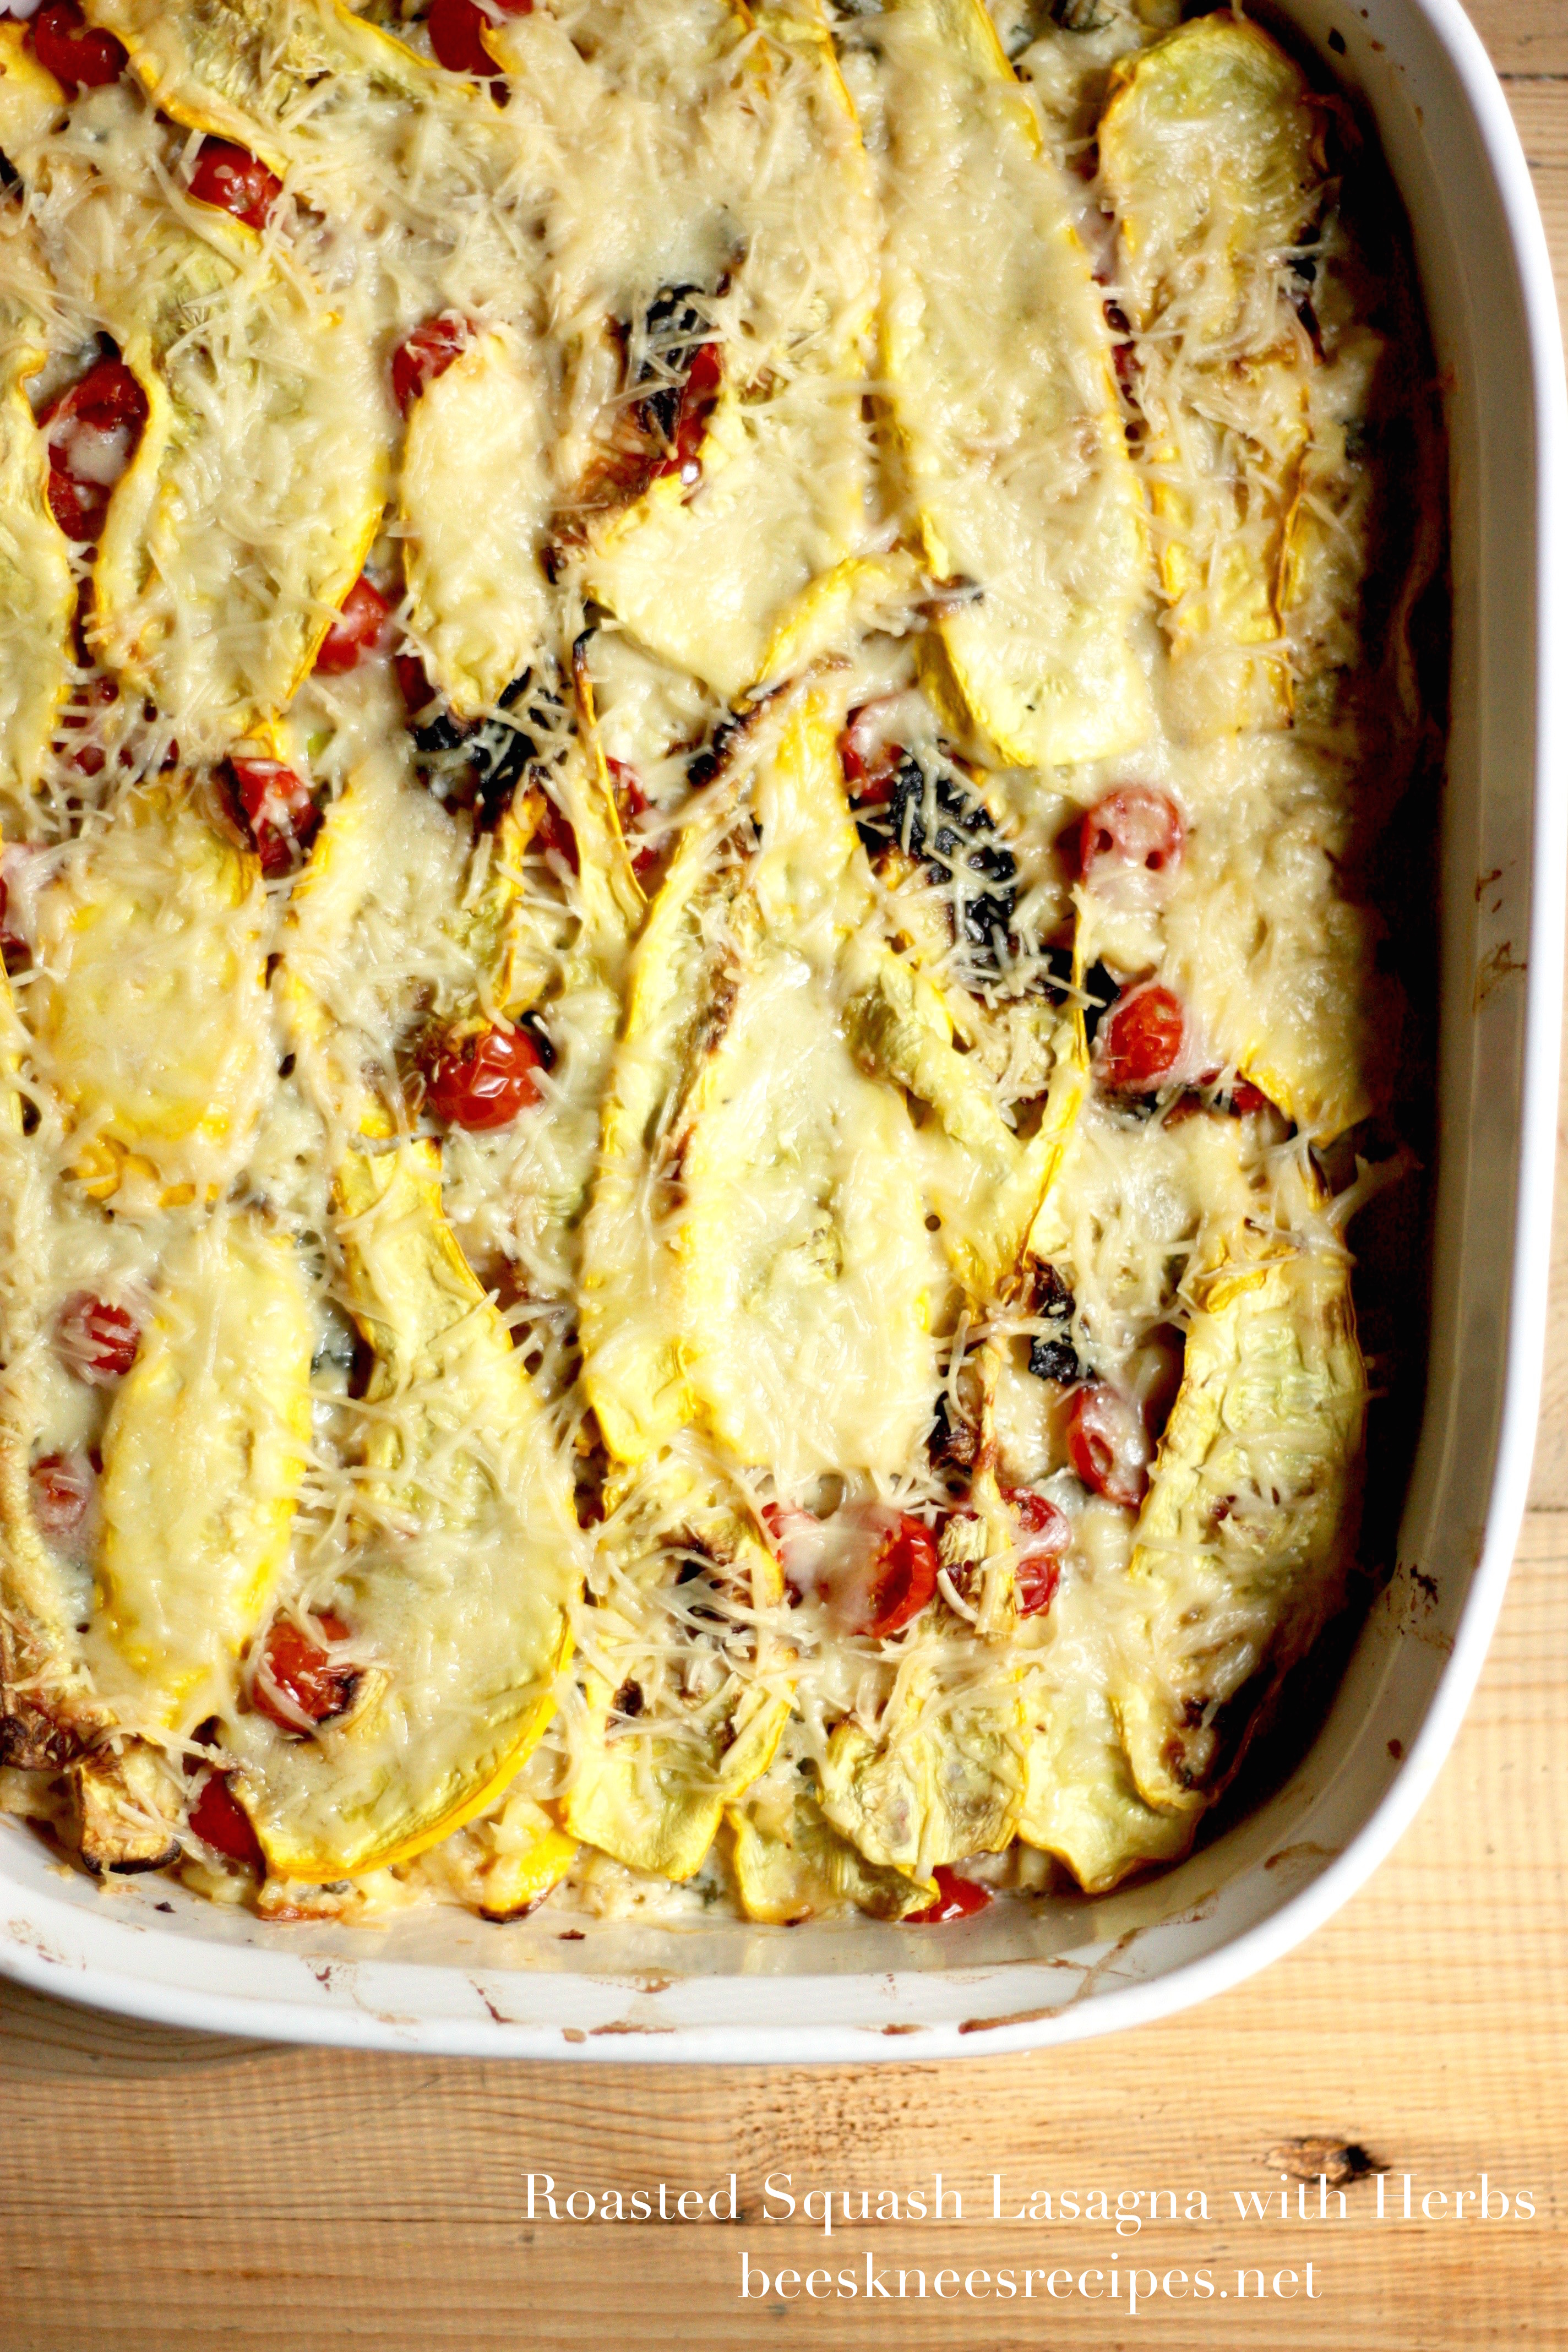
Crazy Good Falafel

FOR THE FALAFEL
½ lb. (1 cup) dried chickpeas, soaked overnight and drained
½ small Spanish yellow onion, coarsely chopped
4 garlic cloves
¼ c. fresh parsley
2 T. fresh cilantro
1 T. kosher salt, plus more as needed
½ t. ground cumin
½ t. ground coriander
¼ t. freshly ground black pepper
1⁄8 t. ground cardamom (optional; if you have it, use it)
½ c. sparkling mineral water
½ t. baking soda
2 to 3 c. canola oil (or another neutral- flavored oil), or as needed, for frying [I used peanut oil and thought it was quite delicious!]

1) To prepare the falafel, combine the chickpeas, onion, garlic, parsley, cilantro, salt, cumin, coriander, pepper and cardamom (if you’re using it) in a food processor and pulse until the chickpeas are finely ground. Turn the mixture out into a bowl and stir in the mineral water and baking soda. Cover the bowl and refrigerate for 1 hour to soften the ground chickpeas.

2) Pour 3 to 4 inches of canola oil into a small saucepan. Fasten a candy or deep-fry thermometer to the side of the saucepan or drop in an unpopped kernel of popcorn into the oil. Heat the oil over medium-high heat until the thermometer registers 350° F or the kernel pops. Remove the popcorn kernel if you used it. (I learned this trick from the venerable cooking magazine Cooks Illustrated, a great magazine if you want to learn to be a better or more knowledgeable cook.)

3) While the oil is heating, give the falafel mixture a good stir and scoop it into 1-ounce (2-tablespoon) portions; roll into balls, and put the balls on a baking sheet or plate. The mixture is very wet and can be awkward to work with; the moisture is what makes the falafels as light as they are. Carefully drop the balls in the oil, adding only as many as will fit in a single layer, and fry them for 1 to 2 minutes, until they are golden brown and crispy, turning them as they cook so they brown evenly. Using a slotted spoon or strainer, transfer the falafel to paper towels to drain, and sprinkle with salt. Fry the rest of the falafel. Enjoy with hummus, cut veggies, or in a pita. I loved adding some pomegranate seeds as well!

Advertisement

Pear, Fig & Onion Quiche

IMG_2328

It’s been such a busy month, I haven’t had a second to breathe! Finally, though, middle school, elementary school, and now preschool have started, and I’m back to teaching at the university as well. That doesn’t sound like things are going to get less hectic! However, at least now there’s more of an enforced bedtime around here, and a chance to sit and look over what I’ve been wanting to post.

This recipe was an easy favorite of the last few weeks. I made it for a shower of a dear friend; it sounded like the perfect shower food, and perhaps a little too indulgent for just a weeknight meal. The recipe comes from Lebovitz’s My Paris Kitchen cookbook, but he titles it Pear and Blue Cheese Quiche. The blue cheese flavor was soooo mild, though, that I hardly think we need to mention it in the title, since it will turn away all those who think they hate the stuff, when they probably won’t be aware that it’s in there if they try it. So, I’ve retitled, and also added figs, simply because I could get them, and I don’t know of anything prettier on the top of a festive summer food.

Pear, fig & onion Quiche

Crust
1 c. (140g) all-purpose flour
1/3 c. (55g) cornmeal
1/2 t. sea salt or kosher salt
8 T. (4 ounces/115g) unsalted butter, cubed and chilled
1 large egg

Filling
1 T. olive oil
6 shallots, peeled and thinly sliced (I used two small red onions, hence the name!)
Sea salt and freshly ground black pepper
1 large, firm, ripe pear, peeled and diced into 1/2-inch (1.5cm) cubes
1 c. (130g) diced cooked (boiled) ham (or bacon, or omit for vegetarian)
1 1/2 c. (375ml) heavy cream or half-and-half
8 oz. (225g) cream cheese
Freshly grated nutmeg
4 large eggs
2 egg yolks
1 1/2 c. (150g) crumbled blue cheese or Roquefort (or goat cheese)
2 T. minced fresh flat-leaf parsley
1 T. fresh thyme (my addition)
2 fresh figs, sliced, for decoration (also my addition)

  1. To make the crust, in the bowl of a stand mixer fitted with the paddle attachment (or in a bowl, by hand with a pastry blender), combine the flour, cornmeal, and salt. Add the butter and beat on low speed until the butter is broken up and the mixture is sandy. Add the egg and mix until the dough begins to clump and come together. Use your hands to gather the dough and shape it into a disk. Wrap it in plastic and chill for at least 30 minutes. (The dough can be made up to 2 days in advance.)
  2. Roll out the chilled dough on a lightly floured surface until it’s 14 inches (35cm) across. Wrap aluminum foil around the outside of a 9- to 10-inch (23 to 25cm) springform pan to catch any leaks, and then transfer the dough to the pan. Press the dough against the side, allowing it to come a bit more than halfway up the sides of the pan. If there are any cracks, patch them with a bit of dough from the edges—you don’t want the filling to leak out during baking. Chill the dough in the pan while you make the filling.
  3. Preheat the oven to 375°F (190°C).
  4. To make the filling, heat the oil in a skillet over medium heat and cook the shallots with some salt and pepper until soft and translucent, 3 to 5 minutes. Remove from the heat and stir in the diced pear and ham.
  5. In a large bowl, blend together the cream, cream cheese, a few gratings of nutmeg, the eggs, and the yolks until smooth. Stir in the blue cheese, the pear and ham mixture, and the parsley and thyme.
  6. Set the springform pan on a rimmed baking sheet and pour in the filling, using a spoon to make sure the ingredients in the filling are evenly distributed. Please figs in a pattern on top, if using. Bake the tart for 45 to 50 minutes, until the top is lightly browned, the filling still jiggles, and a toothpick inserted into the center comes out clean. Let cool until firm enough to slice, then serve warm or at room temperature.

    Pear Fig Quiche

Honeyed Apricot Flatbread with Rosemary

Apricot Flatbread 2

It’s truly summer. Lots of time away, running our five kids to swim, play, hike, visit cousins and squeezing in a vacation or two. So, I’m missing my normal kitchen time just a little. As part of my hopes to reconnect (with my kitchen), I started a sponge for ciabatta last night. Unfortunately, I was thinking about the timing today very well, and since we had a crazy day of violin lessons, meeting with middle school counselors, celebrating the birth of my cousin’s baby, and swimming, there was no chance for the ciabatta to become ciabatta. So, instead, I turned it into flatbreads to serve along with a fresh tomato soup, and then starting digging through the fridge for toppings. I did a couple with cheese and pepperoni for the kids, two with fresh figs and goat cheese, and then I tried something new, needing to use all the apricots on my counter (obviously, I just used a couple, but the rest are now happily stored in my freezer). I think I will do this one again, perhaps with plums or peaches next time. This idea is a riff from a memorable appetizer in Lisbon many years ago where I had the marriage of honey and rosemary and cheese for the first time. Still beloved!  So, here’s a little idea, if you need one, for a fun, and a little bit sweet, summer meal.

Honeyed Apricot Flatbread with Rosemary

pizza dough (any kind, but here’s my favorite)
1/2 c. ricotta cheese
4-5 fresh apricots (or peaches or plums), sliced in half and pitted
2 T. honey
a handful of rosemary

Preheat oven to 475 degrees, with a pizza stone, if you have one placed in the lower half of the oven.

After the pizza dough has had its final rise, shape it by stretching into a circle or oblong and place on parchment paper. Top with ricotta, dolloping it and then lightly spreading it. Then, place apricots on top, with the skins on the bottom. Drizzle honey over the entire flatbread, then sprinkle rosemary and a little bit of salt.

Using a pizza peel, place the flatbread on the pizza stone. Bake for 6-8 minutes, or until browned on top and bottom. Remove to a rack to let it cool for at least ten minutes before serving.

Apricot Flatbread 1

Cumin-Infused Black Beans

Black Beans

Fantastic photo by Melissa Gallup

These simple black beans are just delicious! They are the perfect backdrop to a taco or burrito, or on a southwest salad, or just a delicious side dish. In fact, we’ve had these three times in the past week, and I’m beginning to be a big believer in having some beans in the fridge at all times since they are the perfect thing when you’re incredibly hungry. I used these as well for my Cinco de Mayo menu.

As I came to write down the recipe, I realized that you will have to pardon the approximations below. I know I’ll have to do specific measurements next time I make these, but it’s just more fun to throw the seasonings in the pan! Also, did you know that you don’t need to presoak black beans? If you have a little time, just throw them in a pot with 1″ water covering them, add a bay leaf and a pinch of baking soda (it preserves their color a bit), bring to a boil and then simmer for about an hour with a lid partially covering the pot. So much more efficient and cost-effective than canned (even though I sometimes still don’t get around to doing it!).

Also, note the maybe-unconventional suggestion of using the canning liquid from the canned beans. I took this idea from the book The Food Lab where the author suggests that using this liquid increases the flavor in your dishes exponentially (okay, maybe he didn’t exactly say “exponentially,” but something like that). I’ve been really pleased with the results, even though I am fully aware that this liquid looks a little like something we should not ingest. If you’re uncomfortable with the idea, feel free to use chicken broth or just water, but you may be as much of a fan of this idea as I am!

Cumin-Infused Black Beans

2 T. vegetable oil
1 onion, diced small
2 cloves of garlic, minced
3 c. cooked black beans, either from dried (see note above and reserve 1 c. cooking liquid) or from 2 cans, with canning liquid
3 generous dashes oregano
2 dashes cumin
1 dash coriander
salt and black pepper to taste (but be generous with your salt! Depending on the beans you use, start with 1/2-1 t. but you may need more!)
1/2 c. cilantro, stems removed and chopped and juice for one lime, if desired, to finish

Heat a 2-3 quart pot over medium to medium-high heat. When hot, add the oil, wait for a minute, then add the onions and sauté until translucent, about 6 minutes. Add the garlic and sauté until you can smell it, about 30 seconds, and then add the herbs, sautéing again for about 30 seconds.

Add the black beans to the pan, with the packing liquid if canned, or 1 c. cooking liquid (or water) if you cooked them from dried, and bring to a boil. Turn the pan down to a simmer and cook for about 15 minutes, to allow the flavors to meld, adding a little more water if necessary to give them a bit of a sauce. Serve with your favorite tacos, or just simply with rice or on top of some greens, chopping some cilantro and adding it to the top, along with a few squirts of lime, if desired.

Sweet Potato with Thai Curry and Coconut

Sweet Potato with Thai Curry and Coconut
I made this recipe the other day because I had everything I needed for it, and because I really love Thai flavors. So happy I discovered it! The sweetness of the potato compliments the other ingredients in the soup, and I served it with sticky rice, and I wished I had made Jamie Oliver’s great chicken skewers, too. I will next time! This recipe comes from Joanne Chang’s
Flour, Too cookbook. One of my favorites!

Sweet Potato with Thai Curry and Coconut

5 large or 6 or 7 medium sweet potatoes, scrubbed clean
3 T. vegetable oil
1 medium onion, cut into 1/2 in. pieces
3 garlic cloves, smashed and minced
1 large carrot, peeled and cut into 1/2 in. pieces
1 celery stalk, cut into 1/2 pieces
1/2 medium fennel bulb, leafy tops trimmed,
and bulb cut crosswise into pieces 1 in/.2.5 cm wide
6 cups/1.4 L Vegetable Stock (see below)
One 13 to 14 oz/390 to 420 ml can coconut milk
2 T. Thai red curry paste
2 1/4 t. kosher salt
1 t. freshly ground black pepper
1/4 c/10 g fresh cilantro leaves for garnish
1/2 lime for garnish

  1. Preheat the oven to 400°F/200°C, and place a rack in the center of the oven.
  2. Place the sweet potatoes on the baking sheet and pierce each one several times with a knife tip or fork. Roast for 1 to 1-1/2 hours, or until they can be easily pierced in the center with a fork. Set aside to cool. (I did this in the morning, to make things go faster at dinnertime.)
  3. In a stockpot, heat the vegetable oil over medium-high heat. Add the onion, garlic, carrot, celery, and fennel; reduce the heat to medium-low; and sweat the vegetables, stirring often with a wooden spoon, for 6 to 8 minutes, or until they soften and the onion is translucent, but not browned.
  4. Peel the cooled sweet potatoes, cut them into large chunks, and add them to the vegetables in the stockpot. Add the stock, raise the heat to medium-high, and bring to a simmer. Reduce the heat to medium-low and simmer gently for 20 to 25 minutes to blend the flavors.
  5. Turn off the heat and add the coconut milk, curry paste, salt, and pepper. Working in batches, blend the soup in the blender until very smooth. Return the soup to the pot and bring back to a simmer. Taste and adjust the seasoning if needed.
  6. Ladle the soup into bowls and garnish each with the cilantro and a squeeze of lime before serving. The soup can be stored in an airtight container in the fridge for up to 3 days or in the freezer for up to 1 month.

Roasted Squash Lasagna with Herbs

Summer Squash Lasagna
I found this recipe in my Sunset magazine last month (or so), and since my yellow squash plant is by far the most happy one in my garden this year, this recipe got used immediately. I then took thislasagna with me to a potluck gathering (it was a little on the fly–I had to use what I had in the house–another point for this recipe), and it turned out to be quite a crowd pleaser, so I’m happy to share it. I wish I could claim more responsibility for its invention, but my only contribution was throwing in cherry tomatoes (which are not in the original recipe), since I have a small tree of a tomato plant growing out of my southern window. This recipe is a delight. Perfect for this time of year.
Roasted Squash Lasagna with Herbs
3 1/2 lbs. green or yellow zucchini (10 medium), ends trimmed, thinly sliced lengthwise
1 3/4 t. kosher salt, divided
3 T. olive oil, divided
1/2 c. chopped shallot
2 garlic cloves, chopped
2 c. raw corn kernels (from 2 or 3 ears corn) (frozen or canned would really be fine, too)
1 t. fresh thyme leaves
15 oz. ricotta cheese
1 1/4 c. shredded parmesan cheese, divided
1 large egg, beaten to blend
1/4 cup chopped basil leaves
2 tablespoons chopped chives
1 pint cherry tomatoes, halved
1/4 teaspoon pepper
1 1/2 tablespoons butter, divided

1. Line 3 rimmed baking sheets with paper towels and arrange zucchini in a single layer on top. Sprinkle with 1 1/2 t. salt and set aside 30 minutes. (This is an important step if you don’t want a soupy lasagna in the end.)

2. Meanwhile, heat a grill to medium (350° to 450°). Heat 1 T. oil in a medium frying pan over medium heat. Add shallot and garlic and cook, stirring constantly, until beginning to brown, about 2 minutes. Add corn and thyme and cook until corn is just hot, 2 to 3 minutes. Transfer to a medium bowl. Stir in ricotta, half of parmesan, the egg, basil, chives, pepper, and remaining 1/4 t. salt.

3. Preheat oven to 375°. Press water out of zucchini with more paper towels and remove all paper towels from baking sheets. Brush zucchini all over with remaining 2 T. oil. Grill half of zucchini, turning once, until grill marks appear, 2 to 4 minutes; transfer to rimmed baking sheets as cooked. Repeat with remaining zucchini.

4. Butter bottom of a 9- by 13-in. baking dish with 1/2 T. butter. Arrange a quarter of zucchini ribbons crosswise in ­bottom of dish, overlapping slightly. Evenly spread a third of corn-ricotta mixture over zucchini. Sprinkle with a handful of tomatoes. Repeat process 2 more times, ending with zucchini. Sprinkle remaining parmesan on top and dot with remaining 1 T. butter.

5. Bake until lasagna turns golden brown, about 45 minutes, rotating dish halfway through for even browning. Let rest 20 minutes before serving.

Spaghetti alla Primavera

Spaghetti PrimaveraI turned to this recipe because I had several vegetables on hand and wanted to get dinner on the table rather quickly, and not only was it quick, but so delicious. A great way to use many summer veggies. I also tried it with substituting different vegetables than it called for, and had fun just cutting up and using what we had. Sauteing the garlic and the tomatoes and basil together was a great finishing touch. Delicious! Taken from Saveur

Spaghetti alla Primavera

6 T. olive oil
3 cloves garlic, minced
6 oz. button mushrooms, quartered
1 c. asparagus tips, blanched
1 c. small broccoli florets, blanched
½ c. frozen peas, blanched
1 small zucchini, quartered lengthwise, cut to 1″ lengths, blanched
1 lb. spaghetti, cooked al dente
1 c. heavy cream
⅔ c. grated Parmesan
2 T. unsalted butter
Kosher salt and pepper, to taste
1 c. grape tomatoes, halved
2 T. thinly shredded basil
½ c. lightly toasted pine nuts

1. Heat 5 T. oil in a 12″ skillet over medium heat. Add ⅔ of the garlic; cook until golden, about 2 minutes. Add mushrooms; cook until golden, about 3 minutes. Add asparagus, broccoli, peas, and zucchini; cook 3 minutes. Add pasta, cream, Parmesan, and butter, season with salt and pepper, and toss to combine; transfer to a platter.
2. Bring remaining oil and garlic, tomatoes, and basil to a simmer over medium heat; pour over pasta; garnish with nuts.

Black Bean and Mango Quinoa Salad

I improvised a little for a luncheon get-together last week, and came up with a new salad that is wonderfully colorful and seemed nutritionally loaded

A bright salad for spring and summer!

(as far as my knowledge of nutrition goes:). It’s also vegetarian and vegan.  I based it off of a recipe from epicurious, although the end result is quite a bit different. So, this is for Sara particularly, but if something doesn’t seem right, let me know! This is how I remember it going . . .

Black Bean and Mango Quinoa Salad

  • 1 cup quinoa (about 6 ounces)
  • 1/4 c. canola oil
  • 2 T. white wine vinegar
  • 1/2 t. cumin
  • 1/2 t. dijon mustard
  • 1/2 t. salt (or more, to taste)
  • 1 c. black beans, cooked and drained (or from a can)
  • 1 c. chopped peeled mango
  • 1 medium tomato, cored and chopped into 1/4″ cubes
  • 1 sweet pepper (orange or yellow look particularly great), seeded, deveined, and chopped
  • 3 green onions, chopped
  • 1 large handful of cilantro, stems removed, roughly chopped

Cook quinoa in medium pot of boiling salted water over medium heat until tender but still firm to bite, stirring occasionally, about 12 minutes. Drain well; cool. Transfer to medium bowl. [My quinoa gets really clumpy when I cook it this way, so instead, I boil it for 10 minutes, then I put it in a fine mesh steamer, and steam it for 10 minutes more. It turns out light and fluffy this way. I also always rinse it 3xs before cooking it, which was the excellent advice of my friend Maryann. Rinsing it ensures the quinoa’s not bitter.]

Meanwhile, whisk oil and next 4 ingredients in small bowl to blend. Season dressing to taste with more salt (if desired) and pepper.

Add chopped mango, black beans, tomato,  green onions, pepper, 1/2 the cilantro and 1/4 cup dressing to quinoa; toss to coat. Garnish with remaining cilantro and drizzle with remaining dressing; serve. Stores well for 2 days in an airtight container, refrigerated.

Serves 4-6.

Swiss Fondue without (much) Wine

We really just do fondue on Valentines Day, but it’s a tradition I really look forward to. However, since I’m not a wine drinker, I’ve found that all the recipes I’ve tried have a little too strong of a wine taste to suit us. This year, I played with it, and I liked the result. I’ll include the original recipe amount for wine as well (the recipe comes from the Best International Recipe), because I’m sure there are many other people who feel quite the opposite of me!

Also, if you haven’t ever purchased Gruyere and/or Emmentaler, you will probably be surprised at how expensive they are (usually about $20 total for the amount needed in this recipe). You can find Gruyere at Costco at a more reasonable cost, but I’m not sure about Emmentaler. Using a nicer cheese makes all the difference, though, since the ingredient list is short, but you should definitely feel free to experiment to fit your budget and taste. In Rhode Island, we asked our Farmstead people for a good fondue mix, and they gave us some amazing cheeses, including one called Appenzeller, I believe. Here in Utah, Harmons has a really nice selection (including bags of preshredded Gruyere and Emmentaler–how convenient! But, I haven’t bought it yet). I’ve even used a mix of Gruyere and plain Swiss when things were tight, and it was fine. Not amazing, but highly edible.

Swiss Fondue

8 oz. Gruyere cheese, shredded
8 oz. Emmentaler cheese, shredded
1 1/2 T. cornstarch
1 clove of garlic, peeled and sliced in half
1/8 t. freshly ground nutmeg
salt and freshly ground pepper to taste
1 3/4 c. dry white wine
or
1 c. chicken stock (or broth)
1/2 c. apple juice
1/4 c. white wine (or take the wine completely out, and just use 3/4 c. apple juice)

1. In a medium bowl, combine the shredded cheeses and toss with cornstarch.

2. If you have a fondue pot, rub the inside of it with the garlic clove. If you don’t, rub the inside of a heavy-bottomed pan with the garlic. Either way, in a heavy-bottomed pan, bring the wine or chicken stock, apple juice, and wine to a simmer. Once the liquid is simmering, add the cheese a handful at a time, whisking after each addition to incorporate. Then, add the nutmeg, and salt and pepper to taste.

3. Transfer the cheese mixture to a fondue pot, if you have one, or simply bring the pot to the middle of the table and enjoy!

Note: When the fondue cools down, it will get stringy. You can remedy this by either having it over a sterno can, or placing it back on the stove to reheat (but DON’T put a ceramic fondue pot on the stove–it will crack. I’ve done this).

We’ve fondued many different foods, but our favorites are cooked and sliced apple chicken sausage, roasted or steamed broccoli and cauliflower, and of course, cubed french bread.

Black Bean Burgers

Well, I’ve tried several recipes that are light at this point, and I think only one is post-worthy (the sweet potatoes from a few posts ago). So, I’m abandoning that approach, and going instead back to my old stomping grounds for good recipes. We tried this one last week, and I’m already sure it will grace our table many times in the future. It’s from the 2011 America’s Test Kitchen Annual, and I love the red pepper in it–it’s terrific. A suggested variation is to sub 1 T. minced canned chipotle chile in adobo sauce for the cayenne and replace 1/4 c. of the red pepper with 3/4 c. thawed frozen corn. Sounds like a good plan for next time.

Black Bean Burgers

2 slices high-quality white sandwich bread, torn into pieces
2 large eggs
3 T. olive oil
1 t. cumin
1/2 t. salt
1/8 t. cayenne pepper
2 (15 oz.) cans black beans, drained and rinsed
1 red bell pepper, stemmed, seeded, and chopped fine
1 shallot, minced (about 3 T.)

1. Adjust an oven rack to the middle position and heat the oven to 350 degrees.

2. Pulse the bread in a food processor to coarse crumbs, about 10 pulses. Spread the crumbs on a rimmed baking sheet and bake, stirring occasionally, until golden brown and dry, 10-12 minutes. Set aside to cool to room temperature. {I just realized I skipped this step–the burgers were quite moist–I’m sure this dries them out and gives them quite a different, likely better, texture. But, foregoing it still produced great results.}

3. Whisk the eggs, 1 T. of the oil, the cumin, salt, and cayenne together in a small bowl. Place 2 1/2 cups of the beans in a large bowl and mash them with a potato masher until mostly smooth. Stir in the bread crumbs, egg mixture, remaining 1/2 c. beans, bell pepper, cilantro and shallot until just combined. Divide the bean mixture into 6 equal portions, about 1/2 c. each, and lightly pack into 1″ thick patties.

4. Heat 1 T. more oil in a 12″ nonstick skillet over medium heat until shimmering. Carefully lay half of the patties in the skillet and cook until well browned on both sides, 8-10 minutes, flipping them halfway through.

5. Transfer the burgers to a plate and tent loosely with foil. Return the skillet to medium heat and repeat with the remaining 1 T. oil and remaining burgers. Serve.