Braided Easter Basket

I go a little nuts at holidays. With baking, that is. It’s all those lovely pictures from my magazines and cookbooks that show everything I would love to have on my holiday table. I have a friend who calls this obsession “holiday hopes and dreams” but I think she is referring to her kids. Strangely, I still have a collection of those.

I saw this loaf and thought it was so pretty, while also being not very sweet, a good addition for someone who likes to go a little overboard on the breads and candies. It’s a charming centerpiece and an easy bake, and rewardingly simple. The recipe comes from Recipes from the Old Mill: Baking with Whole Grains.

You can also see the multiplicity of bakes here: I couldn’t stop with just the Braid! I actually also made cupcakes and cookies, too. And distributed many of them. My additional holiday hope and dream is to cover the house in Cadbury Mini Eggs. I mean, it’s just once a year.

Braided Easter Basket

2 1/4 t. yeast
3/4 c. warm water
1/4 c. sugar
3 T. instant dry milk
1/4 c. oil or butter
1 t. salt
1 egg
1 c. whole wheat flour
2-2 1/2 c. flour

Dissolve yeast in warm water. Let set for 5 minutes. Add sugar, dry milk, oil or butter, salt, egg, and whole wheat flour. Add enough flour to make a soft dough.

On floured surface, knead 8-10 minutes, till smooth and elastic. Place in greased bowl, turning once to grease surface. Cover. Let rise in warm place till double, about 1 hour.

Punch down. Divide in thirds. Cover. Let rest 10 minutes. Shape 1/3 of dough in 6 “eggs.” Place close together in the center of greased baking sheet. For nest, shape remaining dough in two 26″ ropes. Twist together. Coil around “eggs.” Seal ends. Cover. Let rise till double, about 45-60 minutes.

Bake at 375 degree for 15-20 minutes.

Frost the braid with confectioner’s sugar icing (powdered sugar, a little milk, and vanilla or orange zest for a little more flavor), starting with the “eggs.” As soon as iced, sprinkle with candy decorations. Glaze the coiled nest. Sprinkle with coconut that has been tinted green with a few drops of green food coloring.

Advertisement

Coconut Buns

I do a lot of practical baking, but then I sometimes see these recipes that are purely for pleasure and they look so enticing, and I’m so curious about how they will turn out that I can’t shake it out of my head until I make it. This is one of those. I was collecting recipes for a class I was teaching when I came across it, and I had never heard or thought of this idea–a cinnamon bun with a coconut mixture. But it sounded so great, and really, after making it, it was so great. So, here’s a fun way to spend a weekend morning if you find yourself being a little homebound lately! I found the recipe in a Bake Magazine from Spring 2018.

Coconut Buns 
Makes 12
Recipe by Ben Mims

  • 1¼ c. (300 grams) warm unsweetened canned coconut milk (120°F/48°C to 130°F/54°C)
  • ⅓ c. (67 grams) granulated sugar
  • 2 T. (28 grams) unrefined coconut oil, melted
  • 1 t. (3 grams) kosher salt
  • 1 large egg (50 grams), lightly beaten
  • 4 c. (500 grams) all-purpose flour (I replaced 1 1/2 c. with whole wheat)
  • 1 (0.25-ounce) package (7 grams) instant yeast (2 1/4 t.)
  • ½ c. (25 grams) unsweetened coconut flakes
  • Coconut Filling (recipe follows)
  • Coconut Icing (recipe follows)
  1. In the bowl of a stand mixer fitted with the dough hook attachment, combine warm coconut milk, sugar, melted coconut oil, salt, and egg. Add flour and yeast, and beat at low speed until a dough forms. Increase mixer speed to medium, and knead until smooth, about 8 minutes. Cover with plastic wrap, and let rise in a warm, draft-free place (75°F/24°C) until doubled in size, about 1½ hours.
  2. Preheat oven to 350°F (180°C). Spread coconut flakes on a baking sheet, and bake, stirring halfway through, until lightly golden brown, about 8 minutes. Transfer coconut to a bowl, and let cool completely. Lightly grease a 13×9-inch baking pan with butter.
  3. Transfer dough to a lightly floured surface. Roll into an 18×12-inch rectangle. Spread Coconut Filling over dough, leaving a ½-inch border on one long side. Starting with opposite long side, roll dough into a tight log. Trim ends, and cut into 12 rounds. Transfer rounds, cut side up, to prepared pan, and cover with plastic wrap. Refrigerate for at least 8 hours or overnight (or let rolls rise at room temperature for 1½ hours).
  4. Preheat oven to 375°F (190°C).
  5. Uncover rolls, and bake until puffed and golden brown throughout, about 35 minutes. Let cool for 10 minutes. Drizzle with Coconut Icing while still warm, and sprinkle with toasted coconut flakes before serving.

Coconut Filling

  • 1 c. (84 grams) finely shredded dried (desiccated) coconut
  • 1 c. (227 grams) unsalted butter, softened
  • ½ c. (110 grams) firmly packed light brown sugar
  • 3 c. (360 grams) confectioners’ sugar, sifted
  • 1 t. (4 grams) coconut extract
  • 1 t. (4 grams) vanilla extract
  • ½ t. (1.5 grams) kosher salt
  1. Preheat oven to 350°F (180°C). Spread coconut on a baking sheet, and bake, stirring halfway through, until lightly golden brown, about 8 minutes. Transfer to a bowl, and let cool completely.
  2. In the bowl of a stand mixer fitted with the paddle attachment, beat butter and brown sugar at medium speed until smooth, about 2 minutes. Add confectioners’ sugar, extracts, and salt; beat until smooth. Reserve ½ cup filling for Coconut Icing. Stir toasted coconut into remaining filling. Cover with plastic wrap until ready to use.

Coconut Icing

  • ½ cup Coconut Filling (recipe precedes)
  • 2 tablespoons (30 grams) unsweetened canned coconut milk
  1. In a small bowl, stir together Coconut Filling and coconut milk. Cover with plastic wrap until ready to use.

Old Mill Bread

A beautiful everyday loaf that slices amazingly for sandwiches.

I have made so many everyday loaves over the years. I have a collection of favorites, and yet since I make them so frequently, I still look for new ones to add to my cache. This recipe comes from one of my favorite wholesome baking books, Recipes from the Old Mill by Sarah E. Myers and Mary Beth Lind. Despite having tried close to half of the recipes before, I somehow had never noticed this one, which reads “This is my favorite bread, the one I always come back to.” How did I miss that? I always want to try a baker’s favorite go-to bread! So, I pioneered it last week, and I think my husband mentioned three times, while cutting it one morning, what a fan he was. So, now it’s part of the honored collection.

Old Mill Bread

2 c. boiling water
1/2 c. cornmeal
1/4 c. honey
2 t. salt
2 packages dry yeast (2- 2 1/4 t.)
1/2 c. warm water
1/4 c. oil
1/2 rye flour
1-2 c. whole wheat flour
3-4 c. flour

Mix together boiling water, cornmeal, honey, and salt. Cool to lukewarm. Meanwhile, dissolve yeast in warm water.

Once the cornmeal mixture is lukewarm, add the oil and the yeast. Mix well, then add the rye and wheat flour. Continue to add the water flour until you have a soft, but not dry, dough.

Knead by hand for 10 minutes, or in a standing mixer for 5-6 minutes at level 4. Once well kneaded, place the dough into a greased bowl and let rise until doubled, about one hour.

Punch down and divide into three parts (for the picture, I divided the dough into just two sections, to make two extra large loaves, instead of three). Taking one amount at a time, flatten into a rectangle (about 12 in. by 8 in. with the short side facing you) and then tightly roll to make a loaf, tucking the dough into the sides as you roll if it starts to balloon out. Place into greased bread pan and shape the remaining two dough balls.

Let rise again for 45-60 min. Twenty minutes before baking, heat the oven to 375 degrees. Bake for 35-45 minutes (until 190 degrees). Immediately turn the loaves out onto a cooling rack once done, to prevent the loaf from getting soggy.

Cinnamon Raisin Variation: After the first rise, once you have created a rectangle, sprinkle the dough with brown sugar, raisins, and cinnamon, and roll in a similar fashion to before.

Cardamom Berry Braid

I pulled this recipe from last year’s Bake from Scratch, holiday edition, and I wanted to make it based solely on its appearance. It’s absolutely stunning. The original recipe calls for  a homemade cranberry filling, but going with the Scandinavian flavors here, I opened a bottle of nice lingonberry jam instead. I liked the flavors tremendously, and I liked saving myself a step, too. I really recommend following suit! I also made a big batch of candied orange peel for the Christmas season, so I used that as well, but if you aren’t inclined to make your own, a purchased one could also work, as could just the zest of an orange grated into the jam. I ended up serving this bread Christmas morning (I baked it a few days in advance, froze it, defrosted it overnight, and then warmed it the morning of Christmas in the oven). I loved this bread (I ate it over the Christmas Kringle we had), and I hope to make it for many years to come. It also got the distinguished title from my father-in-law as “the best thing you’ve ever made.” Has a nice sound to it, doesn’t it?

Cardamom Berry Braid

  • ¾ c. (180 grams) whole milk
  • ½ c. (100 grams) granulated sugar
  • ¼ c. (57 grams) unsalted butter, cubed and softened
  • 1½ t. (4.5 grams) kosher salt
  • ½ c. (120 grams) warm water (105°F/40°C to 110°F/43°C)
  • 1 T. (6 grams) instant yeast
  • 2 large eggs (100 grams)
  • 5½ c. (688 grams) all-purpose flour
  • 1 t. (2 grams) ground cardamom
  • Lingonberry Jam or Cranberry Filling (recipe below)
  • Storebought or Homemade Candied Orange Peel, diced
  • Vanilla Glaze (recipe below)
  1. In a small saucepan, bring milk to a boil over medium heat. Remove from heat; add sugar, butter, and salt, stirring until completely incorporated. Set aside until cooled to 120°F (49°C) to 130°F (54°C).
  2. In the bowl of a stand mixer fitted with the dough hook attachment, combine ½ cup (120 grams) warm water and yeast. Add warm milk mixture. Stir in eggs. With mixer on low speed, add flour and cardamom, beating until combined. Increase mixer speed to medium-low, and beat until smooth and elastic, 5 to 7 minutes. Spray a large bowl with cooking spray. Place dough in bowl, turning to grease top. Cover directly with plastic wrap, and let rise in a warm, draft-free place (75°F/24°C) until doubled in size, about 1 hour.
  3. Line a large baking sheet with parchment paper.
  4. On a lightly floured surface, roll dough into a 24×12-inch rectangle. Spread Lingonberry Jam onto dough, leaving a ½-inch border on all sides. Sprinkle with diced Candied Orange Peel. Starting at one long side, roll up dough, jelly roll style; press edge to seal. Place on prepared pan.
  5. Using a serrated knife, cut roll in half lengthwise. With cut sides facing up, carefully twist dough pieces around each other. Form into a circle, pinching ends to seal. Cover loosely with plastic wrap, and let stand in a warm, draft-free place (75°F/24°C) for 30 minutes.
  6. Preheat oven to 350°F (180°C).
  7. Bake until golden brown and internal temperature registers 190°F (88°C), about 40 minutes. Let cool completely on a wire rack. Drizzle with Vanilla Glaze. Store in an airtight container at room temperature for up to 4 days.

Cranberry Filling (optional)

  • 1⅓ c. (171 grams) dried cranberries
  • ⅓ c. (67 grams) granulated sugar
  • 1 T. (14 grams) unsalted butter, cubed
  • ½ t. (1 gram) ground cardamom
  • ¼ t. ground cinnamon
  1. In a small saucepan, bring cranberries and water to cover by 1 inch to a boil over high heat. Reduce heat to low, and cook until cranberries are softened, about 20 minutes. Drain cranberries, reserving 2 tablespoons (30 grams) cooking liquid.
  2. In the work bowl of a food processor, place warm cranberries, reserved 2 tablespoons (30 grams) cooking liquid, sugar, butter, cardamom, and cinnamon; pulse until mixture has the texture of jam. Let cool completely. Refrigerate in an airtight container for up to 1 week.

Vanilla Glaze

  • 1 c. (120 grams) confectioners’ sugar, sifted
  • ¼ c. (60 grams) heavy whipping cream
  • 1 t. (4 grams) vanilla extract
  • ½ t. (1.5 grams) kosher salt
  1. In a small bowl, whisk together all ingredients until smooth. Use immediately.

Sweet Cheese Strudel

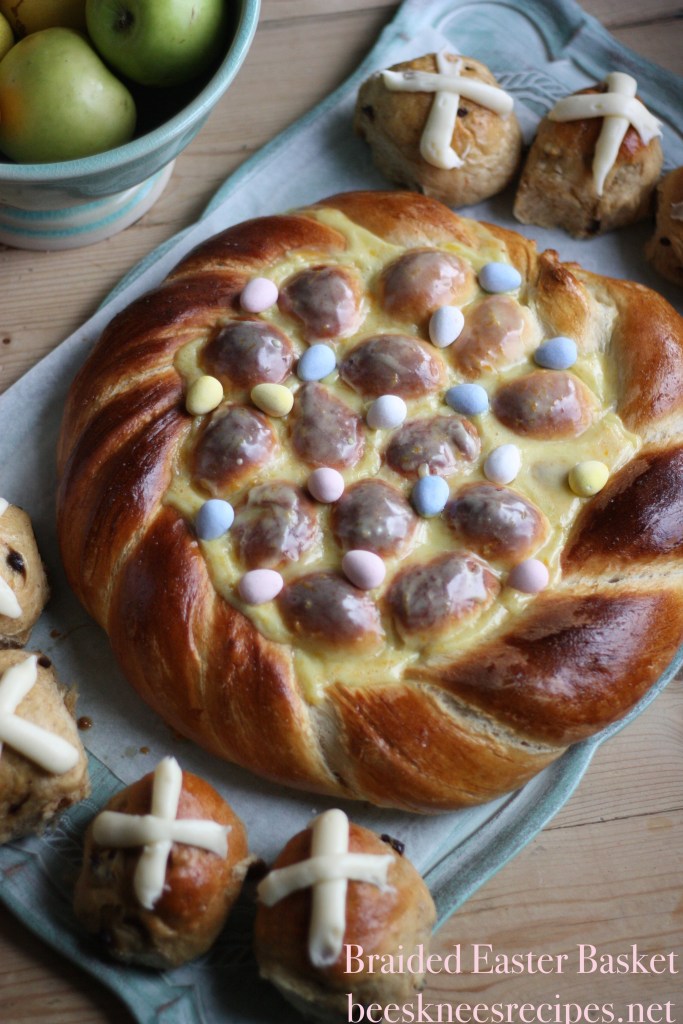
This bread is our favorite Easter morning breakfast. In February, my oldest daughter Lucy usually starts asking me if I’ll make it this year for Easter, and she’s also been known to request it for her birthday. The original recipe comes from Beth Hensperger’s Bread for All Seasons. I’ve done everything here the same as the original, except sometimes I only use cream cheese (I don’t add the goat cheese), and I also braided this plait instead of rolling it like cinnamon rolls–and it turned out beautifully.

It’s a simple but dramatic loaf and one of the best ways to start any morning. I think perhaps tomorrow I’ll also add some blueberries into the filling–just a few! Oh, also note that it rests in the fridge overnight, so start the day before.

Sweet Cheese Strudel

Yeasted Sweet Cheese Strudel or  Cream Cheese Braided Danish

2 1/2 t. active dry yeast
1/2 c. sugar
1/2 c. warm water
1/2 c. sour cream
6 T. unsalted butter, at room temperature, cut into pieces
2 eggs
Grated zest of 1 large lemon
1 1/2 t. salt
3 1/4 c. unbleached all-purpose flour (exact measure)

Sweet Cheese Filling
8 oz. fresh goat cheese (not Feta! that rookie mistake was embarassing), at room temperature
8 oz. cream cheese, at room temperature [sometimes, I just use 16 oz. of cream cheese instead of goat cheese, and it is great either way]
2/3 c. sugar
1 egg
2 t. pure vanilla extract
Grated zest of 1 large lemon

Brandied Almond Crust
1 egg yolk
1 t. good-quality brandy [or almond extract]
2 T. light brown sugar
1/4 t. ground allspice
1/2 c. slivered or sliced almonds

1. In a small bowl, sprinkle the yeast and a pinch of the sugar over the warm water. Stir to dissolve. Let stand until foamy, about 10 minutes. Warm the sour cream on the stove top or in a microwave to about 105 degrees, then add the butter pieces. Stir to melt.

2. In a standing mixer (or equivalent), combine the remaining sugar, eggs, lemon zest, salt and 1 c. of flour. Add the warm sour cream and yeast mixtures. Beat until smooth, about 1 minute, switching to a wooden spoon as necessary if making by hand. Add the remaining flour, 1/2 c. at a time. The dough will be rather soft and have a silky, translucent quality. Scrape down the sides of the bowl with a spatula. Cover the bowl with 2 layers of greased plastic wrap and let rise in the fridge overnight.

3. The next day, make the sweet cheese filling. With an electric mixer, blend together the cheeses, sugar, egg, vanilla, and lemon zest until smooth and well combined. Cover and refrigerate until needed.

4. Using a large dough scraper, scrape the chilled batter onto a lightly floured work surface. Divide into 3 equal portions. Roll out each portion in to an 8-by-12-inch rectangle, dusting lightly with flour as necessary to prevent sticking. Spread each rectangle with one-third of the sweet cheese filling, leaving a 1/2-inch border around the edges. Starting from a long side, roll up jelly-roll fashion and pinch the seam together to seal. Pinch both ends to seal and tuck them under. (In the picture above, I spread the filling down the center and then cut the dough on both sides into one-inch strands, and folded them over each other to create the braid. I like the look much better.)

5. Place on a greased or parchment-lined baking sheet, at least 3 inches apart. Using a serrated knife, score each finished cylinder in 5 places across the top, no more than 1/4 inch deep. Cover loosely with plastic wrap and let rise at room temperature until doubled in volume, 45 minutes to 1 hour. Twenty minutes before baking, preheat the oven to 350 degrees.

6. Bake in the center of the preheated oven 10 minutes. Meanwhile, prepare the brandied almond crust. In a small bowl, combine the egg yolk, brandy, brown sugar, and allspice and beat briskly with a whisk. Using a pastry brush, spread the crust mixture gently over the tops of the partially baked strudels. Immediately sprinkle each strudel with one-third of the almonds. Quickly return the pan to the oven and bake until the strudels are golden, sound hollow when tapped, and a cake tester inserted into the center comes out clean, another 15-20 minutes. Using a spatula, carefully transfer the strudels from the baking sheet to a rack to cool completely. Enjoy!

Honeyed Apricot Flatbread with Rosemary

Apricot Flatbread 2

It’s truly summer. Lots of time away, running our five kids to swim, play, hike, visit cousins and squeezing in a vacation or two. So, I’m missing my normal kitchen time just a little. As part of my hopes to reconnect (with my kitchen), I started a sponge for ciabatta last night. Unfortunately, I was thinking about the timing today very well, and since we had a crazy day of violin lessons, meeting with middle school counselors, celebrating the birth of my cousin’s baby, and swimming, there was no chance for the ciabatta to become ciabatta. So, instead, I turned it into flatbreads to serve along with a fresh tomato soup, and then starting digging through the fridge for toppings. I did a couple with cheese and pepperoni for the kids, two with fresh figs and goat cheese, and then I tried something new, needing to use all the apricots on my counter (obviously, I just used a couple, but the rest are now happily stored in my freezer). I think I will do this one again, perhaps with plums or peaches next time. This idea is a riff from a memorable appetizer in Lisbon many years ago where I had the marriage of honey and rosemary and cheese for the first time. Still beloved!  So, here’s a little idea, if you need one, for a fun, and a little bit sweet, summer meal.

Honeyed Apricot Flatbread with Rosemary

pizza dough (any kind, but here’s my favorite)
1/2 c. ricotta cheese
4-5 fresh apricots (or peaches or plums), sliced in half and pitted
2 T. honey
a handful of rosemary

Preheat oven to 475 degrees, with a pizza stone, if you have one placed in the lower half of the oven.

After the pizza dough has had its final rise, shape it by stretching into a circle or oblong and place on parchment paper. Top with ricotta, dolloping it and then lightly spreading it. Then, place apricots on top, with the skins on the bottom. Drizzle honey over the entire flatbread, then sprinkle rosemary and a little bit of salt.

Using a pizza peel, place the flatbread on the pizza stone. Bake for 6-8 minutes, or until browned on top and bottom. Remove to a rack to let it cool for at least ten minutes before serving.

Apricot Flatbread 1

Swedish Cinnamon-Cardamom Bread

Swedish Cardamom Bread

This recipe is the type of recipe that when I make, I think, I should make this everyday. Life would be a lot happier if I had this to look forward to in the morning or afternoon. Or evening. But, as it happens, I don’t make it everyday, and when I do make it, I’m lucky to get one slice, before all the kids, and darling friends of kids, quickly grab as much as they can.

This recipe is similar to a cinnamon roll, but you don’t cut the individual rolls, making the prep time a little bit faster, and the presentation much different. I love how the shaping of it encourages everyone to tear a handful and just eat! This recipe comes from the Jan. 2015 Saveur

Swedish Cinnamon-Cardamom Bread
For the dough
7 T. unsalted butter
1 12 c. whole milk, heated to 115°
2 t. active dry yeast
4 12 c. flour, plus more for dusting
14 c. sugar
1 12 t. cardamom seeds, lightly crushed (or ground cardamom)
14 t. kosher salt

For the filling
12c. granulated sugar
7 T. unsalted butter, softened
1 T. ground cinnamon
1 12t. cardamom seeds, finely crushed (or ground cardamom)
1 egg, beaten
Pearl sugar, for topping

Make the dough:
Melt butter in a 1-qt. saucepan over medium. Remove from heat and stir in milk and yeast; let sit until foamy, about 10 minutes. Whisk flour, sugar, cardamom, and salt in a bowl. Stir in yeast mixture until dough forms. Transfer dough to a lightly floured surface; knead until smooth and elastic, about 3 minutes. Return dough to bowl and cover with a clean dish towel; let sit in a warm place until dough is doubled in size, about 1 hour.

Make the filling:
Mix granulated sugar, butter, cinnamon, and cardamom in a bowl until smooth.

Assemble the bread:
On a lightly floured surface, roll dough into an 11″ x 17″ rectangle, about 14″ thick. Spread filling over dough, leaving a 12″ border along edges. [I’ve found it works better to divide the dough into two and make two separate loaves. They fit on an baking sheet better. They spread quite a bit in baking!] Working from one long end, roll dough into a tight cylinder; transfer seam side down to a parchment paper-lined baking sheet. Cover with dish towel; let sit in a warm place until dough has doubled in size once more, about 45 minutes.

Bake the bread:
Heat oven to 375°. Using kitchen shears and starting 1″ from ends of dough, make crosswise cuts, spaced 1″ apart, three-quarters of the way through dough. Fan dough slices away from the center, alternating left to right. Brush dough with egg and sprinkle with pearl sugar; bake until golden brown, about 22 minutes. Let bread cool completely before serving.


Breadmaking Tips


So, also to prepare for my little bread class tomorrow, I thought I’d share a few things I’ve learned about bread over the years. I’m sure there’ll be many more thoughts as I continue to work on my bread, but for now, here’s a few things that have helped me along the way.

A few basic pointers:

  • Try making bread! It is so much better than anything store bought. The aroma alone is worth all the work!
  • Get a thermometer!  Baked bread should register at 190 degrees F.
  • Make sure your oven cooks at the temperature you think it’s cooking at.
  • Be persistent. It takes a long time and a lot of practice to get consistent results (I’m not sure I’m there yet), but all the practice is edible! Okay, there was one loaf once . .
  • Make sure you know if your yeast is working or not.
  • Always use salt (about 2 t. per loaf).
  • Bread dough is wetter than you think! As an old relative used to say, if you’re not willing to get your hands messy, you’re not going to have good bread. If your dough is so dry it doesn’t leave residue on your hands, it probably has too much flour, and will be a dry loaf.
  • A dough with powdered milk in it makes really nice sandwich bread.
  • Whole wheat flour is pretty dry. If using, make sure the recipe incorporates soaking it, or using mashed potatoes or dried milk to help it be a softer loaf.
  • Use reliable sites or cookbooks for your reference. My favorites are King Arthur Flour, any bread book by Beth Hensperger, Jim Lahey’s books, and Josey Baker Bread.

Some other, more involved thoughts . . .

  • The best bread incorporates time to do the work. This includes overnight sponges or periods of resting. Time helps relax and build the gluten, giving loaves a wonderful chew and lovely air pockets.
  • Most of the equipment you need for bread, you probably already have: a big bowl, spoon, a clean, lint-free kitchen cloth, a colander, a dutch oven. You don’t need a stand mixer or a bread machine or anything else fancy to make a really great loaf of bread. These items will have you on your way to making Jim Lahey’s or ATK or KAF’s best loaves.
  • Using natural yeast is incredibly simple! Why didn’t I know this ten years ago?! It seemed so overwhelming, but it’s way simpler and more consistent. If you are still using instant yeast for your loaves, consider giving natural yeast (sourdough starter) a try. You can start your own by mixing equal parts water and flour in a glass jar right now. Leave it loosely covered on your counter, and pour out all but 1/2 c. of it every time it looks brown, dingy, with brown water on top. Within a few days, you’ll have a bubbling natural yeast. Then, you’ll be ready to start a feeding schedule and have it raise your bread.
  • Try using a scale. Many recipes today are switching to a scale, and it is very successful.

If using an instant yeast recipe:

  • Test your yeast first (especially if it isn’t fresh) by placing it with the warm water and a pinch of sugar. After five minutes, it should be bubbly.
  • Warm your water to 110-120 degrees to help the dough start rising quickly.
  • For one loaf, you should have about 2-3 c. of flour, 1 1/4 c. water, and 2 t. salt, plus other enhancements (honey, butter, powdered milk). If the salt seems low, you may want to adjust the amount. ALWAYS have enough salt in your dough.
  • Give the bread the proper time to rise, preferably at room temperature. The PROOF feature in the oven can cause the loaf to rise too much (over proof). This is actually the worst thing that can happen to your bread.
  • If making an enriched (with butter and eggs) dough, make sure to refrigerate it (probably overnight) to allow it to be workable (not too soft). This really just means, follow the recipe, and don’t try shortcuts.

What are your best tips I could share with my friends tomorrow night? I’d love to hear them!


One Perfect Loaf, of many!

KAF perfect loaf
I’m teaching a breadmaking class tomorrow night (if you’d like to come, you’re totally invited! It’s just at my house with some friends. Contact me and I’ll give you details!), so I’m wondering why I haven’t put more bread recipes up here on my blog! I’ve been making bread for about fifteen years, and sometimes I still feel like a complete novice, even though I probably make between 6-10 loaves a week. It’s just amazingly complex, and yet a complete surprise every time. Usually a delightful surprise! This is a loaf I was very committed to about a year ago. Now, I’m into a new recipe (which should be posted shortly) but there are so many ways you can go about making bread, I thought I’d share a few of my favorites.

This recipe comes from King Arthur Flour, which is such a great repository of baking knowledge and inspiration. I love the look of this loaf especially. It’s a little bit of a dazzler, and almost always gives you wings (the crust on the top that splits and sprays itself away from the loaf. Beautiful!). Anyway, their instructions are great and easy to follow, so I’ll include them here as well. This is King Arthur Flour’s definition of the perfect loaf of crusty bread. I’ll just add it to one of many that I love. I’ve changed their technique, because I didn’t want to use a bread machine, like they wrote the instructions for.

KAFs Perfect Crusty Loaf

THE SPONGE (BEGIN THE NIGHT BEFORE)

  • 1 cup cool water
  • 1/4 teaspoon instant yeast
  • 1 1/4 cups Unbleached Bread Flour
  • 2 tablespoons 100% Whole Wheat Flour
  • 1 tablespoon yellow cornmeal
  • 1 tablespoon semolina flour

THE DOUGH

  • 1 cup cool water
  • 1 tablespoon kosher salt
  • 1 tablespoon granulated sugar
  • 1/4 teaspoon instant yeast
  • 3 1/2 cups Unbleached Bread Flour
  1. To make the sponge: Place all of the sponge ingredients in a bucket and stir well. Let the sponge rest at room temperature overnight, or for 8 to 12 hours.
  2. The next day, add all of the dough ingredients to the sponge in the bucket.  Mix it well with your hands to form first a soft mass, then eventually a ball that’s soft, but not overly sticky. Adjust with additional flour or water as necessary.
  3. Cover again and let it rest for 30 minutes. If you want to leave the dough all day, place it in a lightly greased bowl, cover the bowl, and refrigerate it.
  4. When you’re ready to work with it, deflate the dough gently and form it into a round ball. Place the ball, seam side-down, on a cornmeal-dusted baking sheet.
  5. Cover the dough lightly. Let it rise a second time until it’s puffy and about 30% to 40% larger, about 1 hour (or longer, if the dough has been refrigerated). Don’t let it rise too much, since it rises some more in the oven and, if it’s over-proofed initially, it’ll collapse as it bakes.
  6. Preheat the oven to 475°F. Make several 1/4″ to 1/2″ slashes or crosshatches in top of the loaf. Using a clean plant mister, spritz the loaf with water. Spray some water into the oven, and place the bread on the lowest rack.
  7. Spritz the oven walls every few minutes for the first 15 minutes of baking. Lower the heat to 425°F (this reduction in heat mimics the “falling oven” used by brick-oven bakers, and will give your bread an incredible crust), and continue to bake until well-browned, about 35 minutes. The interior temperature of the bread should register at least 190°F on a digital thermometer. [I use a cloche or dutch oven instead of spritzing the loaf, and I remove the lid after 25 minutes.]
  8. Remove the bread from the oven, and cool it on a rack before slicing. 

Pepper, Sausage & Potato Bread

Sausage Pepper Potato BreadTwo weeks ago, after a great loss in our family, I was looking for something to make to both comfort and to give to my family members and myself. It is funny how sometimes embracing the very earthy task of eating can help us cope with the greater insecurities of loss and departure. But, that’s what we needed this night, and honestly, the time I spent chopping and adding vegetables to a big pot for a large batch of soup, and preparing the dough for this bread helped calm my mind, and I think I will remember this loaf for how it brought our family together that night.

It’s a beautiful loaf–a whole sandwich in one piece! as my cousin declared–and it’s one of those breads that you want to break with your hands, perhaps dip in melted cheese or a bit of soup, and just enjoy. I’ve adapted this recipe from Ruth Clemens’ the Pink Whisk Guide to BreadMaking. She uses chorizo and a hot pepper instead.

Pepper, Sausage & Potato Bread

1 medium potato, boiled and cooled
3 c. (375 g) bread flour
1 t. salt
1 1/2 t. instant yeast
1/2 c. (120 g) sour cream
3 1/4 oz. water
1 link, Italian sausage
1 orange or yellow bell pepper, finely diced

  1. Grate the potato and combine in a large bowl with the flour, salt and yeast. Make a well in the center and add the sour cream and water. (You can warm the sour cream a little to quicken the process of raising, if you like). Knead the dough for 10 minutes until it becomes smooth and elastic (this can be done by hand or in a stand mixer, but it will only take 4-5 minutes in a mixer).
  2. Transfer to a lightly oiled bowl, cover, and allow to rise for 1 1/2 hours or until doubled in size.
  3. While the dough rises, heat a skillet over medium to medium-high heat. Remove the casing from the sausage, and cook it in a little bit of olive oil until browned, breaking it into small pieces as you stir.
  4.  Turn the dough out onto a work surface and spread it into a rough rectangle. Scatter the sausage and the diced pepper over the rectangle. Gather the dough together and knead gently for a couple of minutes to incorporate the additions. Place it back in the bowl and let it rest for a few minutes to make shaping easier.
  5. Line a colander or a bread bowl with a cotton dish towel that has been dusted liberally with flour.
  6. Take the dough out of the bowl and pat it out once again. Fold each outside edge in to the center, repeating all the way around. Repeat again, folding the outside to the middle until the dough is tightened up into a rough ball. Pop the ball of dough into the lined colander with the seam upwards.
  7. Fold the overhanding edges of the dish towel over the exposed dough and place in a warm position to rise until almost doubled in size, approximately 45 minutes. Preheat the oven to 425 degrees.
  8. Line a baking sheet with baking parchment or grease it well. Unfold the dish towel and place the tray over the top of the colander. Invert the tray and colander together then remove the colander and dish towel. Dust the loaf with a little more flour and slash the top in a square pattern using a very sharp knife.
  9. Bake in the preheated oven for 35 minutes. When it’s baked through, remove from the oven and transfer to a wire rack to cool completely. The crust will be firm as soon as it comes out of the oven, but will soften on cooling.

Sasuage Bread2