Moist 100% Whole Wheat Sandwich Bread

This is a great recipe for several reasons. One, you might be sick of multigrain bread every week (me). Two, you can use ALL whole

So, this loaf is only about 50% whole wheat, but it works both ways!

wheat if you want to (think “getting rid of barrels of wheat in my basement”). Three, it has no fat in it, which when I’m on my pendulum swing towards better diet, I really appreciate. Plus, it’s delicious. I promise. It’s  a pretty wet dough, but it will still rise and cook well, and it makes 3 loaves, which is a good-sized amount. A word of caution, though: there’s a little too much dough in this recipe to mix in a standard Kitchen Aid, so either 2/3 the amounts or turn it out by hand and knead, if applicable (or be willing to clean the Kitchen Aid  after you’re done mixing because it gets up into the spring thingy–that’s what I usually opt to do).

Margo’s Famous Whole Wheat Bread

2 1/2 c. warm water
1/2 c. powdered milk
2 T. yeast
1/2 c. honey
1 c. mashed potatoes (or reconstituted potato flakes)
1 c. applesauce
2 eggs (ohh–I guess there is a little fat; I forgot about these)
1/2 c. wheat gluten (this is optional–you can buy this in the Health food store/aisle–Arrowhead Mills makes some. It helps the bread rise better and if you’re using 100% whole wheat, I would recommend using it).
2 T. salt
9 c. whole wheat, approximately (I usually do 1/2 wheat and 1/2 white)

Dissolve yeast in 1/2 c. of the warm water with a pinch of sugar in the bottom of a mixing bowl. In five minutes, add the remaining water and the rest of the ingredients through the salt, plus 2 c. of flour. Mix (by hand or mixer) for 1-2 minutes until creamy, then continue to add the remaining flour 1/2 c. at a time until the dough comes off the side of the bowl (adding the flour should take about 3-4 minutes). Knead the dough by mixer or by hand, 5-6 minutes in a mixer, 10-12 minutes by hand. This is a wet dough, so you may find yourself adding more flour. When the dough is smooth if you brush your finger across it but sticky when you touch directly, and it comes together in a good ball, place it in a greased container and let rise until doubled, 1 1/2-2 hours.

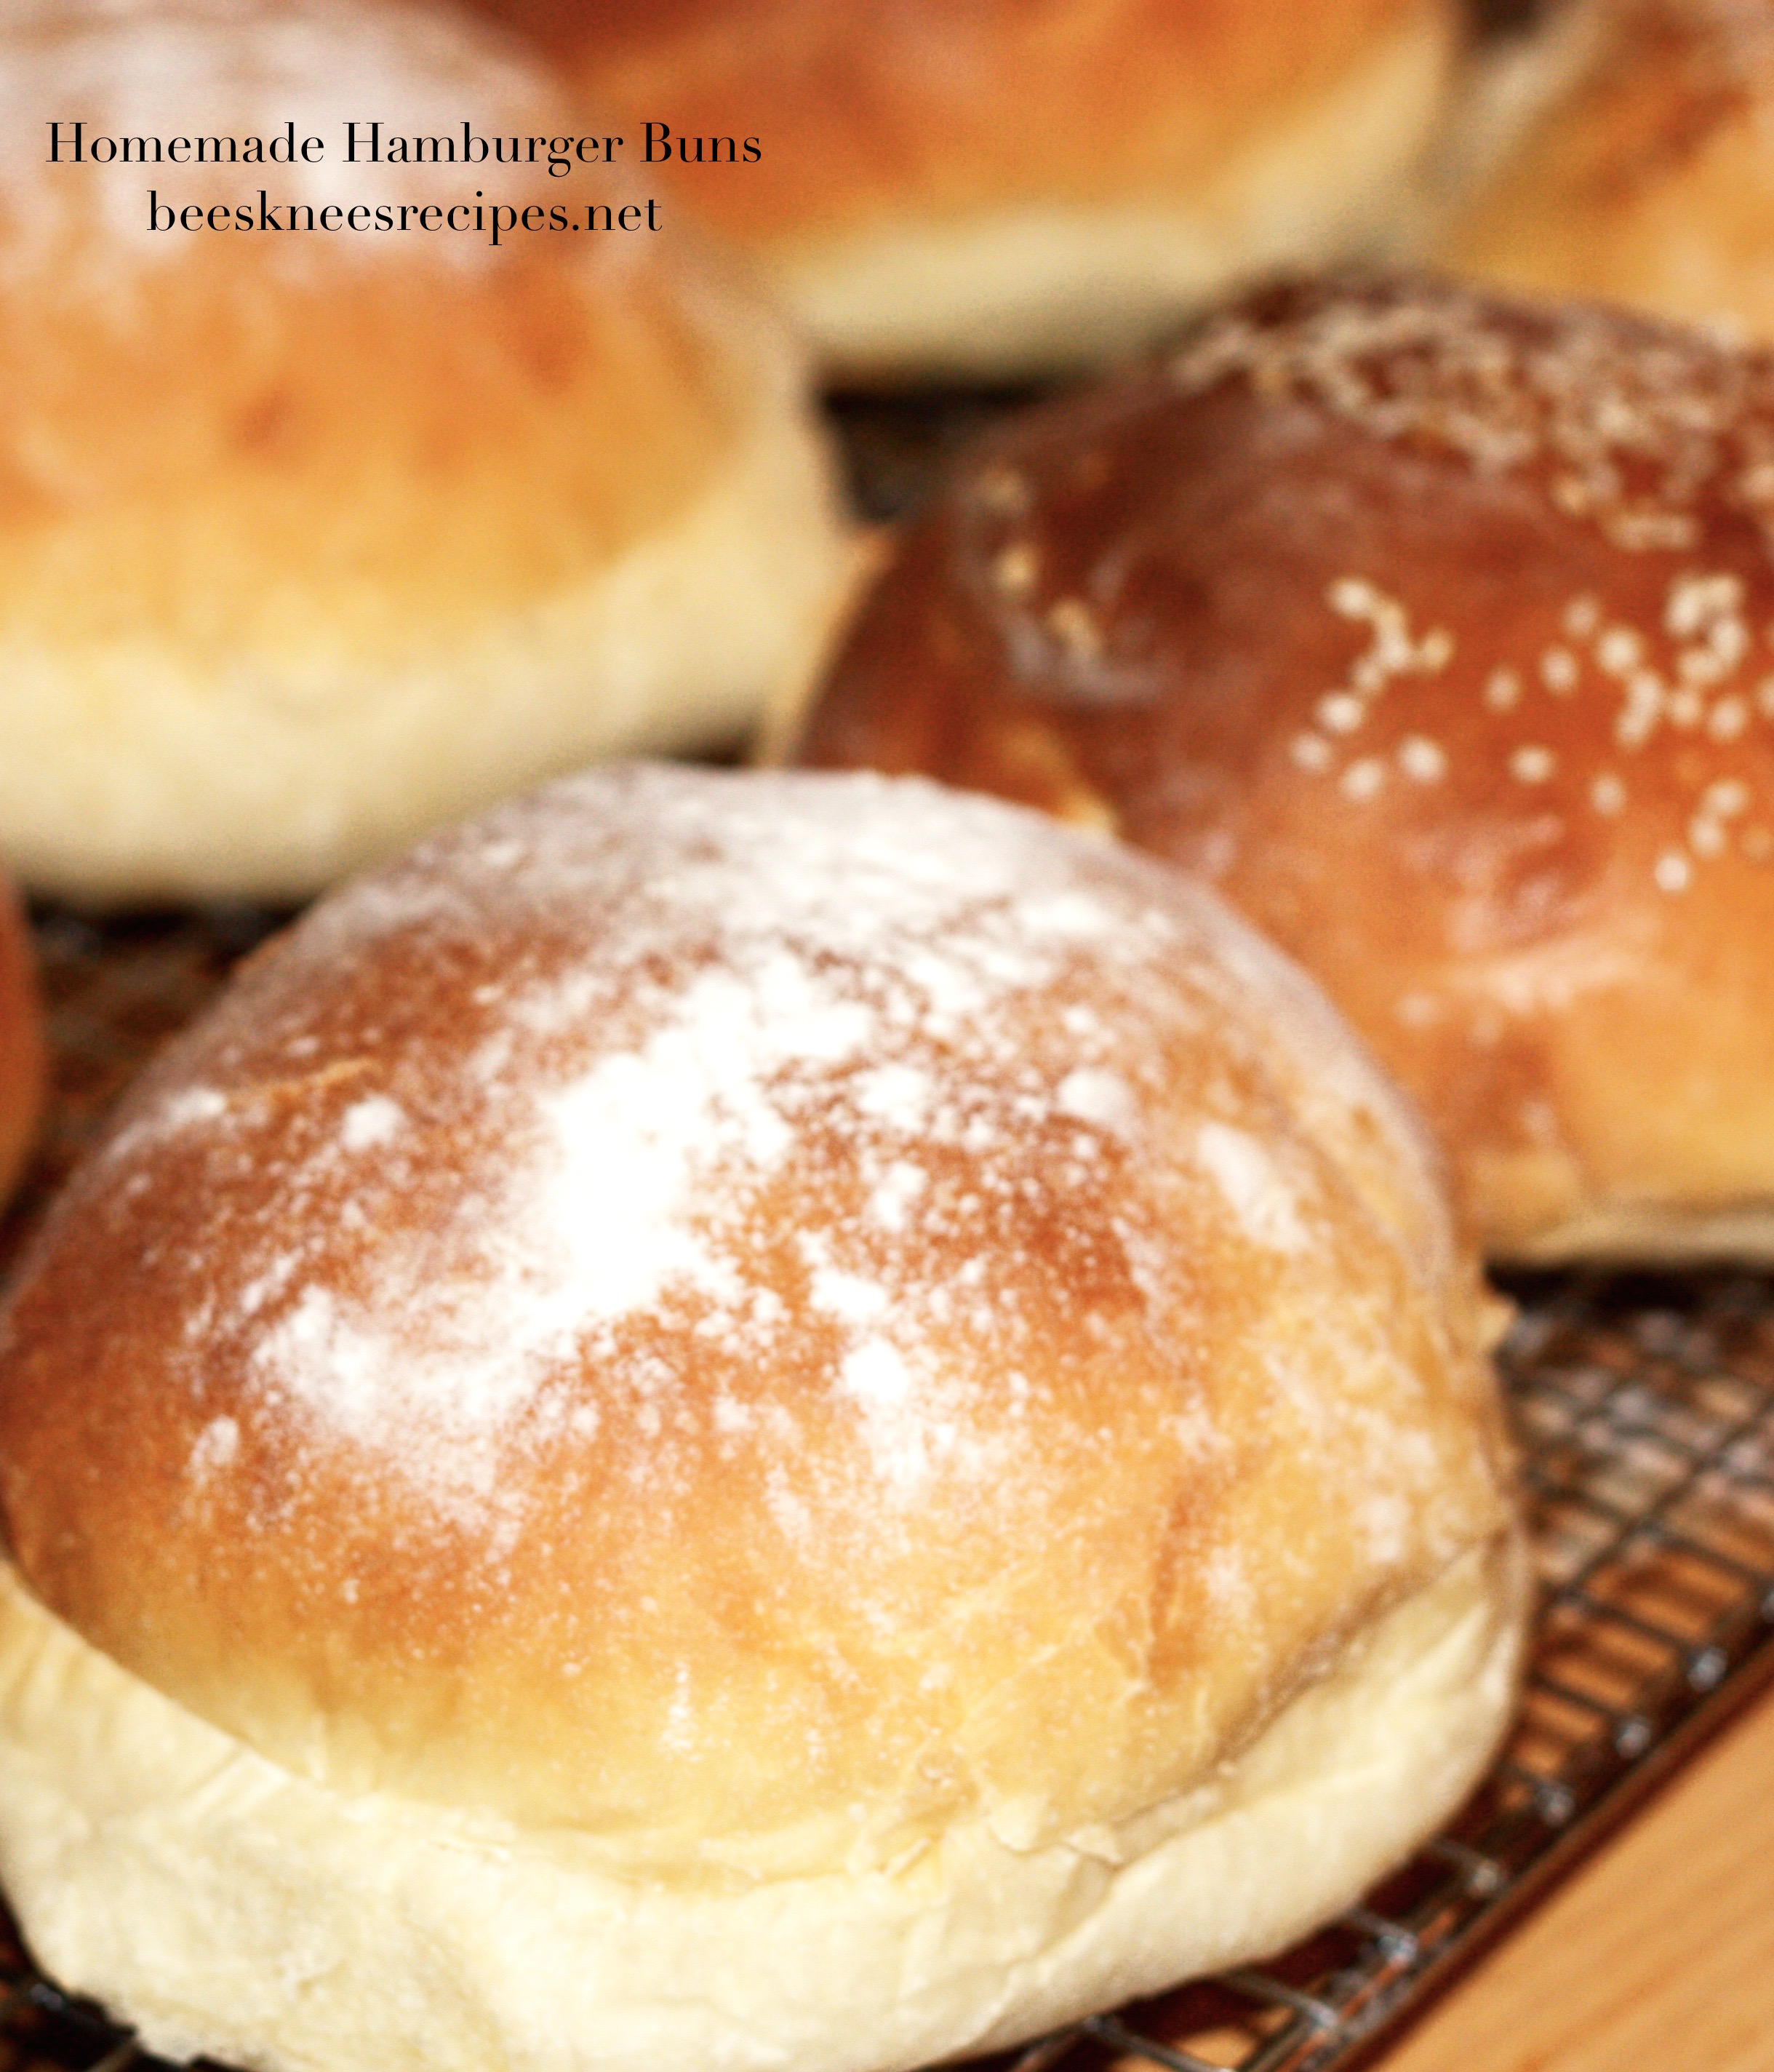
Turn the dough out and divide into 3 parts. Form each section into a rectangle, then starting at the shorter end, roll the dough up tightly and pinch the ends. Place the pinched side on the bottom of a greased (or cooking sprayed) bread pan. Cover lightly with plastic wrap and let rise again for 1 hour. Twenty minutes before baking, preheat oven to 350. You can dust the loaves with a little flour before throwing them into the oven (see pic) or not. Bake the loaves for 38-45 minutes.

Corn Bread/Cake

A couple weeks ago, Jason and I went to a church dinner catered by LaVerle Ward, who some of you know.  She was the former Relief Society president in my ward until she and her husband moved, but thankfully they are still close by and we get to see them sometimes.

She’s a FABULOUS cook!  I was raving about her corn bread that she served that night a couple of weeks ago and she sent me the recipe.  She granted me permission to post the recipe here, and you all are so lucky!

I have always had a problem with corn bread being either bland or dry.  This is neither of those.

In a bowl:
Melt ½ c. margarine (1 square)

Then  add and mix:
2 eggs
¾ c. sugar
6 heaping Tbs. cornmeal
2 tsp. baking powder
1 tsp. salt
2 c. flour
1 c. milk

Pour into 9×9 greased pan. Bake at 350 degree oven for about 30 minutes.

Broiled Lemon Caper Mahi Mahi

I’ve been branching out with our fish choices and recently tried mahi mahi, which is kind of a bland fish.  The good news about a bland fish is that you can dress it up to taste fabulous.  This recipe is a slight variation on Grilled Mahi Mahi with Lemons and Capers from Kalyn’s Kitchen, my other favorite recipe blog.

Mahi Mahi filets, one per person
Marinade:
3 T fresh squeezed lemon juice
1 tsp. Dijon mustard
1/4 cup extra virgin olive oil
2 T capers (I LOVE capers)
2 cloves garlic, minced
1 tsp. dried parsley
1/2 tsp fresh ground black pepper

Mix marinade ingredients well. Put Mahi Mahi filets into ziploc bag, pour marinade over, and allow to marinate 2-3 hours. (Don’t leave it longer than that for best results.)
Preheat broiler.  Place mahi mahi filets in broiler and pour the marinade and capers from the bag on top.  Broil for about 10 minutes, or until filets start browning.

Two Mint Brownie Recipes

Mint BrownieI guess I figure mint brownies are a natural St. Patty’s dessert not because of any Irish affliliation, but because of the green frosting. These are my two favorite. I post the BYU mint brownie recipe because I fell in love with mint brownies there. Although this is supposedly the real deal (from an alumni magazine), I don’t know that it tastes the same as the sheets that come out of BYU catering–but a good enough substitute.

The second recipe is from a family cookbook and I think it’s fantastic. Definitely more butter! The more the merrier . . . Of course, you can simply make  a box of brownies and frost them with these frostings, and have this dessert a little faster (FHE treats this week for us). The picture above is of the BYU mint brownie, minus the chocolate frosting on top, and the green food coloring in the mint frosting.j

BYU Mint Brownies

1 c. butter
1/2 c. cocoa
2 T. honey
4 eggs
2 c. sugar
1 3/4 c. flour
1/2 T. baking powder
1/2 t. salt
1 c. chopped walnuts

Mint Icing
5 T. butter
dash of salt
3 T. milk
1 T. light corn syrup
2 1/3 c. powdered sugar
1 t. mint extract
1-2 drops mint food coloring

Melt butter and stir in cocoa. Allow to cool. Add all ingredients except nuts, and mix well, then gently fold in the nuts. [These instructions are the ones from the BYU recipe. I mixed the dry ingredients in one bowl, then combined eggs, sugar, cooled cocoa mixture and honey in another, then combined.] Pour into a greased 9 x 13 pan. Bake at 350 for 25 minutes and cool. [Note: at 25 minutes yesterday, these didn’t seem done, so I let them go an extra 7 minutes, and the end result was pretty dry. I think they must need to be pulled out at 25 minutes to be the right consistency, even though they’ll seem underdone.]

For the icing, soften butter. Add salt, corn syrup, and powdered sugar. Beat until smooth and fluffy. Add extract and coloring. Mix. Add milk gradually until the consistency is a little thinner than cake frosting. Spread mint icing over brownies. Place brownies in the freezer for a short time to stiffen the icing. Remove from the freezer and carefully add a layer of chocolate icing (if desired).

Diane’s Chocolate Mint Dessert (aka Brownies)

1 c. flour
1 c. sugar
1/2 c. butter, softened
4 eggs
1 t. salt
1 1/2 c. Hershey chocolate syrup

Heat oven to 350. Greae 9 x 13 pan. In a bowl, combine flour, sugar, butter, eggs and syrup. Beat till smooth. Pour into pan and bake 25-30 minutes. Cool.

Mint Cream
2 c. powdered sugar
1/2 c. softened butter
1 T. water
1/2-3/4 t. mint extract
3 drops green food coloring

Combine all mint cream ingredients and beat until smooth. Spread on cooled brownies and refrigerate until  cold (1-2 hours).

Chocolate topping
6 T. butter
1 c. chocolate chips

Melt butter and chocolate chips over low heat or in the microwave at 30 second intervals. Pour over chilled dessert and cover and chill 1 hour.

Peanut Butter & Kisses Cookies

I don’t know what these cookies are called, so I kind-of made up this name. In my America’s Test Kitchen book, they call them Peanut

Don't these take you back?

Blossom cookies, but I had never heard that before, and in fact, skimmed over the recipe several times before I looked at it. When I did look at it, I actually preferred an older recipe I had for these cookies, which came from my second cousin. This recipe below is super reliable, and tastes just how I want these cookies to taste. The Test Kitchen recipe is similar, but blends a cup of peanuts with the flour before adding it to the cookies–I don’t need that many peanuts for my taste. The suggestion of the Test Kitchen that I did like, though, is to put the Hershey Kiss on the cookie  1-2 minutes before they have finished baking. When the cookies cool, the interior of the kisses stay soft, which is a nice touch, and they have a nice sheen. This recipe yields about 24-28 cookies.

Peanut Butter & Kisses Cookies

1 3/4 c. flour
1 t. soda
1/2 t. salt
1/2 c. butter, softened, but not too soft (1 stick)
1/2 c. peanut butter
1/2 c. sugar
1/2 c. brown sugar
1 egg
1 t. vanilla
1 package Hershey Kisses, unwrapped

Preheat oven to 375. Get out a cookie sheet, but there’s no need to grease it. In a small bowl, whisk flour, soda and salt. In another bowl, cream butter, then add peanut butter and beat until combined (1 minute). Add sugars and cream for 2-3 minutes. Then add egg and vanilla and mix another 30 seconds, until combined. Add the dry ingredients and mix until the flour has been absorbed, making sure to scrape the bottom of the bowl.

Roll the dough into balls the shape of walnuts, and then roll the balls in granulated sugar and place on cookie sheet (they will spread to be about 1 1/2″ as they bake). Bake for 10-12 minutes, until lightly browned. After removing them from the oven, place a kiss in the middle of the cookie. Wait one minute, then twist the kiss into the middle to secure. (Or see note above for the Test Kitchen’s alternative.)

Roasted Red Pepper Spread

We made this last weekend when we got together with friends, and we were surprised out how well it turned out, especially ’cause it’s made mostly with pantry supplies (I love things that are easy to keep on hand–it seems like I’m always needing to find something to make for a party and I don’t have enough time to get to the store beforehand. And between this and the quesadillas, I now have two reasons to keep roasted red peppers on hand!). The dip’s sweeter than I would’ve expected, but it tasted great with salty crackers and the other veggies we had. This recipe comes from The New Best Recipe cookbook.

Roasted Red Pepper Spread

1 c. walnuts
12 oz. jarred raosted red peppers, drained, rinsed, and patted dry with paper towels
1/8 t. cayenne pepper
1/4 c, coarsely ground plain wheat crackers
3 T. juice from 1 large lemon
1 T. mild molasses
1 t. honey
1/2 t. ground cumin
3/4 t. salt
2 T. extra-virgin olive oil

Place the walnuts in a medium skillet over medium heat and toast, shaking the pan occasionally to turn the nuts, until they are fragrant, about 5 minutes. Cool the nuts on a plate.

Process the toasted walnuts with the remaining ingredients in a food processor until smooth, about 10, one-second pulses. Transfer to a serving bowl, cover with plastic wrap and chill until the flavors meld, at least 30 minutes (the dip can last 2 days in the fridge before serving).  Note: you can also finely chop the walnuts and peppers and mix with other ingredients, or use your blender if you don’t have a food processor.

Garlicky Potato Wedges

Oh my. These are quite amazing, a welcome respite after a week of pretty so-so recipes (which pinnacled with ricotta pie last

Only two wedges remained after dinner.

night that the kids took one bite of and said “this is disgusting.” Any one have a good recipe for ricotta pie?). Anyway, if you’re into garlic and potatoes (personal favorites), I think you will love these. I declared last night that we should eat these weekly–Henry objected (he doesn’t like potatoes!?) and conceded monthly, then declared, “and today’s the first day of March! No more potatoes in March.” Rex and I both decided we would count yesterday as February instead.

Garlicky Potato Wedges
from America’s Test Kitchen Annual, 2009

3 russet potatoes, cut into twelve wedges lengthwise
6 cloves garlic, minced
6 T. vegetable oil
2 T. cornstarch
1 1/2 t. salt
3/4 t. pepper
1/2 t. garlic powder

Preheat oven to 475. Place oil and garlic in a large microwaveable bowl and microwave on high for 1-2 minutes, until the garlic is fragrant. Leave the garlic in the bowl, but remove 5 T. of the oil to a large rimmed baking sheet and swirl to cover the sheet. Set aside.

Place potato wedges in microwaveable bowl and toss with the remaining garlic. Cover tightly with plastic wrap and microwave on high for 2-3 minutes. Remove, stir potatoes, then microwave again for an additional 2-3 minutes, until the edges of the potatoes are translucent. Meanwhile, stir the cornstarch, salt, pepper, and garlic powder together in a small bowl.

Transfer the potatoes to the oiled baking sheet and sprinkle with the cornstarch mixture. Roast for 35-40 minutes, flipping the wedges  half way through the baking time. Enjoy!

Oatmeal Chocolate-chip Cookies

When I was growing up, “Mrs. Fields Cookies” had just gotten its start, and recipes purporting to be hers abounded. My mom got this

A little thin, but great flavor!

one from her mom and would make them using a quarter cup of batter per cookie, which does make cookies roughly the size of Mrs. Fields’. I remember one of my friends thinking that the resultant huge cookies were the best things ever. I took over production of said cookies when I was maybe eleven, and before long I had this recipe memorized. The recipe, as I wrote it down probably in high school (to judge from my handwriting) reads as follows:

4 eggs

1 lb butter

2 c. sugar

2 c. brown sugar

_______________

1 t. salt

2 t. baking soda

2 t. baking powder

2 t. vanilla

4 c. flour

5 c. oats

1 pkg chocolate chips

400 degrees for 5-6 min.

I know the line indicates “cream above ingredients” but don’t recall any other technique specifics. Basically, everything goes in the KitchenAid, then it gets scooped out in cookie-sized dollops & baked. (I did have to bake them for 8-9 minutes but that’s typical of my oven.) I am sure that “flour” means white flour & believe that “oats” means old-fashioned (not quick) ones. I made a full batch yesterday–for the first time in at least a decade (I usually halve it), and substituted in one cup of wheat flour. I also added the flour a cup at a time and mixed in between, which cut down on the spillage issue. A full recipe strains the capacity of my old-school KitchenAid. It also makes over 5 dozen big cookies. I figured I’d freeze a bunch, but 24 hours & 6 guests later, I only have about a dozen left.

This recipe works so well at high altitudes & with an electric oven, which is my way of saying that yesterday’s cookies were, in my opinion, a bit flat & that this has been an issue for many of my recipes here in Chicago. They also crumbled easily, though that could be the result of not letting them cool completely. Should I be adding more flour?

Chinese Pork and Cabbage Dumplings

Potstickers are undoubtedly one of the most divine foods. This recipe is also quite straightforward, and terrific. The dipping sauce also really makes it shine. I served these with rice and broccoli. Yum. And thanks to Kung Fu Panda, my kids think they’re cool to eat, too.

Pork and Cabbage Dumplings
from the Best International Recipe

Filling:
3 c. minced napa cabbage leaves
3/4 t. salt
3/4 lb. ground pork
4 scallions, minced
2 egg whites, lightly beaten
4 t. soy sauce
1 1/2 t. minced or grated fresh ginger (must use! critical for flavor)
1 medium garlic clove, minced
1/8 t. black pepper

Dumplings:
24 round gyoza wrappers (you can use wonton wrappers, which will decrease cooking time to 6 minutes, and increase the yield to 40)
2 T. vegetable oil
1 c. water

For the filling:
Toss the cabbage with salt in a colander and set over a bowl and let stand for 20 minutes, until cabbage begins to wilt. Press the cabbage gently with a rubber spatula to squeeze out any extra moisture, then transfer to a medium bowl. Add the remaining filling ingredients and mix thoroughly, then cover with plastic and refrigerate until mixture is cold, 30 minutes or up to 24 hours.

For the dumplings:
Fill, seal and shape the dumplings. If you haven’t done this before, I found a great, short video clip here:

I usually use water and my fingers to seal, just because it’s easy–and fun. As you fill the dumplings, place them on a floured or parchment-lined sheet. At this point, they can be frozen for up to a month. (It’s great to have help with this step or else it takes a little while. We’ve had fun filling and cooking these with friends as a casual dinner party.)

When ready to cook, brush a non-stick 12-inch skillet with 1 T. of oil, then arrange half the dumplings in the skillet with the flat side facing down. Place the skillet over medium-high heat and cook the dumplings, without moving, until golden brown on the bottom, about 5 minutes. Reduce the heat to low, add 1/2 c. of water and cover immediately. Continue to cook, covered, until most of the water is absorbed and the wrappers are slightly translucent, about 10 minutes. Uncover the skillet, increase the heat to medium-high, and continue to cook, without stirring, utnil the dumpling bottoms are well browned and crisp, 3-4 minutes more. Slide onto a towel-lined plate to let drain, then transfer to a platter. Cook remaining dumplings and serve with sauce.

Scallion Dipping Sauce

1/4 c. soy sauce
2 T. rice vinegar
2 T. mirin or white wine mixed with 1 t. sugar
2 T. water
1 scallion, sliced thin on the bias
1 t. chili oil (optional)
1/2 t. toasted sesame oil

Combine all ingredients in a bowl and serve.

Homemade Hamburger Buns or Potato-Buttermilk Rolls

hamburger-buns
So, lest it appears that all my family eats is bread and dessert, I feel as though I should say that I am constantly trying to get fruits and veggies down us in any way, shape or form. It’s just that I get the most excited about making new breads and desserts, hence the high population on my blog. This week’s task was to find a good hamburger bun recipe. Last time I bought hamburger buns, I felt a little like we were eating soft-ish cardboard. Not pleasant. So, this was the first recipe I found that claimed it was a great bun. And it is. I made them two days ago, and we just finished the last of them for lunch today–they are very light and moist and made my mediocre burgers taste terrific (well, it was a combination of the buns and the raspberry chipotle barbeque sauce).

Hamburger Buns or Potato-Buttermilk Rolls
adapted from Williams-Sonoma Baking

1 c. mashed potato (peel and cook 1 large russet or use reconstituted potato flakes–the easier option!)
1 1/2 c. water
1 1/2 c. buttermilk (you can also squeeze 1 1/2 T. lemon juice into milk and let it sour for 5 minutes before using)
2 packages yeast (4 1/2 t.)
6 c. all-purpose flour (can substitute up to 2 c. with whole wheat flour)
2 T. sugar
1 T. salt
1/2 c. butter, softened or melted

Combine 1/2 c. water and yeast in a small bowl, stir, and let foam for 5 minutes.

If using a mixer: Combine mashed potato, buttermilk, remaining 1 c. water, sugar, salt, butter and 2 c. flour, attach the dough hook and mix for 1-2 minutes. Add the yeast mixture. Continue to add the remaining flour, 1/2 c. at a time, until the dough pulls from the sides of the bowl, but still sticks to the base. Knead with the hook for 5-7 minutes more.

If doing by hand: Combine mashed potato, buttermilk, remaining 1 c. water, sugar, salt, butter and 2 c. flour and stir until shaggy. Add the yeast, stir, and then continue to add the remaining flour, stirring as long as you are able, 1/2 c. at a time. Using your hands, add the rest of the flour, then flip the dough onto a counter, place the bowl on top of it, and let it rest for 5-10 minutes. Then, knead the dough until it is smooth and elastic, 5-7 minutes.

Place the dough into a greased bowl, cover with plastic wrap, and let rise for one hour. Line two baking sheets with parchment or cooking spray. Turn out dough onto a counter, let deflate, then divide into 16 pieces (the recipe says to only make 12 hamburger buns, which I did, and they were huge! I would definitely divide the dough into 16 for rolls or buns, and I’m sure they will still be quite sizeable). Shape any way you want (for buns, pull the sides of the roll under and tuck into the bottom of the roll, creating a nice, taut dome), then place on baking sheets. Cover with a clean towel and let rise for another 30-40 minutes (the more rise time, the airier the roll). Preheat the oven to 375.

Before baking, dust the rolls with flour or brush with egg yolk+1 t. water and then sprinkle with sesame seeds. Bake for 20-25 minutes. Remove to a rack and let cool slightly before serving.

Hooray for a good bun!