Irish Soda Bread with Raisins and Caraway Seeds

irish-soda-bread
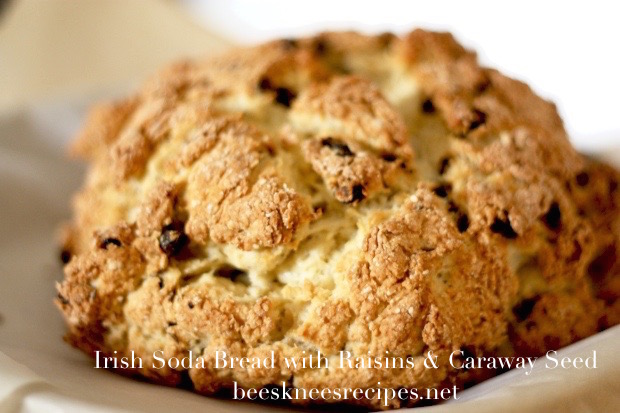
On the off-chance that someone out there is looking for soda bread to make tonight (or this weekend), I thought I would post my favorite one that I’ve made–it comes from
The New Best Recipe. This is one of the variations that they list for classic soda bread, but I find it more interesting than the normal loaf, and it’s extremely easy to make. If you cook it in a dutch oven or cloche, it also turns out beautiful and crusty. If you want, of course, omit the raisins and caraway seeds, but to make the classic bread, also decrease the sugar by 2 T. and leave out the egg (but what fun would that be?).

Irish Soda Bread with Raisins and Caraway Seeds

3 c. lower-protein unbleached all-purpose flour, such as Gold Medal or Pillsbury [I’ve used whatever I’ve had on had, and it’s okay, just be careful not to overwork the dough or it doesn’t have the right crumb; I’ve even included 1 c. whole wheat flour, and it works great]
1 c. plain cake flour
1/4 c. sugar
1 1/2 t. baking soda
1 1/2 t. cream of tartar
1 1/2 t. salt
4 T. unsalted butter, softened, plus 1 T. melted for the crust
1 1/4 c. buttermilk (or just add 1 T. lemon juice to regular milk and let it sit for a few minutes)
1 large egg, lightly beaten
1 c. raisins
1 T. caraway seeds

1. Adjust an oven rack to the upper-middle position and heat the oven to 400 degrees. Whisk the flours, sugar, baking soda, cream of tartar, and salt together in a large bowl. Work the softened butter into the dry ingredients with a fork or your fingertips until the mixture resembles coarse crumbs.

2. Combine the buttermilk and egg with a fork. Add the buttermilk-egg mixture, raisins, and caraway seeds to the flour mixture and stir with a fork just until the dough begin to come together. Turn out onto a flour-coated work surface; knead just until the dough becomes cohesive and bumpy, 12-14 turns. (Do not knead until the dough is smooth or the bread will be tough. You don’t want the bread to work up its gluten.)

3. Pat the dough into a round about 6 inches in diameter and 2 inches high; place on a greased or parchment-lined baking sheet. [I put mine in a cloche or dutch oven.] Score the dough by cutting a cross shape in the top of the loaf.

4. Bake, covering the bread with aluminum foil if it is browning too much, until the loaf is golden brown and a skewer inserted into the center comes out clean or the internal temperature reaches 170 degrees, 40-45 minutes. Remove the loaf from the oven and brush the surface with the melted butter; cool to room temperature, 30-40 minutes. Serve.

Pizza Dough for Grilling

With the warmer weather on its way I’m anxious to find reasons to be outside at the grill. Scratch that. My hubby does the grilling ’round here. I should mention though that this recipe works in your oven just as well. The recipe is from Cuisine At Home but the grill technique is the hubby’s.

For thin, crispy, chewy pizza crust with smoky flavor.

Makes enough for four 12-inch pizzas
Total time: 15 minutes + 3 hours for rising

Ingredients

1 cup warm water (105-115º)
1 Tbsp. sugar
1 pkg. of active dry yeast (2 1/4 tsp.)
2 1/4 cups all-purpose flour
1 cup cake flour
1 Tbsp. kosher salt
2 Tbsp. olive oil

Directions

Combine water, sugar, and yeast. Proof until mixture turns foamy, about 5 minutes.

Mix flours and salt in the bowl of a stand mixer fitted with a dough hook.

Add oil to proofed yeast mixture; (if kneading by hand, knead dough the same amount of time.)

Place dough in a lightly-oiled bowl. Turning dough to coat surface. Cover dough with plastic wrap. Let dough rise in a warm place until doubled, about 2 hours.

Punch dough down and divide it into four balls, pinching the bottom closed. Cover with plastic wrap; let rise in a warm place another hour. Prepare pizza toppings.

Preheat one side of grill to medium-high, the other side to low. Preheat with lid down. Prepare work station by setting your toppings, tongs, pizza peel, and other tools you might need, near your grill. Timing is everything.

Roll out the dough on a flour dusted surface. Shape it into a 10-12 inch rustic circle or rectangle.

Transfer the dough directly onto the hottest part of the grill. Close lid and cook 1-3 minutes. The crust will bubble and grill marks will appear underneath. If your grill has hots spots use tongs to rotate the crust.

Flip crust and move to the cool side of the grill (or a baking sheet if you don’t have a cool side). Brush crust with olive oil before adding toppings. Be light handed with the toppings because of the quick cooking time or just precook your toppings. We recommend keeping this simple. Homemade marinara, thin slices of mozzarella, and basil.

Place dressed pizza back on the hot side of the grill and cover for 30 seconds to a minute. Watch the crust carefully. Total time on the grill is as little as 2 1/2 – 4 minutes.

Slide finished pizza onto your peel using tongs,. Add finishing toppings such as red pepper flakes or Parmesan cheese. Now it is time to enjoy it.

Hints
There are so many variables in this recipe. Play around with the thickness of your rolled out pizza dough. Thinner dough = more crackery; thicker dough = more chewy. Also, Medium-high on our grill is about 375º. It cools to 300-325º each time the lid is opened. Be sure to put the lid back down between pizzas to allow for proper reheating. If you are adapting this to your oven the temperature should be much higher, 450º-500º depending on your oven. Put a pizza stone in the oven to heat up and transfer your pizza dough to the warm stone. Adapt where necessary.  If you don’t have a pizza peel just use a rim-less cookie sheet or the back of a regular cookie sheet. Have fun.

Spicy Pork Posole

I first had posole soup at a Chicago restaurant my sister took me to, and I’ve been meaning to make it home ever since, and finally found a good recipe. This recipe is from Everyday Food, but for some reason cannot be found on their website (?!!?), so I’m typing it up. I love the hominy in it. If you haven’t tried hominy yet, you’re in for a big treat. It’s corn that’s been alkalized, so it puffs and has a completely different texture and taste than corn does. The closest thing I can compare it to is garbanzo beans, but if that makes it sound gross, ignore that, because it’s not. Anyway, my Cape Verdean friends in Rhode Island use hominy in some of their great dishes, but posole is the only other dish I’ve seen it in (you can read this as a call for more great hominy recipes, if you have some). This soup is also a great, easy weekday dinner that uses many kitchen staples. Incidentally, you can leave the spice out by using only the adobo sauce, and not the chile, if you prefer the soup to be mild.

Spicy Pork Posole

2 T. olive oil
1 pork tenderloin (1-2 lbs.)
1 small onion, diced
2 cloves garlic, peeled and minced
2 c. water
2 (15 oz.) cans chicken broth, or 3 1/2 c. homemade chicken broth
2 cans hominy, drained and rinsed
1 can (15 oz.) diced tomatoes, with juices
1 chipotle chile in adobe sauce, chopped (with 1 T. sauce, if you prefer)
1/2 c. chopped cilantro, stems removed
lime wedges, diced avocado, sour cream for serving (optional, but really a good idea)
salt and pepper to taste

1. In a large dutch oven, heat the oil over medium-high. Add the pork tenderloin to the pan, allowing it to brown on every side, rotating it every 2-3 minutes. Remove the pork to a bowl.

2. Add the onion and garlic to the pan, salt and pepper according to taste, and then, stirring frequently, cook until tender and translucent, about 4-5 minutes. Add water, chicken broth, hominy, tomatoes, chipotle chile, and pork (with any accumulated juices) and bring to a boil. Turn the heat down, and allow to simmer until the pork is fully cooked (between 5-10 minutes. You may want to check it with an instant-read thermometer. It should be from 160-170 degrees).

3. Remove the pork from the soup and shred it (use 2 forks and scrape the pork down with the grain). Return to soup, adjust seasonings, and allow to simmer until ready to serve. Stir in cilantro just before serving, and pass chopped avocados, sour cream, and lime wedges with the soup, if desired.

Best Beef Stew Ever

I made beef stew in the crock pot yesterday that was apparently so marvelous that my husband had to text me immediately during our Young Womens activity to tell me we should eat it every night from now on.  Then today he told me to put it on the recipe blog.  This from the guy who regularly informs me that recipe blogs are complete dullsville.  (Of course, his idea of a good time is reading economics blogs.)

I think part of what made it so great was using shredded beef.  We had the remains of 3 separate pot roasts in the freezer since there are only 2 of us and we get sick of pot roast way before we finish all the leftovers.  I thawed them and shredded them and it gave the stew a more interesting texture than my usual chopped stew meat.  But stew meat would probably be fine too, since I think the herbs were also key (and maybe the vinegar).

So here you go.  May your husband (or wife or significant other) praise you as mine praised me.

Best Beef Stew Ever

1 1/2 lbs shredded beef
6-7 stalks celery, chopped
4 cloves garlic, minced
1 large onion, diced
2 carrots, chopped
2 cans salt-free diced tomatoes
2 cans beef broth (or 4 C. homemade beef broth) + 1 can water
2 T. Herbes de Provence
1 T. kosher salt
1/4 C. white vinegar

Throw everything in the crock pot, give in a good stir and cook on low for 8-10 hours.

Swiss Fondue without (much) Wine

We really just do fondue on Valentines Day, but it’s a tradition I really look forward to. However, since I’m not a wine drinker, I’ve found that all the recipes I’ve tried have a little too strong of a wine taste to suit us. This year, I played with it, and I liked the result. I’ll include the original recipe amount for wine as well (the recipe comes from the Best International Recipe), because I’m sure there are many other people who feel quite the opposite of me!

Also, if you haven’t ever purchased Gruyere and/or Emmentaler, you will probably be surprised at how expensive they are (usually about $20 total for the amount needed in this recipe). You can find Gruyere at Costco at a more reasonable cost, but I’m not sure about Emmentaler. Using a nicer cheese makes all the difference, though, since the ingredient list is short, but you should definitely feel free to experiment to fit your budget and taste. In Rhode Island, we asked our Farmstead people for a good fondue mix, and they gave us some amazing cheeses, including one called Appenzeller, I believe. Here in Utah, Harmons has a really nice selection (including bags of preshredded Gruyere and Emmentaler–how convenient! But, I haven’t bought it yet). I’ve even used a mix of Gruyere and plain Swiss when things were tight, and it was fine. Not amazing, but highly edible.

Swiss Fondue

8 oz. Gruyere cheese, shredded
8 oz. Emmentaler cheese, shredded
1 1/2 T. cornstarch
1 clove of garlic, peeled and sliced in half
1/8 t. freshly ground nutmeg
salt and freshly ground pepper to taste
1 3/4 c. dry white wine
or
1 c. chicken stock (or broth)
1/2 c. apple juice
1/4 c. white wine (or take the wine completely out, and just use 3/4 c. apple juice)

1. In a medium bowl, combine the shredded cheeses and toss with cornstarch.

2. If you have a fondue pot, rub the inside of it with the garlic clove. If you don’t, rub the inside of a heavy-bottomed pan with the garlic. Either way, in a heavy-bottomed pan, bring the wine or chicken stock, apple juice, and wine to a simmer. Once the liquid is simmering, add the cheese a handful at a time, whisking after each addition to incorporate. Then, add the nutmeg, and salt and pepper to taste.

3. Transfer the cheese mixture to a fondue pot, if you have one, or simply bring the pot to the middle of the table and enjoy!

Note: When the fondue cools down, it will get stringy. You can remedy this by either having it over a sterno can, or placing it back on the stove to reheat (but DON’T put a ceramic fondue pot on the stove–it will crack. I’ve done this).

We’ve fondued many different foods, but our favorites are cooked and sliced apple chicken sausage, roasted or steamed broccoli and cauliflower, and of course, cubed french bread.

Chocolate-Cherry Fudge Bars

I come back to this recipe every February: chocolate, cherries, pink. Nice. And a real winner  if you’re a fan of marachino cherries and fudginess, which I

Quite festive, n'est-ce pas?

certainly am on both accounts.  I’ve tried substituting cocoa powder for the baking chocolate, and the baking chocolate comes out better. It’s also important not to overbake this recipe, or it will come out more cakey than fudgy. I pulled it from a collection of Kraft recipes years ago. I’m leaving out all the branding, but I’m sure if you use all Kraft products, the brownies will taste, umm, Krafty.

Chocolate-Cherry Fudge Bars

4 squares unsweetened baking chocolate
3/4 c. butter (1 1/2 sticks)
1 1/2 c. sugar
3 eggs
1 t. vanilla
1 c. flour
1 pkg. (small–4 serving size) chocolate instant pudding dry mix (1/2 c.)
3/4 c. maraschino cherries, divided
7 T. maraschino cherry juice, divided
2 oz. cream cheese, softened
1/2 c. powdered sugar

1. Preheat oven to 350. Line 13×9″ baking pan with foil, ends extending over the side of the pans. Spray foil with cooking spray. Set aside.

2. Heat chocolate and butter in small saucepan (or microwave in a bowl in 30 second increments) until butter is melted. Stir until chocolate has also melted. Add sugar and mix well. Blendin eggs and vanilla. Add flour and dry pudding mix. Combine. Stir in 1/2 c. of the chopped cherries and 5 T. (1/3 c.) of the cherry juice. Spread into the prepared pan.

3. Bake 30-35 minutes or until wooden toothpick inserted in center comes out with fudgy crumbs. (Do not overbake.) Place pan on a wire rack to cool.

4. Mix cream cheese, powdered sugar and remaining cherry juice until well blended. Drizzle over cooled dessert [I find this works best by dipping a fork into the glaze and quickly drizzling across the top of the brownies, moving from left to right; speed’s the key]. Top with remaining 1/4 c. cherries. Use foil handles to remove dessert from pan before cutting into bars. Store leftovers in a tightly covered container in the refrigerator.

Note: If using a glass baking dish, reduce the temperature by 25 degrees.

Black Bean Burgers

Well, I’ve tried several recipes that are light at this point, and I think only one is post-worthy (the sweet potatoes from a few posts ago). So, I’m abandoning that approach, and going instead back to my old stomping grounds for good recipes. We tried this one last week, and I’m already sure it will grace our table many times in the future. It’s from the 2011 America’s Test Kitchen Annual, and I love the red pepper in it–it’s terrific. A suggested variation is to sub 1 T. minced canned chipotle chile in adobo sauce for the cayenne and replace 1/4 c. of the red pepper with 3/4 c. thawed frozen corn. Sounds like a good plan for next time.

Black Bean Burgers

2 slices high-quality white sandwich bread, torn into pieces
2 large eggs
3 T. olive oil
1 t. cumin
1/2 t. salt
1/8 t. cayenne pepper
2 (15 oz.) cans black beans, drained and rinsed
1 red bell pepper, stemmed, seeded, and chopped fine
1 shallot, minced (about 3 T.)

1. Adjust an oven rack to the middle position and heat the oven to 350 degrees.

2. Pulse the bread in a food processor to coarse crumbs, about 10 pulses. Spread the crumbs on a rimmed baking sheet and bake, stirring occasionally, until golden brown and dry, 10-12 minutes. Set aside to cool to room temperature. {I just realized I skipped this step–the burgers were quite moist–I’m sure this dries them out and gives them quite a different, likely better, texture. But, foregoing it still produced great results.}

3. Whisk the eggs, 1 T. of the oil, the cumin, salt, and cayenne together in a small bowl. Place 2 1/2 cups of the beans in a large bowl and mash them with a potato masher until mostly smooth. Stir in the bread crumbs, egg mixture, remaining 1/2 c. beans, bell pepper, cilantro and shallot until just combined. Divide the bean mixture into 6 equal portions, about 1/2 c. each, and lightly pack into 1″ thick patties.

4. Heat 1 T. more oil in a 12″ nonstick skillet over medium heat until shimmering. Carefully lay half of the patties in the skillet and cook until well browned on both sides, 8-10 minutes, flipping them halfway through.

5. Transfer the burgers to a plate and tent loosely with foil. Return the skillet to medium heat and repeat with the remaining 1 T. oil and remaining burgers. Serve.

Garlicky Breadsticks

At Halloween time, I was recipe shopping for breadsticks, and I found that the prospects were grim (Rex says no pun intended). So, I merged a few of the recipes together, and I really liked the results. I’m thinking of it now because of the upcoming Superbowl–which I’m only interested in because of the appetizers we usually eat. Back to the breadsticks, here’s the know-how:

Garlicky Breadsticks

1 recipe deep dish pizza dough
optional add-ins for the breadsticks: 1/4 c. fresh herbs and/or 1 c. parmesan cheese, finely grated
1/3 c. olive oil
1/2 t. salt
2-3 cloves garlic

Mix the pizza dough recipe, using any add-ins you may be interested in, and then allow to rise the first time. Instead of greasing cake pans, grease 2 lipped cookie sheets with olive oil (either brush it on, for a light application, or pour it in and swirl it around, for a heavier one). After the first rise, heat the oven to 375 degrees, and divide the dough into 16? 20? pieces (now I can’t remember, but do whatever seems appropriate to your needs), and stretch the dough into long ropes and place on the greased cookie sheet; cover with plastic. Allow to rise an additional 20 minutes.

Meanwhile, in a mortar with a pestle, smash the garlic and salt together until the mixture forms a paste. Add the olive oil and allow it to seep while the bread rises and cooks (if you don’t have a mortar and pestle, smash the garlic with the side of your knife, sprinkle the salt on top, and run the knife blade back and forth over the garlic until a paste forms, then add it to a small bowl with the olive oil).

Bake the breadsticks for about 10-12 minutes, or until browned on top, one sheet at a time. Immediately out of the oven, brush the breadsticks with the garlic-infused oil, and allow to cool slightly before serving.

You can also top the breadsticks, before or after baking, with 1 c. shredded parmesan.


Deep Dish Pizza Crust

I did the traditional pizza I posted earlier for many years, but since I’ve happened upon this recipe, I’m almost wholly converted. I find this recipe to be much simpler–less messy, less time-intensive, and more capable of handling a pile of toppings. I don’t fill the pans as full of olive oil as the recipe calls for most of the time, but it’s worth doing the first time, so you know how terrific the recipe can be, and then pare back according to the needs of your constituents (or conscience). I almost always use this crust for a barbeque chicken pizza, so I jotted that down at the bottom.  This recipe is from the 2007 America’s Test Kitchen Annual.

Deep Dish Pizza Dough

1/2 c. olive oil
3/4 c. plus 2 T. skim milk, warmed to 110 degrees (or 1/3 c. dry milk powder plus 3/4 c. warm water)
2 t. sugar
2 1/3 c. unbleached all-purpose flour, plus extra for dusting
1 envelope (2 1/4 t.) instant yeast
1/2 t. salt

Adjust an oven rack to the lowest position and heat the oven to 200 degress. When the oven reaches 200 degrees, turn it off. Lightly grease a large bowl with cooking spray. Coat two 9″ cake pans with 3 T. oil each.

Mix the milk, sugar and the remaining 2 T. oil together in a liquid measuring cup (if using dry milk, just mix the water, sugar, and oil together). Mix the flour, yeast, and salt (and dry milk, if using) in a standing mixer fitted with a dough hook. Turn the machine to low and slowly add the milk mixture. After the dough comes together, increase the speed to medium-low and mix until the dough is shiny and smooth, about 5 minutes. Turn the dough onto a lightly floured work surface, gently shape it into a ball, and place it in the greased bowl. Cover the dough with plastic wrap and place it in the warm oven until doubled in size, about 30 minutes.

After the first rise, transfer the dough to a lightly floured work surface, divide the dough in half, and lightly roll each half into a ball. Working with 1 dough ball at a time, roll and shape the dough into 9 1/2″ round and press it into an oiled pan. Cover with plastic wrap and set in a warm spot (not in the oven) until puffy and slightly risen, about 20 minutes. Meanwhile, heat the oven to 400 degrees.

Remove the plastic wrap from the dough. Ladle 2/3 c. pizza sauce on each dough round leaving a 1/2″ border around the edges. Sprinkle each with 1 1/2 c. cheese and any other toppings your desire. Bake the pizzas until the cheese is melted and the crust is browning 16-20 minutes. Remove the pizzas from the oven and let them rest in the pans for 1 minutes .Using a spatuala, transfer the pizzas to a cutting board, cut each into 8 wedges, and serve.

Barbeque Chicken Pizza: I’ve based this variation off of Wayland Bakery, where they used to serve my favorite barbecue chicken pizza.

Sauce: 1 part pizza sauce to 1 part of your favorite bbq sauce (the Test Kitchen recently rated Masterpiece KC to be taster’s fave–I’ve actually never tried it, so I’ll add it to my list).  An easy pizza sauce is to simmer one can of crushed tomatoes (I think 20 oz?) with 2 minced cloves of garlic and about 1 T. olive oil for twenty minutes.

Toppings: shredded chicken (can be microwaved and shredded, or use leftovers), a mixture of mozzarella and monterey jack cheeses (I just throw a couple handfuls of each on top of the pizza), and sauce

After the pizza comes out of the oven, add about 3 green onions, sliced thin, and a good 1/4 c. cilantro, minced (or larger leaves, which is pretty but tends to turn off the small children here, not that they would eat this pizza anyway).

If you have more time, you can caramelize onions and add them with the chicken, and leave off the green onions at the end. I like this way better, but don’t always get to caramelizing the onions.

Sweet Potato Pancakes (Latkes)

Wow. I must be on a sweet potato kick–hadn’t realized it. These are delicious. I love them. We usually eat them as a main course, although I know they’re more common as a side. This recipe comes from a 2006 Everyday Food.

Sweet Potato Pancakes

1 lb. sweet potatoes, peeled
3 scallions, finely chopped
2 large eggs, lightly beaten
1/2 c. all-purpose flour
coarse salt and ground pepper
3/4 c. vegetable oil
sour cream, for serving

1. Coarsely grate sweet potatoes on the large holes of a box grater ) or use a food processor fitted with a shredding blade). Transfer to a large bowl: stir in scallions, eggs, flour, 1 t. coarse salt and 1/2 t. pepper.

2. Using a packed 1/4 c. measure of potato mixture per pancake shape into mounds. With hands, form each into a firm ball; transfer to a baking sheet. With palm, flatten balls into 3/4″ cakes.

3. In a large skillet, heat oil over medium until hot.* Using a metal spatula with a thin blade, carefully transfer 6 cakes to skillet; flatten to about 1/2″ thick. Cook until golden brown, 4-5 minutes per side. Transfer pancakes to a paper-towel-lined plate; sprinkle with coarse salt. Repeat with remaining cakes. Serve immediately, with sour cream, if desired.

*Make sure not to get the pan too hot (like on high heat), or the sides will brown too quickly, but the middles won’t be cooked entirely.