Winter Chopped Salad

Winter Chopped Salad

I always feel like salads in the winter should be different than salads in the summer. Something seems incongruous to me if we’re having tomatoes and cucumbers with lettuce in the heart of winter, and though I love Martha’s baked goat cheese salad, as well as my favorite roasted pear salad, I’ve needed to expand my winter salad vocabulary this year. I found this recipe in Sustainably Delicious with a claim that it was one of Paul Newman’s favorite. Well, that’s enough to convince me to give it a whirl. Their salad, though, was decidedly a warm-weather creation, so I changed it to feel more seasonal, but like all the salads, any number of vegetables could be used to change its personality.

Winter Chopped Salad

  • 1/4 c. white-wine vinegar
  • 1/4 c. extra-virgin olive oil
  • 1 t. honey
  • 1/2 t. sea salt
  • 1/4 t. freshly ground pepper
  • 3 medium stalks celery, diced (1/4-inch)
  • 2 medium carrots, diced (1/4-inch)
  • 2 medium tart apples, peeled and diced (1/4-inch)
  • 2 large golden beets, roasted, peeled, and diced 1/4″
  • 4 c. baby arugula
  • 1 bunch watercress
  • 1 c. crumbled goat cheese
  • 1/2 c. toasted almonds, roughly chopped
  1. Whisk vinegar, oil, honey, salt and pepper in a large salad bowl until well combined.
  2. Add celery and carrots to the vinaigrette. Let marinate for at least 10 minutes and up to 1 hour (or longer, if you want a stronger pickled flavor. I did!)
  3. Add apple, beets, arugula and watercress to the bowl; toss to coat. Add almonds and toss to combine.


Orange & Chocolate Panettone

Panettone
I’ve been wanting to make panettone to have on Christmas morning for years, so I have had this recipe tucked away in a binder, waiting for the Christmas when I would be able to accomplish it. I’ve wanted to make this panettone in particular because, although I like the idea of an assortment of fruits and nuts in a Christmas bread, it isn’t that easy to find them where I live, and my kids don’t go for it. So, I thought that a more familiar orange and chocolate flavor would appeal to the whole family.

This year became the year for the panettone, which meant I actually had panettone paper liners (hooray!) and made the time to make this bread. But the thought that this would appeal to everyone? Well, I was wrong. The kids really wanted nothing to do with this bread. On the happy side, the adults just loved it. It was fantastic.

I know that the difference between store-bought anything and its homemade counterpart is usually quite distinctive, but this one really shows off. The texture is so much lighter and fresher and brighter than any panettone I’ve had before. The flavors are rich and full and the bread showcases them perfectly. Hopefully, when I bring this out in holidays to come, the kids will be more on board! This recipe comes from a 2009 copy of Martha Stewart Living. Also, note that this bread needs to be started at least 24 hours in advance, to allow for an overnight rise in the fridge.

Orange & Chocolate Panettone

  • 1 T. plus 1 1/2 t. active dry yeast (two 1/4-ounce envelopes)
  • 1/3 c. whole milk, warmed
  • 14 oz. unbleached bread flour (about 3 cups), plus more for surface
  • 1/4 c. granulated sugar
  • 4 large eggs, lightly beaten, plus 1 large egg
  • 1 1/2 t. coarse salt
  • 10 oz. (2 1/2 sticks) unsalted butter, room temperature
  • 5 1/2 oz. bittersweet chocolate, coarsely chopped (1 1/4 cups)
  • 1 c. diced candied (glazed) orange peel (make your own!)
  • 1/2 t. pure almond extract
  • 1/2 t. pure orange extract
  • Vegetable oil, for bowl
  • 2 t. best-quality unsweetened cocoa powder
  • Pearl sugar, for sprinkling
  • 1/4 c. plus 2 T. sliced almonds, for sprinkling
  1. Sprinkle yeast over milk in the bowl of a mixer fitted with the dough-hook attachment. Let stand until foamy, about 5 minutes. Sprinkle 2 ounces flour (about 1/2 cup) and 1 tablespoon granulated sugar over top. Cover with plastic, and let stand for 1 hour.

  2. Add remaining 12 ounces flour and 3 tablespoons granulated sugar, the beaten eggs, and the salt. Mix together on medium speed until dough forms a smooth, stiff ball, about 5 minutes. Add butter, 1 tablespoon at a time, mixing well after each addition.

  3. Switch to paddle attachment, and mix dough on medium-high speed for 5 minutes. Reduce speed to low, and add chocolate, orange peel, and extracts. Mix until combined.

  4. Turn out dough onto a clean surface, and form into a ball. Transfer to a lightly oiled bowl. Cover with plastic, and refrigerate overnight.

  5. Bring dough to room temperature [this can take a little while!!], and divide in half. Form each half into a ball; place each in a 5 1/4-by-3 3/4-inch paper panettone mold. Transfer to a baking sheet. Let stand in a warm place until doubled in volume, about 2 hours.

  6. Preheat oven to 350 degrees. Lightly beat remaining egg and the cocoa powder together. Brush glaze mixture onto panettone dough, and sprinkle with pearl sugar and almonds. Bake until golden brown, about 50 minutes.

  7. Remove molds from oven, and run a wooden skewer horizontally through the bottom of each panettone loaf. Hang loaves upside down by propping ends of each skewer on 2 large, heavy cans [this step prevents the loaves from collapsing inwards. I was rushed on time and innovative thinking, so I just flipped them upside down. It worked fine because the loaves didn’t raise above the wrapper edges]. Let cool completely.

Christmas Cookies & Candies

Sometimes I feel like I’m hosting cookie tryouts all year long to discover the perfect holiday cookies. But, inevitably, the bulk of trial and error happens in December, as I try and get the right colors and flavors in little boxes that we give to family and friends. Over the last ten or so years, the following cookies and candies have become my favorite, both for variety of taste and appearance, although I try plenty of new ones every year and I already have some I’m excited to post as soon as I get them photographed. Here are some great crowd pleasers! Merry Christmas!
IMG_7911

Cookies
White Christmas Dream Drops
Mint Chocolate-Covered Cookies
Brown Sugar Rugelach
Peanut Butter Toffee Cookies
Pink & White Pinwheels
White Chocolate + Citrus Cookies
Chocolate Crinkle Cookies
Mexican Wedding Cookies
Ginger Spice Cookies

IMG_8313
Candies
Peanut Brittle
Favorite Caramels
Egg Nog Fudge
Candied Orange and Hazelnut Bark

Christmas box

Let the festivities begin!


Pink and White Pinwheels

Pink and White Pinwheels
These pretty and simple little cookies were the perfect addition of color and shape for our Christmas cookie collection last year. Planning to make them again this year! This recipe is a slight adaptation from Heirloom Baking with the Brass Sisters, where this cookie was originally a chocolate and vanilla pinwheel (you can make it chocolate by adding 2 oz. melted bitter chocolate to one-half of the dough, instead of red food dye.) Happy baking!

Pink and White Pinwheels 

2 c. all-purpose flour
1 t. baking powder
1/4 t. salt
2/3 c. unsalted butter
1 c. sugar
1 egg
1 t. vanilla extract
red food dye

Sift the flour, baking powder, and salt together and set aside.

In a mixer with a paddle attachment cream the butter well; then add the sugar and continue creaming until light and fluffy. Add the egg and then the vanilla.

On the low setting, add the dry ingredients and mix just until combined. Divide the dough in half and return half the dough to the mixer. Add a couple drops of red dye and mix to combine. Wrap dough in wax paper and chill both halves of dough 1 hour, or until firm enough to roll.

Roll red dough between 2 sheets of wax paper into a 12-inch by 8-inch rectangle. Repeat for vanilla dough. Remove top sheets of wax paper and invert vanilla dough onto red dough. Remove remaining wax paper. Roll both doughs together, jelly-roll style. Wrap in wax paper and refrigerate at least 3 hours (or freeze 1 hour) until firm.

Preheat the oven to 375 degrees F. Cover a baking sheet with foil, shiny side up. Coat the foil with vegetable spray or use a silicone liner.

Butter a sheet pan. Unwrap the roll and cut into 1/4-inch slices. Place them 1 1/2 inches apart on the sheet pan and bake for 12-15 minutes, or until edges just begin to brown. Coll on a rack. Store between sheets of wax paper in a covered tin.

Apple Cranberry Cake

Apple Cranberry Cake

This cake is so fascinating. It’s almost too tart for my taste, and yet I’ve made it three times now in the last three weeks, and it’s been gone before nightfall. My kids have somehow equated it with the sour spray they get at the summer snow cone stands, and they have just used big ole spoons to work their way through it. And, as mentioned previously, I’m still working on the bags of cranberries I got a little bit excited about in November, so this may have another reiteration or two before Christmas. Which will just be delightful. This recipe comes from Ina Garten’s How Easy Is That? which is a really delightful book for the eager, but sometimes stressed out, hostess that I like to be.

Apple Cranberry Cake

12 oz. fresh cranberries, rinsed and picked over for stems
1 Granny Smith apple, peeled, cored, and diced
1/2 c. light brown sugar, lightly packed
1 T. grated orange zest (2 oranges)
1/4 c. freshly squeezed orange juice
1 1/8 t. ground cinnamon, divided
2 extra-large eggs, at room temperature
1 c. plus 1 T. granulated sugar
1/4 lb. (1 stick) unsalted butter, melted and slightly cooled
1 t. pure vanilla extract
1/4 c. sour cream
1 c. all-purpose flour
1/4 t. kosher salt

Preheat the oven to 325 degrees F.

Combine the cranberries, apple, brown sugar, orange zest, orange juice, and 1 teaspoon of the cinnamon in a medium bowl. Set aside.

In the bowl of an electric mixer fitted with the paddle attachment, beat the eggs on medium-high speed for 2 minutes. With the mixer on medium, add 1 cup of the granulated sugar, the butter, vanilla, and sour cream and beat just until combined. On low speed, slowly add the flour and salt.

Pour the fruit mixture evenly into a 10-inch glass pie plate. Pour the batter over the fruit, covering it completely. Combine the remaining 1 tablespoon of granulated sugar and 1/8 teaspoon of cinnamon and sprinkle it over the batter. Bake for 55 to 60 minutes, until a toothpick inserted in the middle of the cake comes out clean and the fruit is bubbling around the edges. Serve warm or at room temperature.

Apple Cran Eli

This little guy gobbled my photo shoot up in minutes. I really only had one option for my photo. But I loved seeing him go at it!

Lemon Chess Pie

Lemon Chess Pie
For Thanksgiving, I did a grand sweep of all my favorite pies (eight in total!), first, because it was Thanksgiving, and second, because I just wanted to remember them all. Well, I remembered that this is my favorite. Not too lemony, but sweet and custardy with the bright citrus flavor. It’s just lovely. In fact, I was so sad it was gone by Friday, that I made another one Saturday. Lucy and I just ate the last bites. Hopefully, we won’t wait until Thanksgiving next year to have this again. This simple pie is perfect for any night or for company, and it comes from America’s Test Kitchen Annual 2011, but has been reprinted in some of their other publications as well.

Lemon Chess Pie

  • 5 large eggs
  • 1 3/4 c. plus 1 t. sugar
  • 1 T. grated lemon zest and 3 T. juice from 1 lemon
  • 2 T. cornmeal
  • 1/4 t. salt
  • 8 T. (1 stick) unsalted butter, melted and cooled slightly
  • 1 (9-inch) pie shell, chilled (try the cream cheese pie crust if you don’t have a recipe you like!)
1. MAKE FILLING: Whisk eggs in large bowl until smooth. Slowly whisk in 1¾ cups sugar, lemon zest and juice, cornmeal, and salt until -combined. Whisk in butter.2. BAKE CRUST: Poke pie shell all over with fork. Refrigerate 40 minutes, then freeze 20 minutes. Adjust oven rack to upper-middle position and heat oven to 450 degrees. Bake shell until small bubbles appear and surface begins to look dry, about 8 minutes. Remove from oven. Reduce oven temperature to 325 degrees.

3. BAKE PIE: Whisk filling briefly to recombine. Scrape filling into prepared pie shell and bake until surface is light brown and center jiggles slightly when shaken, 35 to 40 minutes. Sprinkle with remaining teaspoon sugar. Cool -completely on wire rack, about 4 hours. Serve. (Pie can be refrigerated, covered with plastic wrap, for 2 days.)

Harvest Grain Rolls

Version 2
So, now that this huge baking week is upon us, I’m looking around thinking, where are all my favorite recipes? Why are they not all on my blog! Why am I not organized!!! Last night, I combed through past pictures, seeing these pies and rolls that I’ve made, and connecting the dots to the recipes they belong to. My hope is to get them all on this fantastic, searchable space, before Wednesday, but if I get even one or two more on here before Thanksgiving, that will help my efforts (and maybe pass along some ideas to you!) next year.

The story of this roll is that I usually like to do a couple of different kinds of rolls, just for fun (I get a whole morning just to make rolls! What fun! I never get to do that except on Thanksgiving morning!), for Thanksgiving dinner, and this is one I usually serve along with a crusty roll and a soft, buttery roll (here are two I like: a crescent and pull-apart). I think they all compliment each other quite well. This recipe comes from the King Arthur Flour website, although, unlike their website but not to disparage the quality of their ingredients, I am not specifying that you should use KAF products exclusively 🙂 NOTE: this will probably not be the most popular roll at the dinner table, but it will be very appreciated when it comes to leftover turkey the next day, when we are all wishing we had eaten a few less white starchy foods the day before. And they are very yummy.

Harvest Grain Rolls

  • 2 c. all-purpose flour
  • 1/2 c. old-fashioned rolled oats (not quick oats)
  • 1 c. whole wheat flour
  • 1/2 c. whole flax meal (I just whiz my flax around in my blender)
  • 2 1/2 t. instant yeast
  • 1 1/2 t. salt
  • 1/4 c. canola oil or melted butter
  • 1 large egg yolk, white reserved for topping
  • 3 T. honey
  • 1/4 c. orange juice*
  • 3/4 to 7/8 c. lukewarm water**
  • *Orange juice won’t add its own flavor to the rolls, but will mellow any potential bitterness in the whole wheat.
  • **Use the greater amount of liquid in winter or in drier climates; the lesser amount in summer, or in a humid environment.

TOPPING

  • 1 large egg white, reserved from dough, whisked with 2 T. cold water
  • rolled oats and/or flax seeds, for topping
  1. Combine all of the ingredients, and mix until cohesive. Cover the bowl, and let the dough rest for 20 minutes, to give the whole grains a chance to absorb some of the liquid. Then knead — by hand, stand mixer, or bread machine — to make a smooth, soft, elastic dough.
  2. Place the dough in a lightly greased bowl, or in an 8-cup measure (so you can track its progress as it rises), and let it rise for 1 to 1 1/2 hours, until it’s risen noticeably. It won’t necessarily double in bulk.
  3. Gently deflate the dough, and divide it into 12 pieces (about 70g each). Shape each piece into a round ball; use your fingers to pull and flatten each ball into a circle about 3″ across.
  4. Place the buns on a lightly greased or parchment-lined baking sheet, cover, and let rise for about 90 minutes, until noticeably puffy. Towards the end of the rising time, preheat the oven to 350°F.
  5. Brush the buns with the egg white/water mixture. Sprinkle with oats and/or flax seeds.
  6. Bake the buns for 21 to 25 minutes, until they’re golden brown. Remove them from the oven, and transfer them to a rack to cool.
  7. Wrap completely cooled buns airtight, and store at room temperature for several days; freeze for longer storage.
  8. Yield: 12 buns.

Cranberry Coconut Macaroons

Cranberry Coconut Macaroon
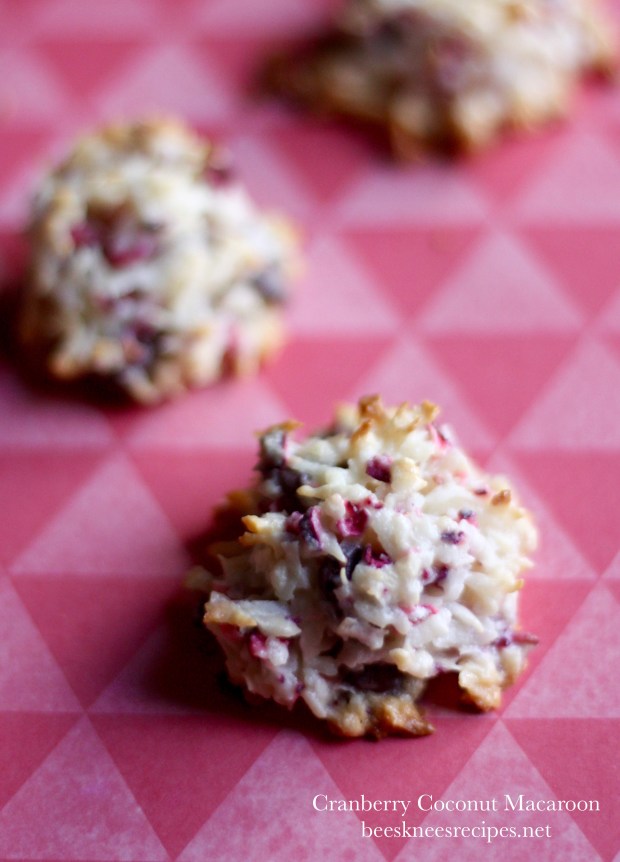
I was very excited to make this recipe, because I may or may not have purchased quite a few bags of cranberries in all my excitement about Thanksgiving. This recipe is lovely. Not the most loved by all of my children, but I loved it, and I am so excited to include it in a Christmas cookie collection. There is a sad story to this recipe, though. I think the original recipe for these cookies (which was on the backside of a cranberry package) must have ended up in the garbage. I’m still looking (and hoping) that it’s somehow just misplaced, and sadly, I can’t seem to locate anything quite like it on the internet. So, I’m posting this from memory, though I’m sure there might be a tweak or two after I make it again. So, consider this a draft, hopefully not too rough.

Cranberry Coconut Macaroons

12 oz. bag sweetened, flaked coconut
3 T. flour (this is the contested ingredient! I believe it’s supposed to be in the cookie, but now that I’m perusing the internet, I’m doubting myself! I’ll just have to make them again to make sure!)
1 can sweetened condensed milk
1 c. fresh or frozen cranberries, finely chopped (or pulsed in a food processor)
1/2 c. chocolate chips

Preheat oven to 325 degrees. Line two baking sheets with parchment paper.

In a large bowl, combine cranberries, flour, and coconut, then stir in the sweetened condensed milk. Once it’s well combined, add the chocolate chips.

Using a teaspoon cookie scoop, drop the cookies onto the prepared sheet. Bake for 20-25 minutes, rotating the sheets to promote even browning. Cool on a rack before serving.

Flaky Cream Cheese Pie Dough

This recipe was recommended to me by my fabulous baker/friend Claudine, who described it as “no-fail.” I totally agree! This recipe is from Rose Levy Berenbaum’s The Pie and Pastry Bible. Note: as you will soon see, Berenbaum is extremely particular and I’m sure her attention to detail yields an amazing crust. I, however, simply use her recipe by putting all the ingredients in my food processor, blending the dry, adding the butter, then the liquid, make into a disk, refrigerate for 1/2 hour, then proceed with my recipes. Maybe someday, I’ll be a little more of a perfectionist . .
Flaky Cream Cheese Pie Dough

[Pastry for a 9-inch pie shell or a 9 1/2- or 10- by 1-inch tart shell]

  • 6 T. unsalted butter, cold
  • 1 c. + 1 T. pastry flour or 1 c. (dip and sweep method) bleached all-purpose flour
  • 1/8 t. salt (for savory recipes, use 1 1/2 times the salt)
  • 1/8 t. baking powder
  • 1/4 c. cream cheese, cold
  • 1 T. ice water
  • 1 1/2 t. cider vinegar

Food processor method:

  1. Cut the butter into small (about 3/4-inch) cubes. Wrap it in plastic wrap and freeze it until frozen solid, at least 30 minutes. Place the flour, salt, and baking powder in a reclosable gallon-size freezer bag and freeze for at least 30 minutes.
  2. Place the flour mixture in a food processor with the metal blade and process for a few seconds to combine. Set the bag aside.
  3. Cut the cream cheese into 3 or 4 pieces and add it to the flour. Process for about 20 seconds or until the mixture resembles coarse meal. Add the frozen butter cubes and pulse until none of the butter is larger than the size of a pea. (Toss with a fork to see it better.) Remove the cover and add the water and vinegar. Pulse until most of the butter is reduced to the size of small peas. The mixture will be in particles and will not hold together. Spoon it into the plastic bag. (For a double-crust pie, it is easiest to divide the mixture in half at this point.)
  4. Holding both ends of the bag opening with your fingers, knead the mixture by alternately pressing it, from the outside of the bag with the knuckles and heels of your hands until the mixture holds together in one piece and feels slightly stretchy when pulled.
  5. Wrap the dough with the plastic wrap, flatten it into a disc (or discs) and refrigerate for at least 45 minutes, preferably overnight. (For a pie shell and lattice, divide it in a ratio of two thirds:one third — use about 9.5 ounces for the shell and the rest for the lattice, flattening the smaller part into a rectangle.)

If you want to make it by hand, please see Epicurious for more directions.

Pear Custard Pie

Pear Custard Pie 2

I clipped this recipe a few years ago from Saveur, and it took me a little while to get around to making it (well, it was actually my sweet neighbor giving me a basket of her pears that got me around to making it!) and now I’ve made it twice in the last two weeks, and I am planning to add it to the Thanksgiving day line-up. Pears and custard are heaven. This lovely recipe combine the two for a sweet, subtle flavor that I love. And notice how simple! This recipe comes from the September 2013 Saveur.


Pear Custard Pie
Flour, for dusting, plus 3 T.
12 recipe Buttery Pie Dough (if you don’t have one you like, try the one below)
4 large ripe Bartlett pears, peeled, cored, and thinly sliced
34 c. sugar
1/4 c. flour
1 c. heavy cream
1 t. clear vanilla [my addition] or vanilla bean paste

On a lightly floured surface, roll dough into a 12″ round. Fit into a 9″ pie plate. Trim edges and crimp; chill for 30 minutes.

Heat oven to 400°. Combine the sugar and flour in a small bowl. Fan half the pears evenly over dough. Sprinkle half of the sugar and flour mixture over pears and drizzle with half the cream. Repeat with remaining pears, sugar, flour, and cream. [I’ve also mixed the sugar, flour, cream in a bowl and poured over the pears, which I believe makes it even creamier.] Bake until crust is golden and filling is set, about 1 hour. Let cool completely before serving.