Swedish Cinnamon-Cardamom Bread

Swedish Cardamom Bread

This recipe is the type of recipe that when I make, I think, I should make this everyday. Life would be a lot happier if I had this to look forward to in the morning or afternoon. Or evening. But, as it happens, I don’t make it everyday, and when I do make it, I’m lucky to get one slice, before all the kids, and darling friends of kids, quickly grab as much as they can.

This recipe is similar to a cinnamon roll, but you don’t cut the individual rolls, making the prep time a little bit faster, and the presentation much different. I love how the shaping of it encourages everyone to tear a handful and just eat! This recipe comes from the Jan. 2015 Saveur

Swedish Cinnamon-Cardamom Bread
For the dough
7 T. unsalted butter
1 12 c. whole milk, heated to 115°
2 t. active dry yeast
4 12 c. flour, plus more for dusting
14 c. sugar
1 12 t. cardamom seeds, lightly crushed (or ground cardamom)
14 t. kosher salt

For the filling
12c. granulated sugar
7 T. unsalted butter, softened
1 T. ground cinnamon
1 12t. cardamom seeds, finely crushed (or ground cardamom)
1 egg, beaten
Pearl sugar, for topping

Make the dough:
Melt butter in a 1-qt. saucepan over medium. Remove from heat and stir in milk and yeast; let sit until foamy, about 10 minutes. Whisk flour, sugar, cardamom, and salt in a bowl. Stir in yeast mixture until dough forms. Transfer dough to a lightly floured surface; knead until smooth and elastic, about 3 minutes. Return dough to bowl and cover with a clean dish towel; let sit in a warm place until dough is doubled in size, about 1 hour.

Make the filling:
Mix granulated sugar, butter, cinnamon, and cardamom in a bowl until smooth.

Assemble the bread:
On a lightly floured surface, roll dough into an 11″ x 17″ rectangle, about 14″ thick. Spread filling over dough, leaving a 12″ border along edges. [I’ve found it works better to divide the dough into two and make two separate loaves. They fit on an baking sheet better. They spread quite a bit in baking!] Working from one long end, roll dough into a tight cylinder; transfer seam side down to a parchment paper-lined baking sheet. Cover with dish towel; let sit in a warm place until dough has doubled in size once more, about 45 minutes.

Bake the bread:
Heat oven to 375°. Using kitchen shears and starting 1″ from ends of dough, make crosswise cuts, spaced 1″ apart, three-quarters of the way through dough. Fan dough slices away from the center, alternating left to right. Brush dough with egg and sprinkle with pearl sugar; bake until golden brown, about 22 minutes. Let bread cool completely before serving.


Sweet Potato with Thai Curry and Coconut

Sweet Potato with Thai Curry and Coconut
I made this recipe the other day because I had everything I needed for it, and because I really love Thai flavors. So happy I discovered it! The sweetness of the potato compliments the other ingredients in the soup, and I served it with sticky rice, and I wished I had made Jamie Oliver’s great chicken skewers, too. I will next time! This recipe comes from Joanne Chang’s
Flour, Too cookbook. One of my favorites!

Sweet Potato with Thai Curry and Coconut

5 large or 6 or 7 medium sweet potatoes, scrubbed clean
3 T. vegetable oil
1 medium onion, cut into 1/2 in. pieces
3 garlic cloves, smashed and minced
1 large carrot, peeled and cut into 1/2 in. pieces
1 celery stalk, cut into 1/2 pieces
1/2 medium fennel bulb, leafy tops trimmed,
and bulb cut crosswise into pieces 1 in/.2.5 cm wide
6 cups/1.4 L Vegetable Stock (see below)
One 13 to 14 oz/390 to 420 ml can coconut milk
2 T. Thai red curry paste
2 1/4 t. kosher salt
1 t. freshly ground black pepper
1/4 c/10 g fresh cilantro leaves for garnish
1/2 lime for garnish

  1. Preheat the oven to 400°F/200°C, and place a rack in the center of the oven.
  2. Place the sweet potatoes on the baking sheet and pierce each one several times with a knife tip or fork. Roast for 1 to 1-1/2 hours, or until they can be easily pierced in the center with a fork. Set aside to cool. (I did this in the morning, to make things go faster at dinnertime.)
  3. In a stockpot, heat the vegetable oil over medium-high heat. Add the onion, garlic, carrot, celery, and fennel; reduce the heat to medium-low; and sweat the vegetables, stirring often with a wooden spoon, for 6 to 8 minutes, or until they soften and the onion is translucent, but not browned.
  4. Peel the cooled sweet potatoes, cut them into large chunks, and add them to the vegetables in the stockpot. Add the stock, raise the heat to medium-high, and bring to a simmer. Reduce the heat to medium-low and simmer gently for 20 to 25 minutes to blend the flavors.
  5. Turn off the heat and add the coconut milk, curry paste, salt, and pepper. Working in batches, blend the soup in the blender until very smooth. Return the soup to the pot and bring back to a simmer. Taste and adjust the seasoning if needed.
  6. Ladle the soup into bowls and garnish each with the cilantro and a squeeze of lime before serving. The soup can be stored in an airtight container in the fridge for up to 3 days or in the freezer for up to 1 month.

Blueberry Cream Hand Pies


So, right now my kitchen is a mess and I have papers to grade, but I’m so excited to write about these little pies that I can’t wait. Having Valentines be on Sunday this year will make it easier to have these sweet little pies for breakfast, which I usually try to do, and have been known to even roll out of bed early to make it happen (though this is really not typical of me). I started making these handpies specifically for Valentines Day a couple of years for the simple reason that I bought a pie press in the shape of a heart and I wanted to use it. But now, these are just my favorite way to share a little love, and create one of the best breakfasts (or desserts, depending on how busy the day becomes!) of the year. I’ve changed the filling, but otherwise am using the recipe from the
Flour bakery cookbook called Homemade Pop-Tarts. 

Blueberry Cream Hand Pies

Pâte Brisée (recipe below)
1 egg, lightly beaten
1 cup (340 grams) blueberry jam*
1/2 cup mascarpone cheese or cream cheese, whipped, and at room temperature

Simple Vanilla Glaze
1 cup (140 grams) confectioners’ sugar
1/4 teaspoon vanilla extract
2 to 3 tablespoons water

Position a rack in the center of the oven, and heat the oven to 350 degrees F.

Remove the dough from the refrigerator and divide it in half. Press each half into a rectangle. On a lightly floured surface, roll out each half into a 14-by-11-inch rectangle. Using a paring knife, lightly score 1 rectangle into eight 3 1/2-by-5 1/2-inch rectangles (about the size of an index card). [If using a decorative cutter, plan accordingly.]

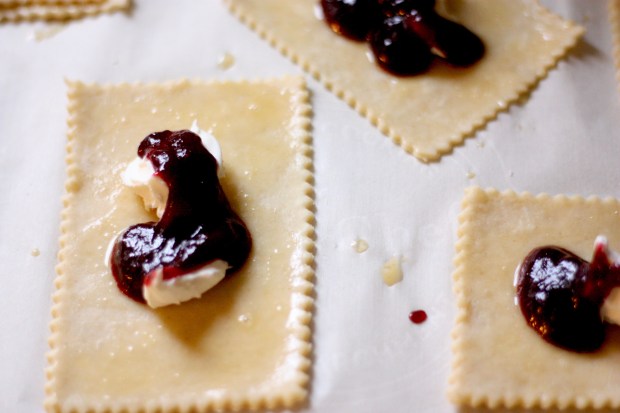
Brush the top surface of the entire scored rectangle with the egg [this is an IMPORTANT step]. Spoon 1 tablespoon of cheese and 1 tablespoon of the jam in a mound in the center of each scored rectangle. Lay the second large dough rectangle directly on top of the first. Using fingertips, carefully press down all around each jam mound, so the pastry sheets adhere to each other.

Using a knife, a pizza roller (easier), or a fluted roller (easier and prettier), and following the scored lines, cut the layered dough into 8 rectangles. Place the rectangles, well spaced, on a baking sheet. [You, of course, can also use the heart pie press if you also couldn’t resist buying one at the store.]

Bake for 40 to 45 minutes, or until the tops of the pastries are evenly golden brown. Let cool on the baking sheet on a wire rack for about 30 minutes.

IMG_8474

To make the glaze: While the pastries are cooling, in a small bowl, whisk together the confectioners’ sugar, vanilla, and enough of the water to make a smooth, pourable glaze. You should have about 1/2 cup. (The glaze can be made ahead and stored in an airtight container at room temperature for up to 1 week.)

When the pastries have cooled for 30 minutes, brush the tops evenly with the glaze, or write sweet messages with the glaze in a piping bag. Let stand for 10 to 15 minutes to allow the glaze to set before serving.

The pastries can be stored in an airtight container at room temperature for up to 2 days.

IMG_8491

Pate Brisee Recipe

1 3/4 cups (245 grams) unbleached all-purpose flour
1 tablespoon sugar
1 teaspoon kosher salt
1 cup (2 sticks / 228 grams) cold unsalted butter, cut into 12 pieces
2 egg yolks
3 tablespoons cold milk

Using a stand mixer fitted with the paddle attachment (or a handheld mixer), mix together the flour, sugar, and salt for 10 to 15 seconds, or until combined. Scatter the butter over the top. Mix on low speed for 1 to 1 1/2 minutes, or just until the flour is no longer bright white and holds together when you clump it and lumps of butter the size of pecans are visible throughout.

In a small bowl, whisk together the egg yolks and milk until blended. Add to the flour mixture all at once. Mix on low speed for about 30 seconds, or until the dough just barely comes together. It will look really shaggy and more like a mess than a dough.

Dump the dough out onto an unfloured work surface, then gather it together into a tight mound. Using your palm and starting on one side of the mound, smear the dough bit by bit, starting at the top of the mound and then sliding your palm down the side and along the work surface (at Flour we call this “going down the mountain”), until most of the butter chunks are smeared into the dough and the dough comes together. Do this once or twice on each part of the dough, moving through the mound until the whole mess has been smeared into a cohesive dough with streaks of butter.

Gather up the dough, wrap tightly in plastic wrap, and press down to flatten into a disk about 1 inch thick. Refrigerate for at least 4 hours before using. The dough will keep in the refrigerator for up to 4 days or in the freezer for up to 1 month.

*I usually make my own blueberry jam by heating up about a cup of frozen blueberries, without adding water, and a 1/2 c. of sugar, over medium heat, in a covered pot. Once the mixture is boiling, I mix a tablespoon of cornstarch with a tablespoon of water and stir it in slowly, and return the mixture to a boil. After it thickens, I remove the pot and add 1 T. of vanilla extract (I love it with the blueberries!) but you can be more circumspect, or even not include it altogether. One teaspoon of lemon juice is also a nice addition. As is vanilla bean paste.

IMG_8506

Happy Valentines Day!!

Breadmaking Tips


So, also to prepare for my little bread class tomorrow, I thought I’d share a few things I’ve learned about bread over the years. I’m sure there’ll be many more thoughts as I continue to work on my bread, but for now, here’s a few things that have helped me along the way.

A few basic pointers:

  • Try making bread! It is so much better than anything store bought. The aroma alone is worth all the work!
  • Get a thermometer!  Baked bread should register at 190 degrees F.
  • Make sure your oven cooks at the temperature you think it’s cooking at.
  • Be persistent. It takes a long time and a lot of practice to get consistent results (I’m not sure I’m there yet), but all the practice is edible! Okay, there was one loaf once . .
  • Make sure you know if your yeast is working or not.
  • Always use salt (about 2 t. per loaf).
  • Bread dough is wetter than you think! As an old relative used to say, if you’re not willing to get your hands messy, you’re not going to have good bread. If your dough is so dry it doesn’t leave residue on your hands, it probably has too much flour, and will be a dry loaf.
  • A dough with powdered milk in it makes really nice sandwich bread.
  • Whole wheat flour is pretty dry. If using, make sure the recipe incorporates soaking it, or using mashed potatoes or dried milk to help it be a softer loaf.
  • Use reliable sites or cookbooks for your reference. My favorites are King Arthur Flour, any bread book by Beth Hensperger, Jim Lahey’s books, and Josey Baker Bread.

Some other, more involved thoughts . . .

  • The best bread incorporates time to do the work. This includes overnight sponges or periods of resting. Time helps relax and build the gluten, giving loaves a wonderful chew and lovely air pockets.
  • Most of the equipment you need for bread, you probably already have: a big bowl, spoon, a clean, lint-free kitchen cloth, a colander, a dutch oven. You don’t need a stand mixer or a bread machine or anything else fancy to make a really great loaf of bread. These items will have you on your way to making Jim Lahey’s or ATK or KAF’s best loaves.
  • Using natural yeast is incredibly simple! Why didn’t I know this ten years ago?! It seemed so overwhelming, but it’s way simpler and more consistent. If you are still using instant yeast for your loaves, consider giving natural yeast (sourdough starter) a try. You can start your own by mixing equal parts water and flour in a glass jar right now. Leave it loosely covered on your counter, and pour out all but 1/2 c. of it every time it looks brown, dingy, with brown water on top. Within a few days, you’ll have a bubbling natural yeast. Then, you’ll be ready to start a feeding schedule and have it raise your bread.
  • Try using a scale. Many recipes today are switching to a scale, and it is very successful.

If using an instant yeast recipe:

  • Test your yeast first (especially if it isn’t fresh) by placing it with the warm water and a pinch of sugar. After five minutes, it should be bubbly.
  • Warm your water to 110-120 degrees to help the dough start rising quickly.
  • For one loaf, you should have about 2-3 c. of flour, 1 1/4 c. water, and 2 t. salt, plus other enhancements (honey, butter, powdered milk). If the salt seems low, you may want to adjust the amount. ALWAYS have enough salt in your dough.
  • Give the bread the proper time to rise, preferably at room temperature. The PROOF feature in the oven can cause the loaf to rise too much (over proof). This is actually the worst thing that can happen to your bread.
  • If making an enriched (with butter and eggs) dough, make sure to refrigerate it (probably overnight) to allow it to be workable (not too soft). This really just means, follow the recipe, and don’t try shortcuts.

What are your best tips I could share with my friends tomorrow night? I’d love to hear them!


One Perfect Loaf, of many!

KAF perfect loaf
I’m teaching a breadmaking class tomorrow night (if you’d like to come, you’re totally invited! It’s just at my house with some friends. Contact me and I’ll give you details!), so I’m wondering why I haven’t put more bread recipes up here on my blog! I’ve been making bread for about fifteen years, and sometimes I still feel like a complete novice, even though I probably make between 6-10 loaves a week. It’s just amazingly complex, and yet a complete surprise every time. Usually a delightful surprise! This is a loaf I was very committed to about a year ago. Now, I’m into a new recipe (which should be posted shortly) but there are so many ways you can go about making bread, I thought I’d share a few of my favorites.

This recipe comes from King Arthur Flour, which is such a great repository of baking knowledge and inspiration. I love the look of this loaf especially. It’s a little bit of a dazzler, and almost always gives you wings (the crust on the top that splits and sprays itself away from the loaf. Beautiful!). Anyway, their instructions are great and easy to follow, so I’ll include them here as well. This is King Arthur Flour’s definition of the perfect loaf of crusty bread. I’ll just add it to one of many that I love. I’ve changed their technique, because I didn’t want to use a bread machine, like they wrote the instructions for.

KAFs Perfect Crusty Loaf

THE SPONGE (BEGIN THE NIGHT BEFORE)

  • 1 cup cool water
  • 1/4 teaspoon instant yeast
  • 1 1/4 cups Unbleached Bread Flour
  • 2 tablespoons 100% Whole Wheat Flour
  • 1 tablespoon yellow cornmeal
  • 1 tablespoon semolina flour

THE DOUGH

  • 1 cup cool water
  • 1 tablespoon kosher salt
  • 1 tablespoon granulated sugar
  • 1/4 teaspoon instant yeast
  • 3 1/2 cups Unbleached Bread Flour
  1. To make the sponge: Place all of the sponge ingredients in a bucket and stir well. Let the sponge rest at room temperature overnight, or for 8 to 12 hours.
  2. The next day, add all of the dough ingredients to the sponge in the bucket.  Mix it well with your hands to form first a soft mass, then eventually a ball that’s soft, but not overly sticky. Adjust with additional flour or water as necessary.
  3. Cover again and let it rest for 30 minutes. If you want to leave the dough all day, place it in a lightly greased bowl, cover the bowl, and refrigerate it.
  4. When you’re ready to work with it, deflate the dough gently and form it into a round ball. Place the ball, seam side-down, on a cornmeal-dusted baking sheet.
  5. Cover the dough lightly. Let it rise a second time until it’s puffy and about 30% to 40% larger, about 1 hour (or longer, if the dough has been refrigerated). Don’t let it rise too much, since it rises some more in the oven and, if it’s over-proofed initially, it’ll collapse as it bakes.
  6. Preheat the oven to 475°F. Make several 1/4″ to 1/2″ slashes or crosshatches in top of the loaf. Using a clean plant mister, spritz the loaf with water. Spray some water into the oven, and place the bread on the lowest rack.
  7. Spritz the oven walls every few minutes for the first 15 minutes of baking. Lower the heat to 425°F (this reduction in heat mimics the “falling oven” used by brick-oven bakers, and will give your bread an incredible crust), and continue to bake until well-browned, about 35 minutes. The interior temperature of the bread should register at least 190°F on a digital thermometer. [I use a cloche or dutch oven instead of spritzing the loaf, and I remove the lid after 25 minutes.]
  8. Remove the bread from the oven, and cool it on a rack before slicing. 

Italian Cherry Cookies

Italian Cherry Cookies
This cookie calls out to be a perfect Valentines Day treat. I found it after going through my friend’s blog, Judy’s Culinaria, this Christmas. I was so motivated to try some of her incredible looking cookie recipes, and I was delighted with every single one! With her permission, I’m posting some of them (in case she accidentally deletes them or some other horrible disaster, and also just to share them with more people!). This cookie was an instant favorite, and honestly, the maraschino cookie recipe I’ve been looking for, and I’ve spent a long time looking! I know these cherries are quite divisive among tastes, but in my opinion, when maraschino cherries are in the mix, it’s always an automatic, “yes. please.” So, for the holidays, for Valentines. And maybe just for Fridays, here’s a fantastic cookie.

Italian Cherry Cookies
1/2 c. unsalted dairy-free margarine or butter
1/2 c. shortening
2 c. granulated sugar
4 large eggs, room temperature
1 T. almond emulsion or extract
1 t. vanilla extract
1/2 c. almond milk or regular milk
1/2 c. maraschino cherry juice
1 c. maraschino cherries, chopped
7 c. flour (can use 1/2 c. more if too sticky)
5 t. baking powder
1/2 t. kosher salt

Cherry Glaze
1 c. powdered sugar, sifted
3 T. maraschino cherry juice
1-1/2 t. almond emulsion or extract

In a mixing bowl combine margarine and shortening. Beat to mix together, then add sugar and beat until light and fluffy, about 3 minutes. Add eggs and extracts. Mix well. Add milk and cherry juice. Mix, then add cherries and beat until mixed, about 1 minute. Sift flour, baking powder, and salt and gradually add to the wet ingredients. Cover with plastic wrap and chill overnight. The next day line four baking sheets with parchment paper and preheat oven to 350 degrees. Sprinkle a bit of flour over the dough and onto hands. Roll dough into balls just a bit larger than a marble. Place on baking sheet and bake 8-9 minutes until cookies are light golden on bottom. Cool on rack. Whisk together glaze ingredients until smooth. Dip cookies into glaze. Let excess glaze drip off. Place on rack to dry. Store in an airtight container with wax paper between cookie layers. Allow cookies to age for several days before eating. Makes 175 cookies. (For me, it was more like 100.)

Judy suggests that these cookies are best when they have aged a few days, but we weren’t able to test that theory at our house. All gone. Very soon.

Honeyed Parsnip Salad

Honeyed Parsnip Salad.jpg

After reading through several recipes for a Christmas Eve salad, I came up with this conglomerate, that I loved! The elements blended so well for a perfect winter salad. We’ve been repeating it every week since Christmas, too.

Honeyed Parsnip Salad

4 parsnips, peeled and diced small
3 semi-tart apples, cored, and chopped into bite-size pieces
4 c. baby arugula
4 c. baby spinach
1 c. roasted hazelnuts, chopped
2-4 T. honey
white balsamic vinegar (about 2 T.)
olive oil (about 1/4 c.)
salt and pepper

Heat the oven to 400 degrees F. Toss the parsnips with oil and salt and pepper and place on an aluminum-foil lined baking sheet. When the oven is preheated, roast the parsnips until browned on the edges (about 15-20 minutes).

Meanwhile, chop the apples, and rinse and dry the arugula and spinach. Place the greens in a serving bowl, then add the apples to the top. Salt and pepper the salad, then dress by splashing with the vinegar and oil.

When the parsnips are fully roasted, remove from the baking sheet to a small bowl and toss with honey. Let cool for a minute, and then scatter the parsnips on top of the apples. Lastly, add the hazelnuts and serve immediately.

Pepper, Sausage & Potato Bread

Sausage Pepper Potato Bread
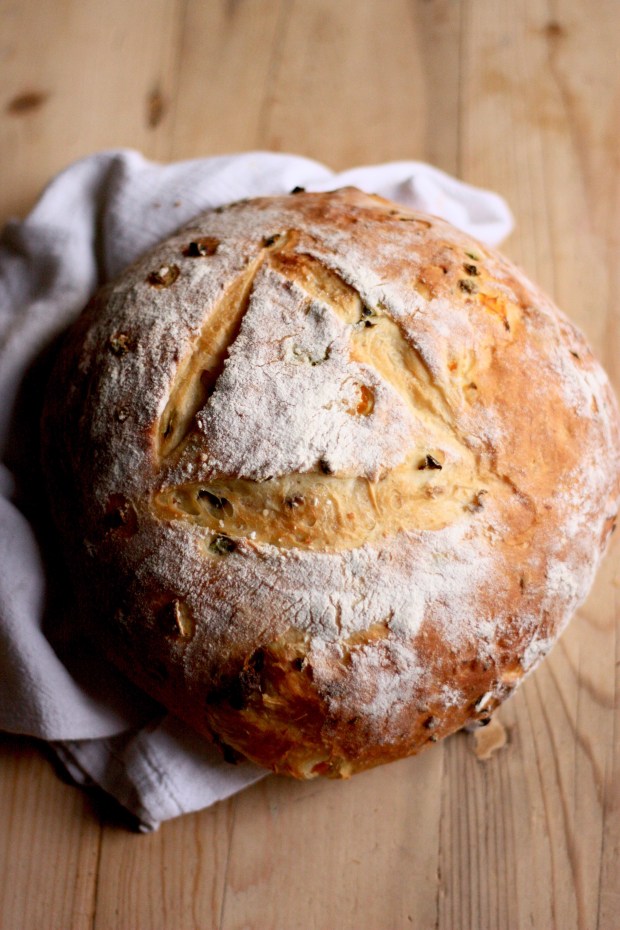
Two weeks ago, after a great loss in our family, I was looking for something to make to both comfort and to give to my family members and myself. It is funny how sometimes embracing the very earthy task of eating can help us cope with the greater insecurities of loss and departure. But, that’s what we needed this night, and honestly, the time I spent chopping and adding vegetables to a big pot for a large batch of soup, and preparing the dough for this bread helped calm my mind, and I think I will remember this loaf for how it brought our family together that night.

It’s a beautiful loaf–a whole sandwich in one piece! as my cousin declared–and it’s one of those breads that you want to break with your hands, perhaps dip in melted cheese or a bit of soup, and just enjoy. I’ve adapted this recipe from Ruth Clemens’ the Pink Whisk Guide to BreadMaking. She uses chorizo and a hot pepper instead.

Pepper, Sausage & Potato Bread

1 medium potato, boiled and cooled
3 c. (375 g) bread flour
1 t. salt
1 1/2 t. instant yeast
1/2 c. (120 g) sour cream
3 1/4 oz. water
1 link, Italian sausage
1 orange or yellow bell pepper, finely diced

  1. Grate the potato and combine in a large bowl with the flour, salt and yeast. Make a well in the center and add the sour cream and water. (You can warm the sour cream a little to quicken the process of raising, if you like). Knead the dough for 10 minutes until it becomes smooth and elastic (this can be done by hand or in a stand mixer, but it will only take 4-5 minutes in a mixer).
  2. Transfer to a lightly oiled bowl, cover, and allow to rise for 1 1/2 hours or until doubled in size.
  3. While the dough rises, heat a skillet over medium to medium-high heat. Remove the casing from the sausage, and cook it in a little bit of olive oil until browned, breaking it into small pieces as you stir.
  4.  Turn the dough out onto a work surface and spread it into a rough rectangle. Scatter the sausage and the diced pepper over the rectangle. Gather the dough together and knead gently for a couple of minutes to incorporate the additions. Place it back in the bowl and let it rest for a few minutes to make shaping easier.
  5. Line a colander or a bread bowl with a cotton dish towel that has been dusted liberally with flour.
  6. Take the dough out of the bowl and pat it out once again. Fold each outside edge in to the center, repeating all the way around. Repeat again, folding the outside to the middle until the dough is tightened up into a rough ball. Pop the ball of dough into the lined colander with the seam upwards.
  7. Fold the overhanding edges of the dish towel over the exposed dough and place in a warm position to rise until almost doubled in size, approximately 45 minutes. Preheat the oven to 425 degrees.
  8. Line a baking sheet with baking parchment or grease it well. Unfold the dish towel and place the tray over the top of the colander. Invert the tray and colander together then remove the colander and dish towel. Dust the loaf with a little more flour and slash the top in a square pattern using a very sharp knife.
  9. Bake in the preheated oven for 35 minutes. When it’s baked through, remove from the oven and transfer to a wire rack to cool completely. The crust will be firm as soon as it comes out of the oven, but will soften on cooling.

Sasuage Bread2

Spiced Lemon Almond Cake

Spiced Lemon Almond Cake
I frequently find myself wanting to bake something, or even needing to bake something for a party or such, and then of course, not having the right ingredients around. (I actually prepare myself constantly against this horrible scenario–perusing specialty baking stores for rose water, non-pareils, anise oil, or any other thing I just may need at any given time.) At these times, baking falls back to fanning the pages of my favorite baking books just to see what I could possibly make that would still be a little interesting, new, and fun. This recipe, the original title of which is “Mrs. Chubb’s Nut Cake” did not stick out because of it’s title. In fact, the title is not a great description of what it is, and had I not been looking carefully at ingredient lists, I probably would have skipped on by it. But, it had the good fortune of my pantry being completely ready for it, so I went ahead and baked it for a friend gathering. So glad. It’s a beautiful winter cake, nuanced by the nutmeg and the cloves, with the hint of lemon and the unique texture of the almond flour. I loved that when one of my friends asked what I had been up to this year, and I replied, “not much,” his response was, “whatever! You made that cake!” The small triumphs 🙂  This recipe comes from the Brass Sister’s Heirloom Baking with the Brass Sisters, a truly sensational baking book. I served this with a homemade raspberry jam.

Spiced Lemon Almond Cake

1 c. almond flour (the original recipe has you pulse your own almonds with a little of the sugar to make your own flour, but it’s easy to buy almond meal these days, so I did)
1 c. sugar
2 c. flour
1 t. baking powder
1 t. salt
1/4 t. nutmeg
1/8 t. cloves
1 c. butter
4 eggs, separated
3 t. grated lemon zest
4 T. lemon juice
1/2 t. lemon extract
3/4 c. milk

For the topping
3 T. untoasted slivered almonds
3 T. clear sanding sugar

Set the oven in the middle position. Preheat the oven to 350 degrees. Cut a parchment paper or wax paper liner to fit the bottom of a 10-inch round tube pan. Coat the pan with vegetable spray. Insert the liner, spray again, and dust with flour.

To make the cake, sift the flour, baking powder, salt, nutmeg, and cloves.

Cream the butter and sugar in the bowl of a standing mixer fitted with the paddle attachment. Add egg yolks, 2 at a time. Add lemon zest, lemon juice, lemon extract, and vanilla, and mix to combine. Add sifted dry ingredients alternately with milk, mixing after each addition until completely blended. Fold in almond flour.

Place egg whites in another bowl of standing mixer fitted with the whisk attachment. Beat until egg whites hold a firm peak. Fold egg whites into batter.

To add the topping: Place batter in tube pan. Sprinkle almonds and sanding sugar on top of batter. Bake 50-55 minutes, or until tester inserted into cake comes out dry. Cool on rack completely before turning out of pan. Store loosely wrapped in wax paper at room temperature. I recommend that you serve this cake with berry preserves!

Chocolate Thumbprint with Salty Caramel

Chocolate Thumbprint with Caramel
Here’s one of a few new favorites from Christmas this year. Actually, I should correct that to say that this was the absolute favorite of my daughter Lucy and two or three others who sampled the whole array. I loved that it kept it’s shape perfectly, and showcased both the pretty sparkling sugar and the caramel. This little cookie is perfect for entertaining or traveling, since it’s stiff enough to hold its shape. It’s also unique and pretty and very tempting! This recipe comes from the December edition of Sunset magazine. Note: this isn’t the easiest caramel recipe to work with, so if you’ve never made caramel before, you might want to use pre-made caramels instead.

Chocolate Thumbprint with Salty Caramel

COOKIES
1 c. flour
Generous 1/2 c. unsweetened cocoa powder
1/4 t. salt
1/2 c. unsalted butter, at room temperature
2/3 c. granulated sugar
1 large egg yolk
1 T. heavy whipping cream
1 t. vanilla extract
1/2 c. sparkling sugar or powdered sugar for rolling, or just leave plain
CARAMEL*
1 c. granulated sugar
6 T. unsalted butter, cut into tbsp.-size chunks
1/2 c. heavy cream
1/4 t. fine sea salt, plus about 1/2 tsp. for sprinkling
1. Make cookies: Preheat oven to 350°. Sift flour, cocoa powder, and salt into a bowl. In another bowl with a mixer on medium speed, beat butter and granulated sugar until pale and fluffy. Reduce speed to low and add egg yolk, cream, and vanilla. Gradually beat in flour mixture.

2. Scoop dough into rounded 1-tsp. portions and roll into balls, then roll balls in sparkling or powdered sugar to coat. Place 2 in. apart on parchment paper-lined baking sheets. With end of a thick-handled wooden spoon, gently press an indentation into center of each cookie. Bake until cookies are just set, about 10 minutes. (The depressions tend to fill in a bit as they bake, so as soon as they’re out of the oven, give them another press with the spoon if necessary.) Slide parchment with cookies onto cooling racks and let cool. If you’ve used powdered sugar, sift a little more onto the cookies.

3. Make caramel: Put granulated sugar in a large nonstick frying pan; spread evenly. Heat over medium-high heat, stirring constantly with a wooden spoon. Sugar will form clumps but eventually will melt and turn into a dark, amber-colored liquid, about 6 minutes. As soon as it’s liquefied, reduce heat to medium-low. Add butter and stir until incorporated. Stirring constantly, drizzle in cream. Boil 1 minute, stirring, then remove from heat and stir in 1/4 tsp. sea salt. Scrape into a bowl and let cool completely.

4. Assemble cookies: Spoon about 1/4 tsp. caramel into each cookie, then sprinkle with a few grains of sea salt.

*You’ll have more caramel than you need, but that’s never a bad thing–it’s great on ice cream. Don’t be tempted to cook a half-batch of caramel, as it won’t cook right and will seize up.

Make ahead: Caramel, up to 5 days, chilled (let soften at room temperature before spooning into cookies). Baked cookies, up to 1 week, chilled airtight.