When I made holiday treats this year, I made a huge batch of candied orange peel, hoping to make panettone and other traditional breads. Well, all those breads never happened, leaving me with a good-sized amount of candied orange peel, which we enjoy on its own, a bit, but when I threw it on this bark I was making, we loved it. This simple candy has been repeated I think three times in the last couple weeks, and I can’t get enough. It takes about 20 minutes to put together, and then it’s pretty and delicious and has interesting flavors. I made it for book group and for a little gathering of friends, and it’s disappeared first of everything, both times. Definitely delicious.
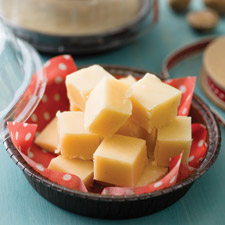
Candied Orange & Hazelnut Bark
8 oz. dark chocolate, my favorite are the semi-sweet bars of chocolate at Trader Joe’s, bought in one pound sizes
1/3 c. candied orange peel (I’ll post my favorite recipe, if you’ve never tried it)
1/3 c. hazelnuts
2 pinches of fleur de sel or sea salt
Preheat the oven to 350. Lay the hazelnuts on a baking sheet lined with aluminum foil. Line another baking sheet with parchment paper and set aside for the chocolate. Once the oven is preheated, toast the nuts until fragrant and lightly browned, about 8-10 minutes. Let cool and then chop coarsely. Set aside.
Meanwhile, finely shave the chocolate with a knife. In a small glass or plastic bowl, melt half of the chocolate in the microwave at 30 seconds. Remove and stir as long as you can. If the chocolate doesn’t continue to melt as you stir, microwave it again for 20 seconds. Then, remove and stir until smooth.
Add a handful of the reserved chocolate shavings and stir until incorporated. Repeat until you have used all the shaved chocolate. It should take you about 5-10 minutes to add and stir. (This is one method of tempering chocolate. There’s a couple of ways to do this, so if you don’t like this one, just google another way!) By the time all of the chocolate is incorporated, your chocolate should be about 90-91 degrees, which is tempered. If you want to skip this all and quickly melt all your chocolate, the chocolate will taste fine, but could have white streaks or bubbles on the surface.
Pour the tempered chocolate onto the parchment-lined sheet and spread with a spatula to a thickness of about 1/4″ inch deep. Working quickly, sprinkle first the nuts, then the candied orange peel, and then the salt over the surface of the chocolate. Either set aside at room temperature or in the fridge to harden. When ready to serve, break the bark into wrist-sized portions. Can keep for 2 weeks in a airtight container, but mine has never lasted longer than one evening!