Dark Chocolate Zucchini Cupcakes (or Muffins)

For anyone else who might be searching for new ways of using zucchini, I really, really like this recipe, and my kids have no idea that zucchini is in it–a definite plus. This recipe was originally published in Everyday Food as “Ian’s Sweet Zucchini Cupcakes” (May 2007), but I’ve changed it a bit (added the chocolate and the milk), because of a memory I had of a chocolate zucchini bread that I loved. If you want to go without the chocolate, just omit the milk as well, and you’ll have the original. Note: I used dutched cocoa, but if you only have baking cocoa like Hershey’s, I would love to hear if the recipe would still work as well–I imagine it would. Also, you can leave these cupcakes unfrosted to be more like a muffin, or you can insert the cream cheese frosting into the middle of the cupcake for a really fun surprise, or spread on top, and sprinkle with cinnamon. Also, as far as I can tell, muffins usually have one less egg than cupcakes, and sometimes a little less sugar. I think these could count as muffins as they are, but if you want them to be denser, omit one egg.

Dark Chocolate Zucchini Cupcakes (or Muffins)

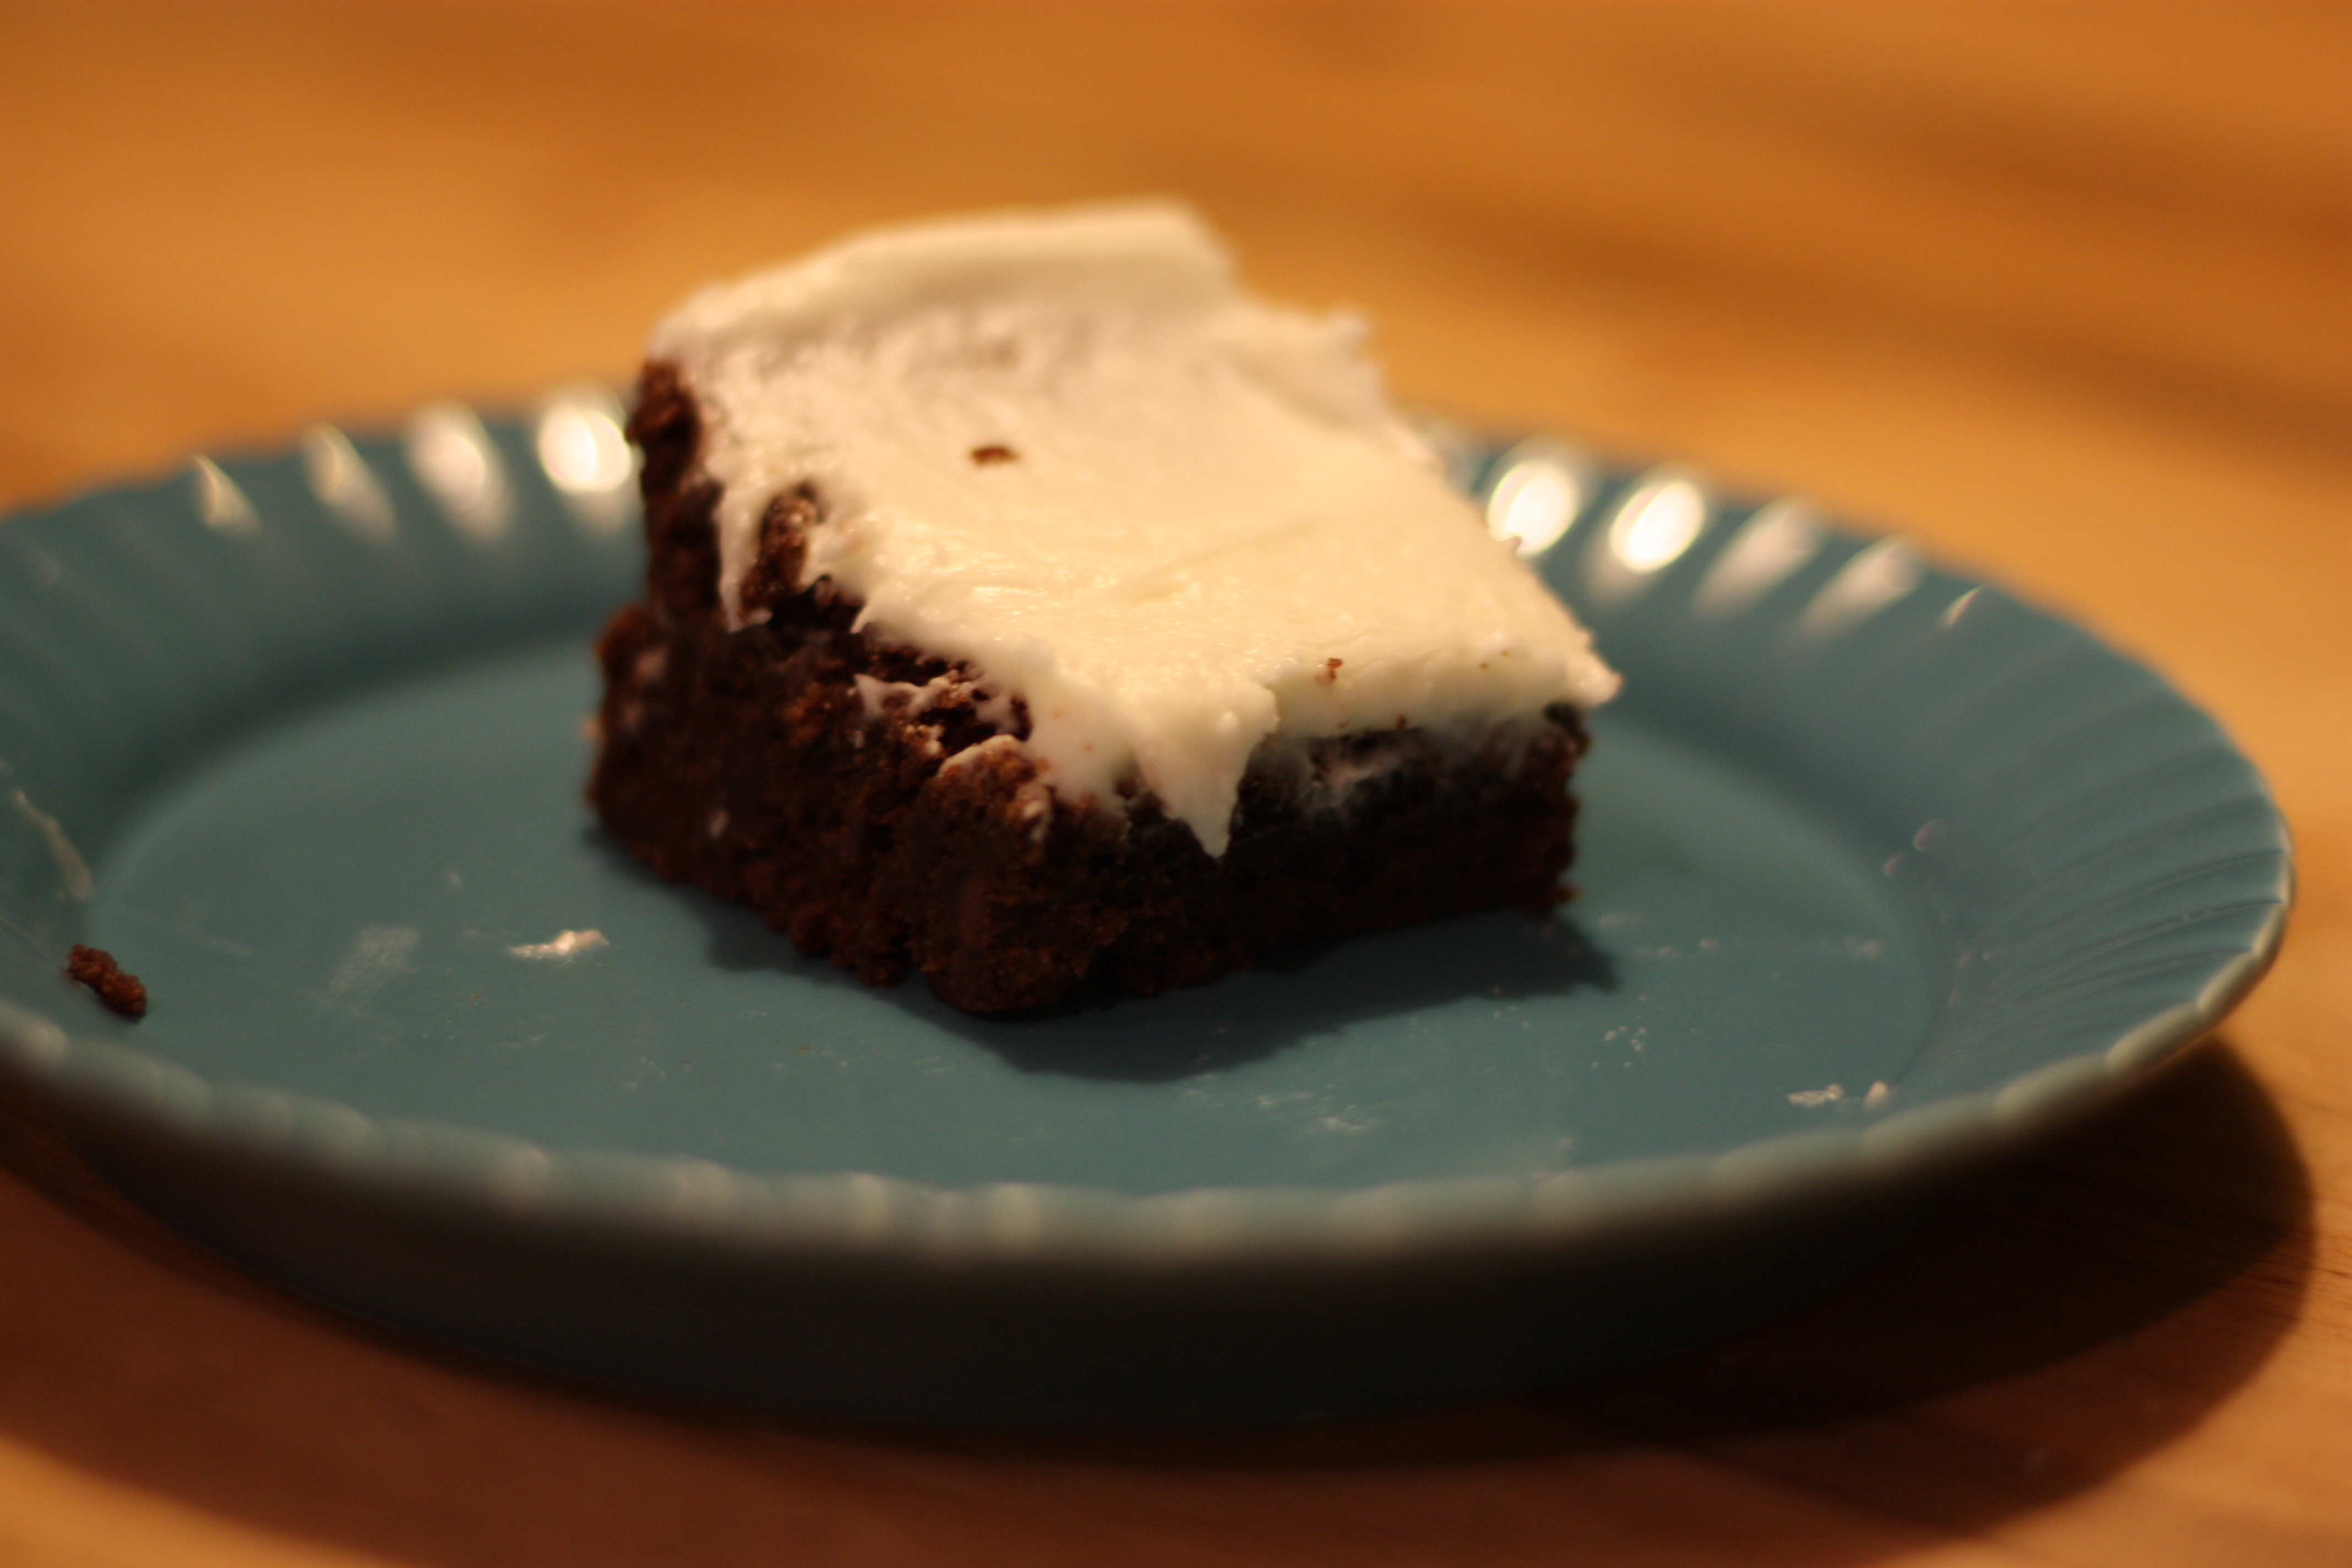
I thought these to be pretty little things, even without frosting

1 1/2 c. flour
1 c. packed dark brown sugar
1/3 c. dutched cocoa
2 t. baking powder
1/2 t. ground cinnamon
1/2 t. salt
1/2 c. coarsely chopped pecans
1 zucchini (10 oz.), grated (1 1/2 c.)
1/3 c. vegetable oil
2 large eggs, lightly beaten
2 1/2 T. milk
1/2 t. pure vanilla
Cream Cheese Frosting (optional)

1. Preheat oven to 375. Line cups of a standard muffin tin with a paper or foil liners. Set aside.

2. In a medium bowl, mix together flour, brown sugar, baking powder, cinnamon, cocoa, and salt. Mix in nuts.

3. In another bowl, combine zucchini, oil, eggs, milk, and vanilla,; add to flour mixture, and mix just until combined.

4. Divide batter evenly among cups. Bake until a toothpick inserted in the center of a cupcake comes out clean, 30-35 minutes.

5. Cool in tin on a wire rack for 10 minute; turn cupcakes out, right side up, and cool completely. Meanwhile, make Cream Cheese Frosting (if using–see below). Using an offset spatula or butter knife, spread frosting on cupcakes. The frosted cupcakes are best eaten within 1 day.

Cream Cheese Frosting
In a medium, with an electric mixer, beat 4 T. room-temperature butter with 4 oz. cream cheese until smooth. Add 2 c. powdered sugar and 1/2 t. vanilla. Beat until light and fluffy.

Fudgy Texas Sheet Cake

texas-sheet-cake-1
This recipe is from the 2009 Annual of America’s Test Kitchen. I’ve always thought of Texas Sheet Cake as dry and not that interesting. This cake is the complete opposite–it’s really moist, fudgy, and my mother even thought it was a flourless chocolate cake. To top that off, it’s even better the next day (perfect for entertaining purposes), and quite amazing out of the freezer as well (if you need to hide the leftovers). Note: it’s critical to ice the cake hot out of the oven–so make sure to plan time accordingly!

Fudgy Texas Sheet Cake

Cake
2 c. all-purpose flour
2 c. white sugar
1/2 t. baking soda
1/2 t. salt
2 eggs, at room temperature
2 egg yolks, at room temperature
2 t. vanilla
1/4 c. sour cream
8 oz. semi-sweet chocolate, chopped
4 T. unsalted butter
3/4 c. vegetable oil
3/4 c. water
1/2 c. dutch-process cocoa powder

Icing
8 T. butter (one stick)
1/2 c. heavy cream
1/2 c. dutch-process cocoa powder
1 T. corn syrup
3 c. powdered sugar
1 T. vanilla
1 c. toasted pecans, chopped

1. For the cake: Adjust an oven rack to middle position and heat the oven to 350 degrees. Grease an 18″ x 13″ baking sheet. Combine flour, sugar, soda, and salt in a large bowl. Whisk the whole eggs, yolks, vanilla and sour cream in another bowl until smooth.

2. Heat the chocolate, butter, oil, cocoa, and water in a large saucepan over medium heat, stirring occasionally until smooth, 3-5 minutes. Whisk the chocolate mixture into the flour mixture until incorporated. Whisk the egg mixture into the batter, then pour into the baking sheet. Bake until a toothpick inserted into the center of the cake comes out clean, 18-20 minutes. Transfer to a wire rack.

3. For the icing: About 5 minutes before the cake is done, heat the butter, cream, cocoa, and corn syrup in a large saucepan over medium heat, stirring occasionally, until smooth. Off the heat, whisk in the powdered sugar and vanilla. Spread the warm icing evenly over the hot cake and sprinkle with the pecans. Let the cake cool to room temperature on the wire rack, about one hour, then refrigerate until the icing is set, about one hour longer. Cut into 3″ squares. Serve. Cake can be wrapped in plastic and refrigerated for 2 days. Return to room temperature before serving [Test Kitchen’s advice, not mine].

Cheesecake Pie

I’m not exactly sure how to describe this dessert.  It’s kind of a like a faux cheesecake.  It was tasty.

Jason and his dad went hiking in New Hampshire this past week.  The chocolate chip cookies Jason’s dad was carrying in his backpack got smashed to bits, so I decided to make a crust out of the crumbs.  My original idea was to make a pudding pie, but then I realized we had some cream cheese in the fridge and I did some Googling and came up with this dessert.

Cheesecake Pie

Crust
1 1/4 c. cookie crumbs
1/4 c. butter
1/8 c. sugar

Mix crust ingredients together and spread into a pie plate.  Bake at 350 degrees for 10 minutes.

Filling
1 (8 oz.) pkg. cream cheese, softened
1/2 c. sugar
1 tbsp. lemon juice
1 tsp. vanilla
Dash of salt
2 eggs

In medium bowl, beat cream cheese until light and fluffy. Gradually blend in sugar, lemon juice, vanilla, and salt. Add eggs one at a time, beating well after each addition. Pour filling evenly over crust.  Bake on baking sheet in preheated 325 degree oven for 25-30 minutes or until knife inserted one inch from edge comes out clean.

Topping
1 c. sour cream
2 tbsp. sugar
1/2 tsp. vanilla

Combine topping ingredients. Spread evenly over top of cheesecake. Bake 10 minutes longer.

Chill for 3 hours before serving.

Free-form Summer Fruit Tart

free-form-tart
This is a recipe from America’s Test Kitchen’s 2007 annal. It’s quite easy to make, and since any combination of stone-fruit/berries can be used, it’s very, very useful. And delicious. And Sharalee, I hope you’re impressed I got it up this quickly!

Free-form Summer Fruit Tart

Dough
1 c. unbleached all-purpose flour
1/4 c. fine-ground cornmeal
2 t. sugar
1/2 t. salt
7 T. unsalted butter, cut into 1/2 in. pieces and chilled
2 T. sour cream
2 T. water

Filling
3 c. mixed berries, or pitted stone fruit, cut into 1/4″ slices (I would blanch and peel the stone fruit as well. I’ve tried this recipe with a mix of nectarines and blackberries, peaches and blackberries, and just blackberries. My favorite’s been the nectarines and blackberries, but many more combos still need testing . . . )
2-3 T. sugar
2 T. unsalted butter, cut into 1/4″ pieces
1 T. water

1. For the dough: Process the flour, cornmeal, sugar, and salt in a food processor until combined. Add half of the butter and pulse until the butter is the size of small peas, about four 1-second puleses. Add the remaining butter and pulse until the butter is the size of small peas, about 4 pulses. (You can also do this by hand: whisk the dry ingredients together, then cut in the butter with a pastry scraper or two knives–or your fingers, if you need to!)

2. Mix the sour cream and water in a small bowl until combined. Add half of the sour cream mxiture to the flour mixture; pulse for three 1-second pusles. Repeat with the remaining sour cream mixtures until the dough just comes together, about five 1-second pulses. Turn the dough out onto the counter and flatten into a 6″ disk. Wrap the disk in plastic wrap and refrigerate for at least 1 hour before rolling.

3. When ready to roll and bake the tart, adjust an oven rack to the middle position and heat the oven to 400 degrees. Remove the disk of dough from the refrigerator and roll it out between 2 large sheet sof parchment paper or plastic wrap to a 13″ circle (if the dough becomes soft and/or sticky, return it to the refrigerator until firm.) Slide the dough, still between the sheets of parchment paper, onto a baking sheet and refrigerate until firm, about 20 minutes.

4. For the filling: Discard the top sheet of parchment paper. Pile the fruit in the center of the dough, leaving a 2-3″ border. Sprinkle 1-2 T. of the sugar over the fruit and dot with the butter.

5. Fold the edges of the dough over the fruit. Brush the top of the tart with the water and sprinkle with the remaining 1 T. sugar. Bake until the crust is golden brown and crisp and the fruit is bubbling, about 40 minutes. Transfer the baking sheet with the tart to a wire rack and cool for 10 minutes. Slide the tart off the baking sheet and cool on the rack until warm or room temperature before serving. Exceptionally good with a dollop of whipped cream.

Apricot Cake

If you are lucky enough to have access to fresh apricots this is definitely a recipe you’ll want to try.  It’s incredibly moist and stands well on its own without frosting, though I did double the recipe to make two 9″ rounds and put about 3/4 cup butter cream frosting between them.  

Apricot Cake

2 1/2 cups apricot halves *

1 1/2 cups flour

2 teaspoons baking powder

1/4 teaspoons salt

3 tablespoons butter, softened

3/4 cup + 2 tablespoons sugar

2 eggs

1/2 tsp vanilla

1/2 cup low-fat milk

powdered sugar

Preheat oven to 350. 

Take 8 apricot halves and puree in blender/food processor until smooth to make 1/3 cup puree. I added a small amount of water (1-2 tsp) to help make it nice and smooth.  Finely chop the remaining apricots to make 1/2 cup and set aside.

Mix together the flour, baking powder, and salt. Set aside.

Cream the butter with the sugar. Add the 1/3 cup apricot puree and mix until smooth. Add the eggs, one at a time. Stir in the vanilla. Alternately, stir in the flour mixture and the milk, stirring until the batter is smooth.  Fold in the chopped apricots.

Pour the batter into a 9″ round that has been coated with cooking spray.  Bake at 350 for 30-35 minutes.  Test for doneness by inserting a toothpick into the cake.  When done, the toothpick comes out clean.  Cool on wire racks.  When completely cool, dust with powdered sugar and garnish with thinly sliced apricots. Delicious!

* The original recipe called for a 15 oz can of apricot halves (drained).  I’m estimating that I used about 2 1/2 cups of fresh apricots, though you made need a little more or less depending on the size of your apricots.

Spiced Graham Pie Crust (to go with Fruit Ice Creams)

Back to blogging! Hooray! We’ve been in our new house five weeks now, and we’re finally settled enough that I can sit at the computer and chronicle a new good thing: the ice cream pie. My friend Kerstin made an inspirational one last week, and then Cooking Light suggested a great dessert would be lemon sorbet with a ginger snap crust. Well, with Brickley’s (in Wakefield, RI) in mind, Rex made a terrific lemon ice cream by adding the zest of two lemons to the Best’s vanilla ice cream, and it worked out well. I couldn’t find a recipe for a ginger snap crusts, so I improvised a little, and thought it worked (for once!).

Spiced Graham Pie Crust

1 bag graham crackers, crushed
1/4 c. almonds, toasted
2 T. sugar
2 T. butter, melted
1 t. cinnamon
1/2 t. ginger
dash of allspice

Preheat oven to 325 degrees. Combine graham crackers, almonds and sugar in a food processor  and pulse until almonds and grahams are pea-sized or smaller (or put them in a baggie and crush with a rolling pin). Add melted butter and spices (which you can adjust to your taste), and continue to pulse until the mixture looks like wet sand. Press the graham mixture into an 8″ or 9″ pie dish, and press down with the bottom of a measuring cup to make uniform. Bake 12-15 minutes, or until fragrant. Let cool on a wire rack. Fill with soft ice cream, then freeze 1-2 hours, until firm.

Homemade Reese’s Easter Eggs and Chocolates

I got this idea last year (after gasping at the price of both the grocery store’s and the candy shoppe’s peanut

Some of the eggs the kids and I decorated--I didn't use a mold for these

butter filled Easter eggs) to try and dip my own. I bought chocolate molds (cost about $2), poured a thin coat of tempered chocolate into them, filled them with the homemade Reese’s filling that I adore, and was quite pleased with the result. Placing them in the little cellophane bags from Michael’s (well, I really got mine at Dyan’s Sweet Tooth, but Michael’s and JoAnn’s would have them too), they looked suitable for the Easter baskets.

This year, I had too much peanut butter filling for just the molded chocolates that I made, so I decided to shape the remaining filling into egg shapes, and then dip them. Because I had some extra colored melting chocolate from another project, I melted it, and the kids and I decorated the eggs. I have to say, it was as enjoyable (if not just a little more) than decorating real hard-boiled eggs.

In addition to filling the molded chocolates with peanut butter, I also made a batch of homemade

Marshmallow-filled duck being propped up by a bunny--I used a mold for this

marshmallows. This was messier, but the result was worth it. Again, I put a coat of tempered chocolate (melt milk chocolate to 88 degrees, and then spoon it in the mold), and let it cool. Then, I made the marshmallows (Martha’s recipe is below), and after putting shortening on my fingers, I pulled the marshmallow out, and shaped it into the mold. I let the mold sit for 4 hours, then covered the back with more tempered chocolate. If you want to try it out, but don’t have molds, you could also cut the marshmallows into squares and dip them, or cut them into egg shapes with a cookie cutter. I also found that you can grease a chocolate mold, dust it with powdered sugar, and then fill it with marshmallow and make molded marshmallows (which I then dipped–the more chocolate the merrier). I would love to hear if anyone tries this, and what you ended up doing!

Martha’s Marshmallows

Makes 24

  • Vegetable oil, for brushing
  • 4 envelopes unflavored gelatin (3 tablespoons plus 1 1/2 teaspoons)
  • 3 cups granulated sugar
  • 1 1/4 cups light corn syrup
  • 1/4 teaspoon salt
  • 2 teaspoons pure vanilla extract
  • 1 1/2 cups confectioners’ sugar
  1. Brush a 9-by-13-inch glass baking dish with oil. Line with parchment, allowing a 2-inch overhang on the long sides. Brush parchment with oil; set aside.
  2. Put granulated sugar, corn syrup, salt, and 3/4 cup water into a medium saucepan. Bring to a boil over high heat, stirring to dissolve sugar. [My note: Place the sugar in the saucepan last, right in the middle. Stir gently so the sugar doesn’t hit the sides of the plan, and once the sugar is dissolved, brush around the sides of the pan with a pastry brush dipped in water to make sure all the water crystals have been wiped down and dissolved.] Cook, without stirring, until mixture registers 238 degrees.on a candy thermometer, about 9 minutes.
  3. Meanwhile, put 3/4 cup cold water into the bowl of an electric mixer; sprinkle with gelatin. Let soften 5 minutes.
  4. Attach bowl with gelatin to mixer fitted with the whisk attachment. With mixer on low speed, beat hot syrup into gelatin mixture. Gradually raise speed to high; beat until mixture is very stiff, about 12 minutes. Beat in vanilla. Pour into prepared dish, and smooth with an offset spatula. Set aside, uncovered, until firm, about 3 hours.
  5. Sift 1 cup confectioners’ sugar onto a work surface. Unmold marshmallow onto confectioners’ sugar; remove parchment. Lightly brush a sharp knife with oil, then cut marshmallow into 2-inch squares. Sift remaining 1/2 cup confectioners’ sugar into a small bowl, and roll each marshmallow in the sugar to coat. Marshmallows can be stored in an airtight container up to 3 days.

Confession: I actually haven’t used this recipe of Martha’s before–the one I’ve used calls for 2 T. of vanilla, and yield is a little lower. I didn’t like how strong the vanilla was, so this last batch, I lowered it to 2 t., which I liked a lot more. If you look on Martha’s website, there are lots of variations–including one that uses a vanilla bean. They are all essentially similar, though, but you may find you prefer more/less sugar, vanilla, etc.

Two Mint Brownie Recipes

Mint BrownieI guess I figure mint brownies are a natural St. Patty’s dessert not because of any Irish affliliation, but because of the green frosting. These are my two favorite. I post the BYU mint brownie recipe because I fell in love with mint brownies there. Although this is supposedly the real deal (from an alumni magazine), I don’t know that it tastes the same as the sheets that come out of BYU catering–but a good enough substitute.

The second recipe is from a family cookbook and I think it’s fantastic. Definitely more butter! The more the merrier . . . Of course, you can simply make  a box of brownies and frost them with these frostings, and have this dessert a little faster (FHE treats this week for us). The picture above is of the BYU mint brownie, minus the chocolate frosting on top, and the green food coloring in the mint frosting.j

BYU Mint Brownies

1 c. butter
1/2 c. cocoa
2 T. honey
4 eggs
2 c. sugar
1 3/4 c. flour
1/2 T. baking powder
1/2 t. salt
1 c. chopped walnuts

Mint Icing
5 T. butter
dash of salt
3 T. milk
1 T. light corn syrup
2 1/3 c. powdered sugar
1 t. mint extract
1-2 drops mint food coloring

Melt butter and stir in cocoa. Allow to cool. Add all ingredients except nuts, and mix well, then gently fold in the nuts. [These instructions are the ones from the BYU recipe. I mixed the dry ingredients in one bowl, then combined eggs, sugar, cooled cocoa mixture and honey in another, then combined.] Pour into a greased 9 x 13 pan. Bake at 350 for 25 minutes and cool. [Note: at 25 minutes yesterday, these didn’t seem done, so I let them go an extra 7 minutes, and the end result was pretty dry. I think they must need to be pulled out at 25 minutes to be the right consistency, even though they’ll seem underdone.]

For the icing, soften butter. Add salt, corn syrup, and powdered sugar. Beat until smooth and fluffy. Add extract and coloring. Mix. Add milk gradually until the consistency is a little thinner than cake frosting. Spread mint icing over brownies. Place brownies in the freezer for a short time to stiffen the icing. Remove from the freezer and carefully add a layer of chocolate icing (if desired).

Diane’s Chocolate Mint Dessert (aka Brownies)

1 c. flour
1 c. sugar
1/2 c. butter, softened
4 eggs
1 t. salt
1 1/2 c. Hershey chocolate syrup

Heat oven to 350. Greae 9 x 13 pan. In a bowl, combine flour, sugar, butter, eggs and syrup. Beat till smooth. Pour into pan and bake 25-30 minutes. Cool.

Mint Cream
2 c. powdered sugar
1/2 c. softened butter
1 T. water
1/2-3/4 t. mint extract
3 drops green food coloring

Combine all mint cream ingredients and beat until smooth. Spread on cooled brownies and refrigerate until  cold (1-2 hours).

Chocolate topping
6 T. butter
1 c. chocolate chips

Melt butter and chocolate chips over low heat or in the microwave at 30 second intervals. Pour over chilled dessert and cover and chill 1 hour.

Peanut Butter & Kisses Cookies

I don’t know what these cookies are called, so I kind-of made up this name. In my America’s Test Kitchen book, they call them Peanut

Don't these take you back?

Blossom cookies, but I had never heard that before, and in fact, skimmed over the recipe several times before I looked at it. When I did look at it, I actually preferred an older recipe I had for these cookies, which came from my second cousin. This recipe below is super reliable, and tastes just how I want these cookies to taste. The Test Kitchen recipe is similar, but blends a cup of peanuts with the flour before adding it to the cookies–I don’t need that many peanuts for my taste. The suggestion of the Test Kitchen that I did like, though, is to put the Hershey Kiss on the cookie  1-2 minutes before they have finished baking. When the cookies cool, the interior of the kisses stay soft, which is a nice touch, and they have a nice sheen. This recipe yields about 24-28 cookies.

Peanut Butter & Kisses Cookies

1 3/4 c. flour
1 t. soda
1/2 t. salt
1/2 c. butter, softened, but not too soft (1 stick)
1/2 c. peanut butter
1/2 c. sugar
1/2 c. brown sugar
1 egg
1 t. vanilla
1 package Hershey Kisses, unwrapped

Preheat oven to 375. Get out a cookie sheet, but there’s no need to grease it. In a small bowl, whisk flour, soda and salt. In another bowl, cream butter, then add peanut butter and beat until combined (1 minute). Add sugars and cream for 2-3 minutes. Then add egg and vanilla and mix another 30 seconds, until combined. Add the dry ingredients and mix until the flour has been absorbed, making sure to scrape the bottom of the bowl.

Roll the dough into balls the shape of walnuts, and then roll the balls in granulated sugar and place on cookie sheet (they will spread to be about 1 1/2″ as they bake). Bake for 10-12 minutes, until lightly browned. After removing them from the oven, place a kiss in the middle of the cookie. Wait one minute, then twist the kiss into the middle to secure. (Or see note above for the Test Kitchen’s alternative.)

Oatmeal Chocolate-chip Cookies

When I was growing up, “Mrs. Fields Cookies” had just gotten its start, and recipes purporting to be hers abounded. My mom got this

A little thin, but great flavor!

one from her mom and would make them using a quarter cup of batter per cookie, which does make cookies roughly the size of Mrs. Fields’. I remember one of my friends thinking that the resultant huge cookies were the best things ever. I took over production of said cookies when I was maybe eleven, and before long I had this recipe memorized. The recipe, as I wrote it down probably in high school (to judge from my handwriting) reads as follows:

4 eggs

1 lb butter

2 c. sugar

2 c. brown sugar

_______________

1 t. salt

2 t. baking soda

2 t. baking powder

2 t. vanilla

4 c. flour

5 c. oats

1 pkg chocolate chips

400 degrees for 5-6 min.

I know the line indicates “cream above ingredients” but don’t recall any other technique specifics. Basically, everything goes in the KitchenAid, then it gets scooped out in cookie-sized dollops & baked. (I did have to bake them for 8-9 minutes but that’s typical of my oven.) I am sure that “flour” means white flour & believe that “oats” means old-fashioned (not quick) ones. I made a full batch yesterday–for the first time in at least a decade (I usually halve it), and substituted in one cup of wheat flour. I also added the flour a cup at a time and mixed in between, which cut down on the spillage issue. A full recipe strains the capacity of my old-school KitchenAid. It also makes over 5 dozen big cookies. I figured I’d freeze a bunch, but 24 hours & 6 guests later, I only have about a dozen left.

This recipe works so well at high altitudes & with an electric oven, which is my way of saying that yesterday’s cookies were, in my opinion, a bit flat & that this has been an issue for many of my recipes here in Chicago. They also crumbled easily, though that could be the result of not letting them cool completely. Should I be adding more flour?